
|
Knightly Combat Fall of France 1 #27 |
||
|---|---|---|
| (Attacker) Germany | vs | France (Attacker) |
| Formations Involved | ||
|---|---|---|
| France |  |
27e Régiment de Tirailleurs Algériens |
| France |  |
4e Groupe de Reconnaissance de Division d'Infanterie |
| France |  |
4e Régiment de Cuirassiers |
| France |  |
6e Régiment de Cuirassiers |
| Germany |  |
15th Panzer Regiment |

| Total | |
|---|---|
| Side 1 | 5 |
| Draw | 1 |
| Side 2 | 13 |


| Overall Rating, 20 votes |
|---|
|
3.4
|
| Scenario Rank: 474 of 913 |
| Parent Game | Fall of France 1 |
|---|---|
| Historicity | Historical |
| Date | 1940-05-18 |
| Start Time | 09:30 |
| Turn Count | 12 |
| Visibility | Day |
| Counters | 43 |
| Net Morale | 0 |
| Net Initiative | 1 |
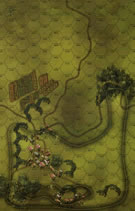
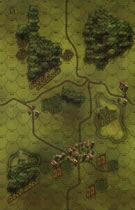
| Maps | 2: 27, 31 |
| Layout Dimensions | 86 x 28 cm 34 x 11 in |
| Play Bounty | 87 |
| AAR Bounty | 129 |
| Total Plays | 19 |
| Total AARs | 8 |
| Battle Types |
|---|
| Inflict Enemy Casualties |
| Urban Assault |
| Conditions |
|---|
| Off-board Artillery |
| Terrain Mods |
| Scenario Requirements & Playability | |
|---|---|
| Fall of France 1 | Base Game |
| Introduction |
|---|
|
Capitaine de Segonzac (commanding the first squadron of 4th Cuirassiers) and Hauptmann Graf Schimmelmann (commanding a company of 15th Panzer Regiment) were the sons of old aristocratic families. They fought a duel on the edge of the Mormal Forest on the road to Le Quesnoy. |
| Conclusion |
|---|
|
De Segonzac was actually a Somua specialist who had trained his men thoroughly in the use of these excellent tanks. So when the Germans attacked the French position near Jolimetz, some of the Somuas charged them and succeeded in driving the panzers back while destroying several German tanks and AT gun positions. Not one Somua was lost, and firing ceased at noon when the Germans realized that a continued frontal assault would cost them far too much. |

|
|
|---|
| AFV Rules Pertaining to this Scenario's Order of Battle |
|---|
|
| Armée de Terre |
|---|
|


| Heer |
|---|
|


| 2 Errata Items | |
|---|---|

|
The reduced direct fire value of the Heer HMG became 5-5 starting with Fall of France. (plloyd1010
on 2015 Jul 31)
|

|
The morale and combat modifiers of German Sergeant #1614 should be "0", not "8". (Shad
on 2010 Dec 15)
|
| A good joust | ||||||||||||||
|---|---|---|---|---|---|---|---|---|---|---|---|---|---|---|
This scenario was played over Skype with Alan Sawyer over the course of just a five hours. We take turns to chose scenario's and this one was my choice so Alan therefore had choice of sides. This scenario is a little deceptive a quick look at the OOB's and terrain would suggest that the Boche have an advantage, although equal in terms of infantry the Germans have more tanks and the French have a broad front to defend. I like Alan would have taken the German side given the choice. However the German tanks are mainly PZI's and PZII's who can not match the French Souma's the French are given three tank leaders which means they can act either as a group or interdependently the French morale is also good. I deployed on a broad front keeping back two platoons of tanks in reserve. Alan came on in two groups, a main force in the middle of the board and a smaller force of PZ11's and on platoon of accompanying infantry in the south. The southern force was obviously meant to draw my reserve off, I decided to take the bait hoping to get some easy tank kills and drive the German initiative down quickly and still have tome to use those reserve tanks for the endgame. This did not work totally to plan and in fact it took nearly the whole game to neutralize this southern thrust however I did so without losing any units so gaining me VP's. This meant that my infantry and HMG units would have to hold out on their own. They did so thanks to a reasonable set up on my part and couple of lucky shots for which I take no credit. We also had 3 or 4 short turns which also helped. The Germans failed to make little headway against my units in the central village and although making inroads into the northern village using combined arms attacks the game ended with a major French victory. Highlight of the game was taking out the PZIII with my reduced Souma unit just before Alan was about to announce a flanking shot ( 11 needed 11 got)very lucky. I think this is a good scenario I would agree with Alan that the French have a slight advantage but not enough to make it not winnable for the Germans, it would be an excellent learning scenario for newer players, it is quick to play and there are, considering how small the scenario is, lots of different units to play with. I would certainly play it again and would take the German side so it gets a 4 rating from me. |
||||||||||||||
| 0 Comments |
| A Joust Anyone? | ||||||||||||||
|---|---|---|---|---|---|---|---|---|---|---|---|---|---|---|
INTRODUCTION THe 4th Cuirassiers are defending an area on the edge of the Mormal Forest near Le Quesnoy, the 15th Panzer Regiment approaching from the East. I played the French in this Skype game against Wayne Baumber, who had played the French in a previous play of this scenario. Having looked at the map and the victory conditions, and seeing that the balance was about even, I figured that I would be best served by defending the largest town area, sacrificing the smaller one to the south. By concentrating on the Northern town, I would be ahead in VP after the Germans took the southern one, with enough VPs to win on occupation alone (i.e. without any casualties counted). I also decided that I would place my AT Gun in the north as a deterrent to the Germans, in case they decided to be sneaky and send some of the lighter tanks from the north to sneak into town. I also spread the INF, ESC and HMGs across the town so that they were within supporting distance of each other. My ultimate goal was to defend and hold the northern town and then inflict step losses in enough quantity to earn the Victory. BATTLE The Germans split into 3 separate attack groups, a small armored group (2x PZ I, 1x PZ II) in the North, A small, combined probing force in the south and putting the bulk of his ground troops and his heaviest tanks directly east of the large forest in the middle of the board. They begin by entering slowly through the woods in the east and pushing north and south, searching for the hidden AT. In the South, the probing grouop made the town without incident and started to consolidate. In the North, the Pz Is and II came around the smaller woods to the north with a reduced S35 shadowing their moves further south. About 600 meters from the woods north of town, the 25mm began firing and destroyed a Pz I and forced the remaining units to beat a retreat back to the woods. Meanwhile, the Germans slowly moved through the woods and up from the South, always avoiding the 2 platoons of S35s patrolling the area south of town. Wayne tried to get me to chase down his units, trying for the easy kill, but I decided to stay close and not chase, considering that he had to ultimately push into town to have a chance at a draw or victory. At one point in our cat-and-mouse manouvering, he had lined up a crossfire shot with a group of PZ Is on one of the S35s, and I had a choice to fire on a PZ 4 and possibly take it out, or move and eliminate the crossfire bonus. I chose to move. Finally, after several turns of trying to reduce the French DRG and ESC units in the southern edge of town facing the woods, The Germans launched their assault in the South, while at the same time, moving the PZ I and II in the north into the town, after the reduced S35 moved to the south to support the assault. The assaults were fairly successful for the Germans but the French were able to stave off enough of the attacks to maintain a small VP lead at the end of the game. French 23 VP, German 21 VP - A Draw. OBSERVATIONS I had decided at the beginning to defend only the Northern town, and had decided that I was not going to run around and chase the smaller units, no matter how tempting, as I had figured that I would be able to concentrate mostly when he had to approach the town. I believe I made a tactical mistake moving my reduced S35 south to support the defense. At the time, it seemed like the way to get extra firepower in the mix, but in hindsight, it opened up a gap right down the road which allowed the Pz I and Pz II to run down the road and capture several town hexes that I had to peel off some units to try and force them out (succeeding in all but one hex). The reduced S35 did not contribute to the defense in the south and had I left him in the north to prevent the mad dash, it would have saved the extra hex for the minor victory. In all, this was a very interesting and fun scenario, finished in about 5 hours. |
||||||||||||||
| 0 Comments |
| Knightly Combat revisited. | ||||||||||||||
|---|---|---|---|---|---|---|---|---|---|---|---|---|---|---|
Having played this one before as the French and rated it highly I was not adverse to playing it again when Tony suggested it. As my previous AAR had stated that though I considered the scenario slightly favours the French but I would play it again as the Germans I considered my self honour bound to take the German side. The battle is fought for control of three villages spread over two map, with VC also for casualties inflicted. Tony's set up was almost a copy of mine in my first game of this scenario against Alan. The French can not hope to hold all three villages as this would spread out their forces two thinly. Tony elected to give up the most southern of the villages, and therefore concentrate his forces around the middle of the board. My tactics were to avoid combat where possible (the French tanks are far stronger then the German tanks and with lots of cover and a narrow board trying to get flanking shots is almost impossible) and then rush the key central village on the last two turns. Should the French tanks come out to play then I would try and take them out with combined arms, I was hoping that I might inflict some casualties prior to the final attack with a strong fire group in the woods to the SE of the middle village. I used some light tanks to threaten the northern village and either pin enemy units in place or if Tony moved units south they might be able to take some town hexes in the endgame. That was the plan, and to some extent it worked OK, the hidden French A/T gun was in woods to the north and took out some PZ1's which nullified that part of the plan until a lucky artillery strike took out the offending A/T gun. My main force advanced patiently from the south east taking the southern village, there was a bit of cat and mouse with the French tanks but they withdrew before the advance of my INF could pin them in assault. My fire group led by best officer failed to make any impression on the French units in the central village. As we came to the last 30 minutes of the action I launched the assault, this succeeded in inflicting some French losses and although not taking the town at least denying VP's to the French. The last turn was a very tense affair and after counting the VP's the French were ahead by two, not enough for a minor victory so the result of this exciting encounter was a draw. I was pleased with that result and with my overall plan, Tony had a good set up and was not drawn into any early counter attack and had the rub of the green with the dice so to grab a draw was good. The scenario is pro French but not enough to deter gamer's who want an exciting tense shortish battle |
||||||||||||||
| 0 Comments |
| Battle Group Schimmelmann Fails to Seize Jolimetz | ||||||||||||||
|---|---|---|---|---|---|---|---|---|---|---|---|---|---|---|
This was a 4-session play-through with the playful and high-morale, cjsiam, as the French Commander seeking to hold off a scratch, and ill-equipped, force of Germans. The well-positioned French defense were spread out from the north in the town of Jolimetz (the 7-hex town on Map 27) and then south to the 3-hex township adjoining the north margin of Map 31. We used the optional smoke, excess initiative and extended assault rules. We chose not to not use the Fog of War rule. The German side is required to seize as many town hexes and inflict as many step losses as possible. – a tall order with this counter mix. Initial action in session one (game turns 1-3) was focused on the German movement-to-contact in two converging groups from the east edge of Maps 27 & 28. The French responded through a series of combined-arms blocking positions that were established and abandoned in this play-through as the Germans slowly ground forward. A series of unsuccessful German feints ensued that were designed to draw the French armor into range for favorable AT shots by the weaker German tanks. The Southern town on Map 31 was occupied by the Germans almost immediately, and both their AT gun platoons were deployed just north in-and-around the woods in that section of the game map. The second session (game turns 4-7) was characterized by the first casualties suffered by both sides, as the French light tank (AMR-35) platoon was destroyed by AT fire in the open ground east of Jolimetz, and one of the German PZ-II platoons was halved by accurate long-range 25mm AT gun fire originating from the same town. The German contingent in the south seized the initiative and setup AT an crossfire situation that failed to lure the half-strength S-35 into the trap, while at the same time, a combined arms probe was able to isolate a platoon of dragoons and a leader in the woods west of the 3-hex township on Map 27. Both sides threw a combined total of six combat 7 die rolls in this session, and German OBA was mostly ineffective. Multiple attempts to lure the French armor into crossfire situations failed, and the French Commander re-deployed his infantry assets to better positions in and around Jolimetz at least twice, while also keeping one of the S-35 tank units just out-of-reach of Germans infantry formations bent on closing for a close assault. By the end of turn 7, Axis lines had tightened around the spread out French defensive positions, portending a series of assaults on the French-held towns. The 3rd session (game turns 8-10) featured two hard-fought close assaults launched by the Germans, one in the southwest, and a second against the S-35 tank platoon in the open east of Jolimetz. Both were initially unsuccessful, but in subsequent action the combined arms attack in the southwest result in the destruction of a Dragoon platoon, while the other was only able to eliminate half of a S-35 unit. The German net slowly closed in the southern 3-hex town as the French Commander shifted the larger portion of his force north to cover Jolimetz, in response to threatening moves in that direction. Half of a German infantry platoon was shredded when they approached too close to Jolimetz, but by the end of the session, a French force was pinned in the southern 3-hex town in a combined-arms, close assault. The scratch nature of Task Force Schimmelmann, was again revealed by the forced use of inadequate Pz-I tanks to try to seize & hold town hexes without benefit of sufficient supporting infantry. The 4th session (game turns 11-12) started out positively for the Germans but ended up as a disaster, resulting in minor French Victory by a score of 29 to 24. Overexuberant German light tanks were not able to hold several town hexes in the absence of decent infantry support, and the French slowly ground down the unsupported tanks in close assaults. Ironically, both sides held the identical number of town hexes (7 apiece) at the end, but the 15 Germans step losses proved to be the critical factor in the stout French defender’s ultimate success. Suggestions for Better Scenario: This was a well-balanced scenario that was fun to play, although neither side is equipped appropriately for the assigned mission. The Germans should have at least 1 unit of combat engineers, and additional junior leader, an 81mm Mortar platoon, and should have an armored car to help keep the French off balance. The French need at least 2 more infantry platoons and a 14-strength increment of OBA. In addition, the French force should have a Cavalry Leader to better keep tabs on the Germans forces lurking in the woods. |
||||||||||||||
| 2 Comments |
When mentioning that each side was not equipped appropriately, could the omission of these units be because historically at this fight they did not have them? As you well know, you go to the fight with what you have, not necessarily with what you want.
You are correct, and that's part of the charm of playing this incredibly tweaky and fiddly -- yet interesting game!
Or, as Teddy Roosevelt once said: "Do what you can, with what you have, where you are."
| Clash of the Inappropriately Equipped | ||||||||||||||
|---|---|---|---|---|---|---|---|---|---|---|---|---|---|---|
This was a relatively quick, 3-session play-through with the playful, yet relentless, Sonora, leading an ill-equipped, force of attacking Germans, while I led a mixed, very stretched, scratch force of defending French units. The defenders manned a very thin line from the town of Jolimetz (the 7-hex town on Map 27) and then south to the 3-hex township adjoining the north margin of Map 31. We used the FOW, optional smoke, excess initiative and extended assault optional rules. The German side is required to seize as many town hexes and inflict as many step losses as possible. This is a very tall order with this counter mix, but resulted in a decently balanced scenario. The German leader draw was quite poor, and the French draw was marginally better. Initial German movement-to-contact was in a single mass charge from the east edge of Maps 27 & 28. The French responded through a series of combined-arms blocking positions that were established and abandoned in this play-through as the Germans slowly ground forward. The Southern town on Map 31 was occupied by the Germans almost immediately, and both their AT gun platoons were deployed just north in-and-around the woods in that section of the game map. The French drew first blood with long-range AT fire of their SOMUA tanks and AT guns. They would end up winning this battle mostly due to excessive German step losses and leader casualties. The second session was characterized by heavy casualties suffered for both sides as teGermans pressed relentlessly on to try and take Jolimetz. Throughout our play-through Germans OBA was remarkably ineffective, as many combat 7-die rolls were thrown. As the game wore on, the scratch nature of Task Force Schimmelmann, was evealed by the forced use of inadequate Pz-I tanks to try to seize & hold town hexes without benefit of sufficient supporting infantry. French close assaults were ultimately successful as they wore down the Germans by frequent counter attacks, and benefited by a Axis senior leader decapitation during game turn 9. In the end, the French controlled 8 town hexes to the Germans 2, but the 20 German step losses proved to be the critical factor in the brave French defender’s ultimate success. Vive le France libre! This was a generally, well-balanced scenario that was oddly fun to play. It is recommended for both SOLO and SHARED play. I give it a generous rating of 4. |
||||||||||||||
| 0 Comments |
| Knightly Combat |
|---|
|
A short 12 turn scenario with interesting choices for both sides. The French decide to concentrate their units on the North board conceding the Southern town hexes. Although time is short the Germans are patient and spend the first several turns spreading out the French defense by threatening both flanks with their armor which draws off the French tanks. The Germans rush the northernmost town hex with 4 Grenadier and 2 HMG. They survive the initial opportunity fire and on the following turn execute a textbook fire and movement. 3 units fire and roll a 12 on the 30 column for a 2X result. Two of the defending units including a somua become demoralized and the French leader disrupted. The remaining three German units assault and after a bloody two turn fight take the town hex and score a minor victory. a fast, furious, fun scenario. |
| 0 Comments |
| Descendants of Charlemagne | ||||||||||||||
|---|---|---|---|---|---|---|---|---|---|---|---|---|---|---|
This was another enjoyable Skype play between myself and Wayne Baumber in a one day sitting. Wayne played the French very well and with a few key rolls had my Germans on there heels. But here is the write up... This scenario is very interesting as the Germans as they have a small but potent advance force moving to capture a French town. They have the advantage in the numbers of tanks and OBA and a slight advantage in morale, while the French have better quality of armor, a few more men and the setup position. Wayne had a interesting setup with troops covering both major towns and the S35's positioned halfway between the towns ready to move up or down the road. I new I had to decoy the main attack toward the towns on board 27 with a small force moving for the major town on board 31. So my forces had the infantry and most of the tanks moving onboard in between boards 31 and 27, while a small group of PzII's maneuvered to probe the main town on board 31. With my initial moves I was able to get a decent fire group to fire on the small town on the very bottom edge of 27 and maneuvered my tanks to support fire as well. But most shots missed leaving the French in good order and ready to fight. The French were able to get a kill OP fire shot on my maneuvering INF's which were the first casualties. To the south the decoy attack had the PzII's maneuvering while being chased by the S35's. this worked well for a while to keep the S35's out of the main battle up on board 27. But finally they were able to maneuver for a kill shot on a PzII. The others continued to race around board 31. Supporting INF for the tanks on board 31 were hit by French OP fire that demoralized them and frozen them in a road hex outside the main town on board 31. Back on board 27 I tried to get the PzIIIF into a crossfire on the lone S35 but a key shot by the S35 reduced the PZIIIF before it could get the shot. But to the north of the major town on 27, this was lightly defended and the PZIVD and a PZI raced to capture town hexes and take on the lone French INF defending. After some sharp firing by there tanks they were able to overrun the French INF and draw some of the other French defenders from the small town on board 27's edge. The German Captain kept up the fire on the small town and demoralized the HMG, giving them a chance to charge the town. Moving up they assaulted the town reducing both the HMG and an INF that was defending. But later in the assault the Germans were hit by an ambush and several were disrupted/demoralized forcing them to recover before continuing the assault. The lone reduce French INF luckily held out and kept the hex contested until the end. By the end of the 10th turn the Germans chances looked grim and after a short turn 11, it had sealed the game. French 35 Germans 12. A decent scenario but the Germans are at a slight disadvantage that only magnifies if they start to take losses and need to play catch up. The German armor is good,but with the S35's armor and all having tank leaders they can zip around the boards attacking or threatening the German armor. German INF can do the job but OP fire can make it a long day for them. |
||||||||||||||
| 0 Comments |
| Somuas of Death | ||||||||||||||
|---|---|---|---|---|---|---|---|---|---|---|---|---|---|---|
An interesting, albeit a bit unbalanced of a scenario. Within several turns I found myself having an incredibly hard time engaging the Somuas effectively and watched as they destroyed 3 steps of Panzer Is before the halfway point. Despite noble efforts from my Panzer III and Panzer IV platoons I never did manage to destroy any S35s and lost both steps of the Panzer III platoon, 3 steps of Panzer IIs, and 3 steps of Panzer Is as well as one platoon of infantry before electing to pull back on turn 10. Easy French victory with their own casualties being one platoon of Esc. |
||||||||||||||
| 0 Comments |