
|
Failed Orders Winter Soldiers #2 |
||
|---|---|---|
| (Attacker) Germany | vs | United States (Defender) |
| Formations Involved | ||
|---|---|---|
| Germany |  |
1st SS "Leibstandarte Adolf Hitler" Division |
| Germany |  |
Kampfgruppe Peiper |
| United States |  |
202nd Engineer Battalion |
| United States |  |
526th Armored Infantry Battalion |
| United States |  |
824th Tank Destroyer Battalion |

| Total | |
|---|---|
| Side 1 | 15 |
| Draw | 2 |
| Side 2 | 2 |


| Overall Rating, 21 votes |
|---|
|
3.14
|
| Scenario Rank: 648 of 913 |
| Parent Game | Winter Soldiers |
|---|---|
| Historicity | Historical |
| Date | 1944-12-18 |
| Start Time | 07:45 |
| Turn Count | 14 |
| Visibility | Day |
| Counters | 46 |
| Net Morale | 0 |
| Net Initiative | 1 |
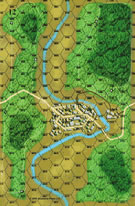
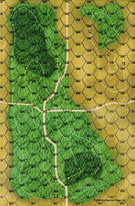
| Maps | 2: 12, 9 |
| Layout Dimensions | 86 x 28 cm 34 x 11 in |
| Play Bounty | 132 |
| AAR Bounty | 129 |
| Total Plays | 19 |
| Total AARs | 8 |
| Battle Types |
|---|
| Bridge Control |
| Exit the Battle Area |
| Urban Assault |
| Conditions |
|---|
| Off-board Artillery |
| Terrain Mods |
| Scenario Requirements & Playability | |
|---|---|
| Battle of the Bulge | Maps |
| Elsenborn Ridge | Counters |
| Winter Soldiers | Base Game |
| Introduction |
|---|
|
Obersturmbannführer Jochen Peiper was unwilling to admit he had fumbled his chance to take Stavelot by a coup de main the previous evening. His excuse to higher headquarters claimed his men were confronted by enemy armor as they approached the town, while infantry circled around to attack his flanks. This was later contradicted by his tank commanders who insisted the Americans were withdrawing. In any case, the pause allowed the Americans to rush reinforcements into the town during the night. His assault today would be tougher. |
| Conclusion |
|---|
|
Headquarters had ordered the engineers stationed there to blow the bridge over the Ambleve River. Demolitions were set but their commander failed to give the order to blow the bridge allowing the Germans to capture it intact. Soon Kampfgruppe Peiper was once again racing towards the Meuse with the Americans scrambling for a way to stop them. If the bridge had been destroyed as ordered chances are Peiper would have been stopped then and there. |
| Additional Notes |
|---|
|
SS transport counters are available as a free download from Avalanche Press. If not using these or other SS transport from other games, players should use regular German army transport as substitutes. |

|
|
|---|
| AFV Rules Pertaining to this Scenario's Order of Battle |
|---|
|
| Schutzstaffel |
|---|
|


")
")
")
")


| Army |
|---|
|


| 2 Errata Items | |
|---|---|

|
The reduced direct fire value of the SS HMG is 5-5 in Beyond Normandy and Road to Berlin. (plloyd1010
on 2015 Jul 31)
|

|
The M18 has a special rule in Battle of the Bulge but it applies globally: "A two-step M18 unit can fire one anti-tank shot and move half its movement allowance (retain fractions) in a single impulse. The order in which it does these two actions is the player's choice." (Shad
on 2010 Dec 15)
|
| Proper Paid the Piper | ||||||||||||
|---|---|---|---|---|---|---|---|---|---|---|---|---|
A company of US infantry, 1 of engineers, a 3inch AT unit, an M18 and some half tracks hold Stavelot against 5 Panthers, half track mounted panzer grenadiers, engineers and HMGs. Germans have 1 81mm mortar and 2 16 factor oba, the US have an 18 factor oba. The Americans deployed in the city with one engineer and one infante dug in on the one bridge hex capable of holding tanks. The AT gun and M18 set up on the southwest corner to try to cover the bridge against attacks by German tanks. Some really good leader draws gave both sides some great leaders, like an appropriate 10-1-2 for Proper, and an 11-2-1 captain for the Americans. Proper wasted no time attacking with Panthers and panzer grenadiers going for the big bridge while more panzer grenadiers and engineers head to the northern, lighter bridge. An armor overrun succeeds in getting past the bridge defenders but are killed by very lucky dice in counter assault. Proper leads a combined arms assault on the US AT position and nearly succeeds in overpowering the defense, by hot dice roll a 2 for leader loss in an otherwise moderate assault result. This turns the tables on the SS attack, and the Panther platoon in the assault falls in the next round. By turn 8, the Germans were up to 17 steps lost, including 3 of 5 Panthers. The assault on the north bridge falters, keeping the panzer grenadiers from easy access to the road west out of town. In the end, the US troops retake the bridge, the Germans are still stalled in assault and the German engineers are having difficulty moving anything across a fording point. Germans fail to get any of their objectives and Proper is dead before the attack really gets started. Great game. |
||||||||||||
| 0 Comments |
| Winter Soldiers #2 Failed Orders |
|---|
|
The Allies set up on Bd 12 in the village with one platoon in the town hex on the east bank. The Allies made an error on the initial set up by not having the U.S. TD in a town hex with a line of sight to one of the Axis approach routes. That in conjunction with the 57mm ATG Battery could have possibly gotten a crossfire shot on one of the Axis's Panther platoons. As it was the U.S. set the TD up in the town center where it had to move to get a line of sight to an axis armored unit thus giving the Axis the first shot. The allies had given up their biggest advantage, shoot & skoot. The Axis barged into town but the Allied infantry proved to be pretty tough. They beat off several Axis attempts to take both bridges. The lone Allied platoon in the town hex on the east bank though reduced and disrupted held out to near the end. When it collapled finally so did the rest of the Allied position. The numerous shots from the Panthers finally wore the Allies down to a nub. They were just too much. Maybe if the TD had been better placed it could have made a difference because time is on the Allies side. Maybe. |
| 0 Comments |
| Winter Soldiers #2 Failed Orders |
|---|
|
My fourth PG scenario. It took 3 1/2 hours to complete, but only because I spent much of my time looking up specific rules. I set up the Americans in the town except for 2 platoons and a lieutenant in the east bank village. The Germans quickly overran the village on turn 2 when the Americans rolled 12, 11, and 11 on a morale check, and failed to recover in their activation phase. The Germans eliminated the demoralized units and then decided to assault the town for a major victory. This proved to be easier said then done as the remaining American were very resilient and inflicted 10 step losses on the Germans before they were pushed into the most western town hex. It came down to the last roll when a demoralized American half platoon had to make a morale check of 5 or less for a minor victory. They failed and thus had to flee out of town. German minor victory. I learned from this scenario that when attacking on a narrow axis, the stronger force has several units idle as they have nowhere to go. After the early German success, I should have sent a German detachment to bypass the town and exit the map in order to secure an easy minor victory. |
| 0 Comments |
| El Kampfgruppe Peiper llegó, vio y venció en Stavelot |
|---|
|
En este escenario una potente fuerza blindada alemana (5 secciones de tanques "Panther"), apoyadas por una compañía reforzada de Panzergrenadier atacan la ciudad de Stavelot, junto al río Ambleve. Esta población en manos americanas está defendida por una compañía de infantería y otra de ingenieros, apoyados por una batería AT (3-inch) y una sección de cazatanques M18. La batalla tiene poca historia. Cuando los alemanes consiguen destruir los M18 americanos y neutralizar la batería AT mediante un asalto, se limitan a concentrar sus "Panther" para ir debilitando sistemáticamente a la infantería enemiga por medio de un potente fuego directo concentrado. Una vez debilitada o desmoralizada la infantería americana, es asaltada por los panzergrenadier de la SS, apoyados por secciones de transportes blindados SPW 251. Al final del turno 12 los americanos son completamente aniquilados y los alemanes consiguen todos sus objetivos. Fácil victoria mayor alemana. |
| 0 Comments |
| Failed Defense | ||||||||||||
|---|---|---|---|---|---|---|---|---|---|---|---|---|
After seeing all the plays with wins for the Germans, I need to see what this scenario was all about. This is a typical early Bulge attack with the Germans having the advantage of armor to overwhelm the Americans. But I thought that there might be some defense that can win this for the Americans. But it seems to require more than that and then some. The Americans seemingly have a good defense with a good amount of INF and ENG plus support weapons that include a 3in AT and M18. But they are facing two companies of SS GRENs and five SS Panther platoons. Leaders on both sides were good with a number of leaders with modifiers. The American defense setup forward of the town of Stuvelt. Digging in the light woods allows the Americans to maximize their defensive bonuses and fight the Germans outside of the towns for a short time. Flanking the main defense of HMG, 3in AT and INF's are ENG's and M3's. This is to prevent the Germans from trying to push through the woods to the north and south of the defense. The M18 setup up in the woods on the northern hill. A lone M3 remains in Stuvelt for any defense when the Americans need to retreat. The Germans look to find a angle that they can take to attack the American defense. They setup most of their force on the wooded hill on the south end of board 9. Panthers and GREN's are grouped for a combined forces attack on the southern American flank. This will give the Germans the best chance of capturing the bridge and cutting the Americans off on the east side of the river. Two platoons of Panthers are stationed to the north to keep an eye on the M18. The attack starts with the Germans advancing down the slopes and into the woods on board 12. American OP fire is accurate and several GRENs are disrupted and demoralized quickly. But the Germans close on the Americans and open fire on the dugin troops. Scoring demoralization's on the left American flank that are able to force the units back. Panther and SPW251 units score the first blood with the reduction of an ENG unit. But American fire is good too. They OP fire on a key advancing group of Germans and score a kill and demoralization on the remnants. The Germans quickly move troops forward to try to press the advantage. The Americans react by shifting the units from the north side of there defense to Stuvelt. Using an old wooden bridge, they are able to shift INF's, ENG's and 3in AT into the town. The Germans dash two Panther platoons over the other bridge to capture the bridge and a town hex. But American OP fire keep the GREN's at bay and the American Major launches an assault on the isolated Panthers. His attack is a success and one Panther step is destroyed. But the other Germans press forward against the American defensive line on the east side of the river. This rolls them back and removes the OP fire threat from the bridge, but the Americans are tough and still hold the small village and deny them the road. To the north the Panthers shadow the M18 looking for an opportunity to destroy it, but the quick M18 keeps them at bay and even get a few close shots at the Germans. But the Germans catch up with it after the "cat and mouse" moves and are able to eventually destroy it. But this keeps two Panthers from flanking the Americans and hold up the attack. Eventually the German GREN's make it over the bridge and are able to destroy the INF's and ENG's holding the town. The 3in AT is demoralized and eventually the crews flee in the face of the German attack. The Germans move some of the Panthers and SPW251's off the board, while the ENG's and other Panthers provide security for the captured town and bridge. A major German victory. Although the Germans have the victory, I believe that they have a lessor victory, Why? First, the Germans lost 6 steps, 1/2 Panther, 1 Gren, 1/2 ENG, and SPW251. For there forces in battle this is significant. Second, the Germans need to leave 2 Panthers, ENG's and SPW251's back to cover the American remnants. Both of these seriously diminish there advancing forces. The units that did make it off were 2 1/2 panthers and a couple of SPW251's without GREN support. I would believe that the VC's would need to have the Germans including some GREN's in the exiting troops as well as having the number of troops left on the board contributing to the American VC's rather than just a strict unit losses. |
||||||||||||
| 0 Comments |
| SS showing off for Obersturmbannfuhrer Peiper | ||||||||||||
|---|---|---|---|---|---|---|---|---|---|---|---|---|
US set-up tried a bit of a forward defense: Dug-in INF + M3 in 1008 (lt woods + hill hex) to defend the track and approach to the personnel bridge across the Ambleve into Stavelot. Inf + 3-in gun in the eastern back hamlet (thought to put the gun forward to keep the SPW's honest - which it did for a while). Dug-in INF + M3 in 1011. The ENG + HMG's were in Stavelot warding the road/track with one holding the personnel bridge hex. The M18 was dug-in on the 20-m hill hex 0317 covering the main bridge at a range of 7 hexes (I thought to "cover" the bridge this way vis-a-vis the Panthers, but in the end used this to attack SPW's that had looped south to aid the Grens). The first three turns looked well for the US as the Waffen SS got a bit crowded up and out of position, perhaps reflecting some poor march discipline (or the player just not thinking very clearly). Turns four-seven though were disasters as the Germans took advantage of some devastating die rolls on large DF attack columns. Whole hexes of US troops disappeared in a matter of minutes in contrast to the fizzles on the first few turns; that and US survivors were spent recovering morale rather than returning fire. The SS also sent an engineer + gren + ldr to loop around the southern woods and make a river crossing in 0712. The M18, after shooting up some SPW's attempting to force the main bridge, finally ran into the town as the panthers, having reduced the eastern hamlet to rubble, moved SW to cross. The dart and shoot ploy worked for one step (rolling a '10')of PzV's before the M18's were sent to their reward. German DF continued to roll extremely well, which is to say, extremely accurately for their commander. Other key elements were the obersturmfuhrer 10-1-2 draw which made morale failure on the Germans a challenge and the Germans won initiative every turn. Although a Major German Victory, had the German DF rolls not been so devastating (even with town or dug-in advantages), with time running short, more risky assaults would have been necessary. Final step losses were six for the Waffen SS (including one step of PzV); sixteen steps to the US. |
||||||||||||
| 0 Comments |
| Try to Stop Pieper! | ||||||||||||||
|---|---|---|---|---|---|---|---|---|---|---|---|---|---|---|
This was a 3-session play through with the clever, CavDo as the German Commander and me playing the scratch, undermanned and poorly-armed US side. We ignored the FOW, but used the smoke/illum, excess initiative and consolidation optional rules. As others have noted, this is a typical early Bulge attack with the Germans having the advantage of a serious amount of excellent armor. As is becoming routine in my online play, I was again serving personal penance for the souls in purgatory by having to play with only minimal, so-called armor (an M-18 "tank destroyer"), and with demonic, but essential, AT gun crews among the defending American troops in this hotly-contested 14-turn scenario. I was very lucky to end this one with a draw. One of the key factors in this outcome is that I drew an exceptional set of leaders, and the SS leaders were a surprisingly poor lot. Also, my opponent had the incredible bad luck of managing to throw a near-record 17 combat 7-die rolls -- almost all in critical situations that likely would have won the game for the Nazi horde. The American forward defenses were in the immediate vicinity of Stuvelt. Being able to dig in the Americans in light woods was a pleasant change of pace. In our play-through, the Germans came on in a vigorous, combine arms frontal attack from the southern portion of Map 9 aiming at the critical bridge. This movement-to-contact quickly took to the woods on Map 12. A number of lucky US OBA and many successful opfire shots made this into a nasty experience for the advancing German wedge. I had to begin migrating US units from the north edge of Stuvelt to shore up the defenders on the southern margins of the town. A costly, and haphazard German attack took the bridge briefly, before a counter attack threw the SS back. The lone M-18 platoon kept moving through this play-through and got off the occasional shot at the marauding Panther tanks, eventually taking out 2 steps before the inevitable occurred and was destroyed in a well-setup crossfire during game turn 12. As the PG fates would have it, this sacrifice helped to protect the US flank for a number of turns and also contributed mightily to the defense of the contested bridge hex. The bridge was still contested at the end of game turn 14, by the then-very-few remaining US troops. All the SS halftracks were eliminated by the end, and only 3 steps of SS were able to exit the battle map. My gracious opponent offered the draw at the start of the last turn when it was clear that the relatively few remaining SS grenadiers would not be able to clear the bridge due to the very high casualties that they had absorbed by that point in the scenario. I give this one a 3, but suggest that it is more suitable for solo play as the deck is too well-stacked for the German side. I was very lucky to be able to manage a draw against a quick-to-learn, hard-fighting and aggressive rookie opponent. |
||||||||||||||
| 0 Comments |
| Winter Soldiers, scenario #2: Failed Orders | ||||||||||||
|---|---|---|---|---|---|---|---|---|---|---|---|---|
*Winter Soldiers has so many interesting looking scenarios that I wanted to play one and this one looked to be a one sitting types of play! So I picked this one first and will play more later. *This didn’t turn into a good Memorial Day battle for my Americans. The highlight for them was taking out a step of Panthers tanks with the 3-inch AT Gun rolling a 12 but since there are 10 steps of these monsters, just a small dent was made. In fact the miss use of my M18 tank destroyer contributed nothing to the American cause. Once the American AT units are gone, the Panther can park across the river adjacent to the town hexes of Stavelot and with 33 DF factors pounded the American infantry and then add the 2 x 16 artillery off board, to soften up the American Infantry before the German Infantry assaults across the Bridge hexes joined by the German armor & halftracks. *The Germans won a major victory in this one but it was still fun to play. Not that it makes a difference but I assumed that the bridge hex #0808 which restricted German tanks still accepted German Halftracks. Bridge hex 1011 was open to all types of armor anyway, and the Germans cleared it pretty early. Played May 30th |
||||||||||||
| 0 Comments |