
|
The Black Brigade White Eagles #22 |
||
|---|---|---|
| (Defender) Poland | vs | Germany (Attacker) |
| Formations Involved | ||
|---|---|---|
| Germany |  |
2nd "Vienna" Panzer Division |
| Poland |  |
10th Mechanized Cavalry Brigade |
| Poland |  |
Zakopane National Guard Battalion |

| Total | |
|---|---|
| Side 1 | 3 |
| Draw | 0 |
| Side 2 | 2 |


| Overall Rating, 6 votes |
|---|
|
3.17
|
| Scenario Rank: 627 of 913 |
| Parent Game | White Eagles |
|---|---|
| Historicity | Historical |
| Date | 1939-09-02 |
| Start Time | 05:00 |
| Turn Count | 30 |
| Visibility | Day |
| Counters | 130 |
| Net Morale | 0 |
| Net Initiative | 0 |
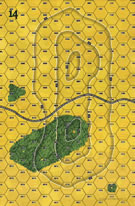
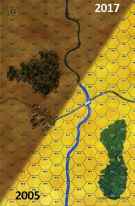
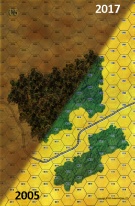
| Maps | 4: 14, 3, 6, 7 |
| Layout Dimensions | 86 x 56 cm 34 x 22 in |
| Play Bounty | 164 |
| AAR Bounty | 159 |
| Total Plays | 5 |
| Total AARs | 3 |
| Battle Types |
|---|
| Bridge Control |
| Inflict Enemy Casualties |
| Road Control |
| Urban Assault |
| Conditions |
|---|
| Entrenchments |
| Minefields |
| Off-board Artillery |
| Reinforcements |
| Terrain Mods |
| Scenario Requirements & Playability | |
|---|---|
| Eastern Front | Maps + Counters |
| Road to Berlin | Maps |
| White Eagles | Base Game |
| Introduction |
|---|
|
Poland had just started to mechanize her armed forces when war broke out; a logical progression from her centuries-long dependence on cavalry. When the panzer divisions crossed into Poland, the 10th Mechanized Cavalry Brigade (one of two large mechanized formations) promptly rolled to the frontier to aid local militia already engaging the invaders. |
| Conclusion |
|---|
|
The National Guard troops put up fanatical resistance until the mechanized cavalry arrived in the nick of time, and managed to restore the Polish lines. By noon the German attack had been blunted with the help of an armored train - bearing the only effective Polish artillery in the sector. German losses included more than 30 tanks, but they were not dismayed by this first setback and would be back the next day. |

|

|
|---|
| AFV Rules Pertaining to this Scenario's Order of Battle |
|---|
|
| Heer |
|---|
|


| Wojska Lądowe |
|---|
|


| 2 Errata Items | |
|---|---|

|
The reduced direct fire value of the Heer HMG became 5-5 starting with Fall of France. (plloyd1010
on 2015 Jul 31)
|

|
The morale and combat modifiers of German Sergeant #1614 should be "0", not "8". (Shad
on 2010 Dec 15)
|
| The Viennese Waltz Through The Black Brigade | ||||||||||||||
|---|---|---|---|---|---|---|---|---|---|---|---|---|---|---|
I played this battle PBEM with John Legan from Chicago over some time and rated it a 4 due to the amount of different 'stuff' that can go on in the game. The Short Report Having read Yves previous report with a Polish win in this battle, it was interesting to see that the German approach in this battle was vastly different to his. The Germans have plenty of men and 5 platoons each of PzI's and II's plus useful OBA. Their aim being to secure the two bridges over the river plus one of the roads that lead from them and off the boards. Arrayed against them the Poles initially have some Militia troops who will then be reinforced by The Black Brigade, which are high-moraled regulars with, in some cases, more powerful tanks than the Germans. There is also an armoured train that has some tough numbers on it. The Poles set up the Militia to hold the bridges and also have available to them a number of mines and entrenchments in which to block the approaches. In this scenario, it is the German approach that determines the entry of the Black Brigade reinforcements. This occurs when the first German unit crosses the river OR they demoralise or KIA a certain amount of Poles, then on comes the Black Brigade. With that in mind, rather than use German OBA and concentrated HMG fire to knock out the Polish defences, I initially used them simply to keep the defenders on the back-foot (disruptions) whilst the main body of the German forces made their way to the river bank to cross as one big body of troops. When the time was ripe, the whole lot crossed over and then the OBA and HMG's let the defenders have it ! The Black Brigade, who had been effectively unaware of this massive attack brewing, finally entered 2 turns after the whole German force had crossed. By this time, the militia were being cut down in serious numbers and German infantry were occupying the bridges and making their way up the rail line to minimise the travelling area and operational scope of the armoured train. This left the German panzers to eradicate most of the opposition posted around the bridges. The Black Brigade themselves entered in two groups, and after around 10 further turns of battle, they were becoming seriously depleted. The German armour managed to catch some of their tanks in crossfire, whilst other Polish armour platoons were set upon by well led (2 morale leadership bonus) Infantry platoons. Overall, the battle was becoming something of a massacre for the Poles, and in the end, finding they were unable to advance on any front without fear of being cut to ribbons, they conceded the field on turn 18. THE FULL REPORT Knowing that the Poles elite Black Brigade were close to hand, the Viennese Panzer Division decided that rather than reveal their strength, they would approach by only using minimal force to keep the Zakopane militia defenders on their back-foot and therefore lead the Black Brigade to believe this was not an area under immediate threat or a concerted attack. From 0500 hours, the German guns fell on the defenders position, whilst the men of the 2nd Panzer Division moved forward. Their task was to capture and control two bridges across the river to their front as well as secure as much of the road ahead. Infantry and Engineers were assigned the bridge on the west whilst Pz I’s and II’s with HMG support would advance to the eastern most bridge. The Poles situated themselves defending both bridges in entrenched positions and they had also mined the approaches to the bridges. Upon reaching 500m distance from the bridges the German attackers laid down extremely heavy machine gun fire supported by MG’s from their tanks and their rapid 20mm gun fire. The part-time soldiers of the Zakopane militia found this assault far too intense and struggled to maintain their order, as well as suffering casualties from the in-coming fire. As they kept their heads down, advancing German troops finally crossed the river as a body at both the western and eastern ends, but in general out of Polish rifle range. However, one platoon of the militia did prove very accurate in cutting down a half-platoon of Germans and demoralizing the other half. But within half an hour of beginning the crossing, the German attackers were swarming across in great numbers heading straight for their assigned objectives. At the east bridge, concentrated German HMG fire, supported in great numbers by most of the panzers simply whittled down the defenders with sheer and intense firepower. At this location and within the nearby town, resistance cracked and fell away fairly quickly, though their losses would not have made such a reaction a surprise to any on-looker. Also, a company of German infantry set forward along the rail-line in order to secure as much of this as was possible. The western bridge area proved something of a tougher nut to crack. Entrenched here as well, the Poles received concentrated German OBA and mortar fire, whilst the enemy infantry continued to close in and lay down more fire. Once the German felt the Poles at this location were weakened, a series of assaults were sent in as the Germans began the potentially arduous task of trench clearing. Fortune was on the German side as the enemy MG’s on the bridge-trench collapsed quickly having received some serious incisive attacks. But other militia in the adjacent trenches held on. At 0645 hours (turn 8) the Polish Black Brigade finally rolled forward and came into sight. They had split themselves to attack both sectors. A smaller section in the east supported the armoured train and some armour, with the larger body advancing over the hills to the west. With these forces in sight, the German attacks on the militia troops appeared to heighten in ferocity in order to clear them as much as possible before the Polish reinforcements could relieve them. As such, most of them were cleared with very high casualty rates indeed. Some Militiamen remained in their trenches near the eastern bridge, and the Germans were forced to leave a residual force to hold them whilst the rest of the German left flank prepared themselves into a defensive line to protect their gains. The machine gun teams from the right flank were also transported over the long distance to this area to stiffen the German line. The focus now switched back to the west or right German flank. The infantry advancing up the rail-lines finally made contact with the enemy near the edge of a large forested area. This was a good position to hold these particular Poles as it would give them nothing to fire at due to the dense forest all around them. Initially, the combination of armoured train, Polish regulars and their tanks caused the German infantry to wobble and become unsteady. But following up right behind them were two more German infantry platoons, and the now released 5 platoons of PzII’s. The reinforcing infantry made sure the line and rail was held, and, with initiative on their side, the German tanks ploughed through the woods and positioned themselves to set-up a crossfire on the enemy armour and train. The train made sure to escape by retiring a little. But their armour was assaulted by the German infantry, trapped and then blown apart by the numerous PzII’s. The Polish train did what it could to assist by eventually wiping out one of the enemy tank platoons, but this location was now definitely in German control. The Polish commander had now to try and send some form of relief to the western flank and therefore, some troops and armour began heading that way. As they travelled though, they were being heavily bombarded from the German guns. The German machine gun teams had also arrived and were laying down some very heavy fire on the tentative Polish advances back at their bridge too. All this meant that Polish casualty rates were rising at a horrible rate. Also, in the confusion, a group of unsupported Polish armour stumbled too near some fresh and pretty well-led German infantry and was set-upon most vigorously. By 0815, the game was probably up for the Black Brigade. Casualties were far too massive. Both bridges were not only lost, but heavily defended and supported by artillery and mortar support. The rail-lines were too all intents and purpose in German control as were all the nearby built up areas, and to top it all, the German armour on the east flank were charging westwards to administer yet more chaos. After 30 minutes more, the Poles had had enough and conceded the battle. It was a pretty decisive defeat. The final casualty count amounted to 33 Polish step-equivalents lost against just 7 German step-equivalents. |
||||||||||||||
| 0 Comments |
| Blindés polonais |
|---|
|
Scénario avec beaucoup de blindés polonais. Les allemands (4 compagnies d'infanterie, du génie et beaucoup de Pz I et II) doivent traverser une rivière et prendre deux routes perpendiculaires à la rivière, ainsi qu'une ville adjacente. Au départ, les polonais ont très peu de forces (des miliciens peu enthousiastes) mais dès que les allemands ont fait un peu de dégâts, une brigade blindée arrive en renfort. Trois premiers tours : j'ai séparé les allemands en trois groupes à peu près égaux : deux groupes attaquent les ponts, et le troisième travers avec le génie, entre les deux routes. La milice polonaise est répartie inégalement, surtout en défense de la ville, avec des mines pour protéger le pont. Je joue stupidement les allemands (pour les handicaper un peu) et je les envoie en plein sur les mines. Un AT peut aussi détruire un camion depuis la ville. L'attaque de ce côté est mal en point, mais l'artillerie démoralise les polonais qui tiennent les ponts. Au milieu, les blindés traversent déjà la rivière. Au début du quatrième tour, les renforts arrivent par le nord. La suite au prochain numéro. Au final, les polonais détruisent suffisament de pas allemands, et ceux-ci ne parviennent pas à prendre la ville et les fortifications qui l'entourent. Victoire mineure polonaise. As Vince Hughes explained in the other AAR, germans can clearly hope to win, but they need to prepare meticulously their attack, as always in PzG. |
| 0 Comments |
| It was cool being the Poles but . . . | ||||||||||||||
|---|---|---|---|---|---|---|---|---|---|---|---|---|---|---|
Not one of my favorites. Vince is a geat player, but this is slanted heavily toward the Boche. My train did Ko a PZII platoon, though! |
||||||||||||||
| 0 Comments |