
|
Polish Prussia White Eagles #19 |
||
|---|---|---|
| (Attacker) Poland | vs | Germany (Defender) |
| Formations Involved | ||
|---|---|---|
| Germany |  |
206th Infantry Division |
| Poland |  |
Podlaska Cavalry Brigade |

| Total | |
|---|---|
| Side 1 | 1 |
| Draw | 0 |
| Side 2 | 3 |


| Overall Rating, 4 votes |
|---|
|
3.5
|
| Scenario Rank: --- of 913 |
| Parent Game | White Eagles |
|---|---|
| Historicity | Historical |
| Date | 1939-09-05 |
| Start Time | 00:00 |
| Turn Count | 24 |
| Visibility | Day |
| Counters | 62 |
| Net Morale | 1 |
| Net Initiative | 3 |
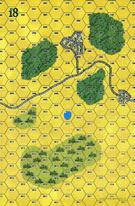
| Maps | 2: 18, 6 |
| Layout Dimensions | 56 x 43 cm 22 x 17 in |
| Play Bounty | 134 |
| AAR Bounty | 165 |
| Total Plays | 4 |
| Total AARs | 2 |
| Battle Types |
|---|
| Road Control |
| Urban Assault |
| Conditions |
|---|
| Off-board Artillery |
| Scenario Requirements & Playability | |
|---|---|
| Eastern Front | Maps + Counters |
| Road to Berlin | Maps |
| White Eagles | Base Game |
| Introduction |
|---|
|
Encouraged by the cavalry raid into East Prussia, the Narew Operational Group decided to repeat the ride on a much larger scale with a full-blown invasion of German territory. This just might, the Polish corps command reasoned, for the Germans to divert some of the mobile forces pressing southward from East Prussia toward Warsaw back to defend their own frontier. |
| Conclusion |
|---|
|
This time the Germans were ready for the Polish invaders, and though the infantry remained relatively unsteady in the face of the Polish lancers they had considerable artillery support. The Poles could not make headway against the heavy shelling, and finally broke off the attack at a cost of 55 dead and wounded. |

|
|
|---|
| AFV Rules Pertaining to this Scenario's Order of Battle |
|---|
|
| Heer |
|---|
|


| Wojska Lądowe |
|---|
|


| 5 Errata Items | |
|---|---|
| Scen 19 |
The map graphic for this scenario is wrong. It should be four maps setup in a vertical rectangle as follows: (clockwise from top left) 18, 19, 15, 17 - all upright. (PG-Tank Dude
on 2010 Apr 30)
|

|
The reduced direct fire value of the Heer HMG became 5-5 starting with Fall of France. (plloyd1010
on 2015 Jul 31)
|

|
The movement allowance on the counters in Airborne is misprinted. It should be "3." (rerathbun
on 2012 Jan 30)
|

|
One unit of Polish Calvary from White Eagles has a printed movement of 5, it should be 6 like the rest. (garbare83686
on 2023 Aug 13)
|

|
Taczankas are not susceptible to the 1 column shift during bombardment for shooting at loaded wagons. (Shad
on 2010 Dec 15)
|
| When Cavalry Isn't Enough |
|---|
|
Map arrangement in book is wrong. It should be four maps setup in a vertical rectangle as follows: Top: 18 and 19, both upright, Bottom: 17 and 15, both upright. Set up Germans in town on roads on all boards. Poles entered on south part of east edge using fields and trees to cover their approach. The Poles surrounded the eastern town on board 17, but the Germans put up a stubborn fight. Ten turns into the game there was still an assault going on in the town while some Polish units had advanced to the western town. The German artillery decimated the Polish cavalry but they were finally able to wrest control of the western town away by turn 21. In the end there wasn't time to capture both roads. A major victory in this scenario for the Poles would be a tough nut to crack as there doesn't appear to be enough time. Regarding victory in general, the Germans held on for a narrow 18-17 minor victory. The German artillery proved to be too much. |
| 0 Comments |
| Ostpreußen Ist Deutschland! | ||||||||||||||
|---|---|---|---|---|---|---|---|---|---|---|---|---|---|---|
IntroductionA scenario I only played at great reluctance. I have no interest in proving what was clear in 1938, that horses and mechanised elements do not complement one another when operating together as a single force. But, my opponent was quite keen, so it was agreed to follow up Flying Carp with Polish Prussia. The Germans need to keep their lines of communication open and kill Polish Lancers. The Poles need to kill Germans and not suffer too heavily doing it. The Germans are limited by the difficult Victory Objectives, the poor quality of their troops, and a paucity of Leaders. Their strength is powerful Divisional Artillery support and a pair of heavy weapons that could tip the balance if handled smartly. The Poles have reasonable mobility, especially compared to their German foe, great troops, plentiful Leaders, and some potent heavy weapons---particularly the 75mm M.97. Cavalry charges hit very hard---apparently the reason my opponent chose this scenario---but are extremely vulnerable to Opportunity Fire. The PlansThe two sides both had solid plans, but once again, the Polish Player gave way to impulse and emotion, wrecking his plan and handing the Germans a chance to inflict staggering losses on the Podlaska Cavalry Brigade, which they promptly did. The GermansThe Germans decided on killing Polish Lancers and holding a single town hex adjacent to the road as being mutually-supporting victory objectives. The Leader situation just doesn't let me risk anything else. The troops are rocky at best, so I need to have plenty of them at hand to accomplish anything offensive. I settle on holding the village in the centre (Hex 1208) and backing that defence with elements in the woods to the West and North. An enfilading position will be set up in the seemingly valueless town hexes to the East (1x Infantry platoon and 1x HMG platoon in 0407). Infantry dig in in front of 1208 (2x Infantry platoons each in hexes 1308, 1309, 1209, 1109). An Infantry platoon, an HMG platoon, and the leIG are in the village proper (Hex 1208). Finally, the 37mm PaK 36 is deployed in the Woods North of the village (1x 37mm in hex 1204). To forestall the Poles simply doing nothing, an Infantry platoon is dug in at the edge of the operational area (hex 0208-17). The idea is simple; draw the Polish Lancers onto the prepared position at 1208 and cut them to pieces. When they try to withdraw, pursue and harass, eliminating any units that fall behind. If the Poles try and clear the South road, the Germans will move to block their line of retreat; it's a very long way to go while taking a pounding from German Divisional Artillery. The PolesThe Poles decide the Germans are right; it's just too far to go to reach the single unit stashed at the edge of the operational area. Instead, they will strike at the weak German infantry platoons, then use the Hit and Run rule (Scenario Special Rule 3) to assure victory. Not exactly an invasion, but for once, it's a prudent plan that has a high probability of success. The Poles will enter along the road and make straight for crossroads position, attacking both the town and the roadblock simultaneously. Once these are cleared out, they will advance and try and flank the German-held village from its open West side, using their superior mobility. If the attack develops well, they will continue it and try and clear the Germans from the road; if not, they will withdraw. The BattleThe Poles had a decided advantage in the quality of their troops and leadership, and it showed. They were one step ahead of German responses throughout the clash, with their Lancer repeatedly slashing into German positions before the Germans could react. The day started well for the Poles, with the Lancers and their Tankette support knocking the German troops about pretty handily at the crossroads. The 75mm M.97 and the two HMGs set up on the German positions pretty quickly, and the fight did last nearly as long as the German command had hoped for. Worse, the Poles rooted out German units in the town hex, even though these hexes had no VP value, which was unusual for the Poles, who generally played the rules, rather than the battle. Fortunately for the Germans, the Polish plan for the German-occupied village was poorly executed---rather like the German defence of the foreward roadblock. The Lancers charged recklessly foreward, rather than re-grouping and moving carefully into a flanking position. Pounded on by artillery and hit with fire from the leIG and the HMG, they were in no position to launch a sustainable assault when they finally worked their way around the German position. The Tankette fell victim to the PaK-37, as did an 81mm Mortar in a Wagon. Direct Fire from German concentrations savaged the Lancers, who were often saved only by their exceptional Morale. The haste with which the attack on the German village was made spelled the doom of the Polish invasion. The Poles quickly became mired in assaults they could not reinforce. Casualties mounted, and the German artillery hammered away at the milling cavalry. Casualties quickly reached unsupportable levels, and the Poles attempted to extricate themselves. More casualties ensued on both sides, until the remaining Polish Lancers took off for the border. Pursuing German troops overran the 75mm M.97, and several already weakened Lancer platoons, but were themselves caught in the open by a Polish counter-attack from the charging Lancers. The slaughter continued until 1200 Hrs. when two sides reeled back, spent, and the guns fell silent. Casualties had been high on both sides, but the Poles had certainly suffered the more for their impertinence. ConclusionPolish losses amounted to 19 Steps, including the Tankette, the 81mm Mortar, and the 75mm M.97 howitzer, along with both Tanczanka platoons and and thirteen of sixteen Cavalry Steps. German losses amounted to 10 Steps, losing both HMG platoons, the leIG, and seven of twelve Infantry platoons. The Poles failed to clear either road, and lost almost twice as many steps as the Germans. With the unit tucked away at the West edge of the board, the Germans control both roads, and have met the conditions for a Major Victory, but it was a bloody one. |
||||||||||||||
| 0 Comments |