
|
Crocodile Rock West Wall #6 |
||
|---|---|---|
| (Defender) Germany | vs |
Britain
(Attacker)
United States (Attacker) |
| Formations Involved | ||
|---|---|---|
| Britain |  |
1st Fife and Forfar Yeomanry |
| Germany |  |
246th Volksgrenadier Division |
| Germany |  |
301st Heavy Panzer Battalion |
| United States |  |
2nd "Hell on Wheels" Armored Division |

| Total | |
|---|---|
| Side 1 | 1 |
| Draw | 0 |
| Side 2 | 4 |


| Overall Rating, 7 votes |
|---|
|
3.43
|
| Scenario Rank: 443 of 913 |
| Parent Game | West Wall |
|---|---|
| Historicity | Historical |
| Date | 1944-11-22 |
| Start Time | 07:00 |
| Turn Count | 20 |
| Visibility | Day |
| Counters | 74 |
| Net Morale | 1 |
| Net Initiative | 0 |
| Maps | 2: 10, 9 |
| Layout Dimensions | 86 x 28 cm 34 x 11 in |
| Play Bounty | 157 |
| AAR Bounty | 141 |
| Total Plays | 5 |
| Total AARs | 6 |
| Battle Types |
|---|
| Hill Control |
| Road Control |
| Rural Assault |
| Urban Assault |
| Conditions |
|---|
| Entrenchments |
| Off-board Artillery |
| Reinforcements |
| Severe Weather |
| Scenario Requirements & Playability | |
|---|---|
| Battle of the Bulge | Maps |
| Beyond Normandy | Counters |
| Cassino '44 | Counters |
| Elsenborn Ridge | Counters |
| West Wall | Base Game |
| Introduction |
|---|
|
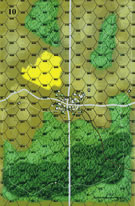
After two months of fighting it looked like the Americans had finally broken the German defenses, with LXXXI Corps decimated and reinforcements scarce. Combat Command B from "Hell on Wheels" was ordered to drive the enemy from Merzenhausen in the morning and reach the open plain beyond. Once there they were to use their mobility to reach the Roer River. |
| Conclusion |
|---|
|
It was a good plan based on the available information, and at first things went well as the terrifying Crocodile tanks devastated the defending infantry and white flags began appearing over some bunkers. For a moment it appeared the enemy was breaking, but then a few unexpected Tiger tanks arrived and destroyed all the Crocodiles. The American infantry then attempted a bayonet charge which was broken up by artillery fire. Eventually the Americans managed to wedge themselves into the western portion of town but could move no farther. |

|
|
|---|
| AFV Rules Pertaining to this Scenario's Order of Battle |
|---|
|
| Army |
|---|
|

| Heer |
|---|
|


| Army |
|---|
|


| 6 Errata Items | |
|---|---|

|
The reduced direct fire value of the Heer HMG became 5-5 starting with Fall of France. (plloyd1010
on 2015 Jul 31)
|

|
Strongpoints are single step units and can be eliminated with X results like any other single step unit. (Shad
on 2010 Dec 15)
|
|
|
The standard mix of strongpoints may be downloaded from Avalanche Press: http://www.avalanchepress.com/German_Strongpoints.php This is the standard mix found in Airborne, Airborne-IE, and Edelweiss Expanded. The strongpoint mix in Cassino '44 is different from that of other PG games. (plloyd1010
on 2012 Feb 01)
|
|
|
Strongpoints are affected by the terrain in their hex just like any other unit.
Even though they can't move, they can attack using Assault Combat if an enemy unit moves into their hex.
They may not dig in or benefit from entrenchments.
(rerathbun
on 2014 Apr 21)
|

|
Liberation 1944's Tiger movement and armor ratings are backwards. They should be Armor 7 and Movement 5. (petermc
on 2014 Feb 14)
|

|
The movement allowance on the counters in Airborne is misprinted. It should be "3." (rerathbun
on 2012 Jan 30)
|
| Blitzed | ||||||||||||
|---|---|---|---|---|---|---|---|---|---|---|---|---|
In this scenario a very outmanned German force is charged with denying the Americans the ability to move quickly up a road, take some high ground and the town behind it. Helping the Germans will be the arrival of two Tiger platoons at some point. The Americans (supported by a British Crocodile platoon) will be moving along a road in some very nasty mud. Up to this point my play of the Americans has shown me little in the way of ability to move quickly. Their attacks have been deliberate with heavy reliance on artillery and massive direct firepower. The distance to cover, the mud, the lack of sufficient transport and the Germans ability to delay the American advance all seemed to argue against an American victory. This is particularly the case since much of the American power is captured in the ample numbers of tanks provided which are totally inadequate in a stand up attack against the reinforcing Tigers. The Germans set up with some forces on the 40 m hill off the road and three delaying forces in the woods along the road. The Americans, forced to eliminate the forces on the hill off road need to divide their force immediately, thus reducing their ability to move quickly through the woods to get to the town. Two companies of Shermans lead the advance and reach the first blocking point (a strongpoint) on turn 2. Normally I would deploy and use the Shermans' firepower to destroy the location but there simply isn't time. With one company in the lead I activate both companies. The lead to assault and the following to move and cross my fingers for the assault. The morale advantage is a big one and the strongpoint is eliminated permitting the second company to leapfrog and move forward. Meanwhile the force sent to deal with the off road hill is having trouble getting set up in the muck and mire. The second delaying point is a platoon of GREN supported by an HMG and the mortars. The American armored cars loop around to their left to approach the mortars from the rear and three halftracks full of American HMGs find their way forward as the tanks keep a wary eye on the Germans. The American HMGs supported by the DF of the halftracks quickly wear down the Germans and a subsequent assault eliminates the German GREN and HMG while the armored cars deal with the mortars. Back on that hill the first German hex is taken and the second flees from the American artillery and mortar fire. The crews of the two Tiger platoons hear some odd noises from their front and resolve to move sometime soon to see what is going on but not quite yet. Back on the off road hill the forces attempt to get back to the road while the armored cars mop up the demoralized German survivors from that fight. The Shermans take the lead again and find the last delaying point in the heavy woods just in front of the town. They use the same tactics as before to eliminate the stronpoint (surviving a close in AT shot in the bargain) while the INF and HMGs which were involved in reducing the second delaying position mount back up and drive up in the rear. As the Americans approach the town the German 75 strikes knocking out one of the Sherman platoons and the Tigers arrive, moving ponderously down the road to get to the town. The 75 is dispatched by an accurate OBA strike (I rolled a 2!) and the Shermans close in and one hex of the town is taken by assault using the Crocodile. The Tigers finally make it to town, mud-spattered and annoyed at having to leave their comfortable laager and start to make the Shermans bleed. It was at this point that my experience with the Soviets kicked in. It wasn't that I had better tanks, I just had an awful lot of them with reasonably high AT values so I shot them all and got one hit on a Tiger. That was enough to Demoralize that platoon and permit the rest of the assaults to go forward. The remaining Tigers and Volksgrenadiers were handled in urban assaults and the town was left with enough wrecks that it would take quite some time to make it passable for vehicular traffic. I found the American force to be much more flexible than I was used to and the leapfrogging attack was a powerful antidote to a delay strategy. The mobility of the American force and the shuttling of transport permitted the Americans to have an overwhelming force available at the town within 12 turns, much faster than I would have expected. The armored cars were quite worthwhile in clearing up the rear. Yes there were plenty of wrecked Shermans surrounding the Tigers but the Americans had complete control of the battlefield and one expects that many of those Shermans were quickly put back into service. I had a blast playing this one. It is very tough for the Germans to win but the process of learning some new capabilities for the Americans made this a great experience. I give it a "5", not for the balance but for the fun of it. The German player has little to do after the initial setup so I would not suggest this for ftf necessarily. |
||||||||||||
| 1 Comment |
| West Wall, scenario #6: Crocodile Rock | ||||||||||||
|---|---|---|---|---|---|---|---|---|---|---|---|---|
West Wall, scenario #6: Crocodile Rock I have just set this scenario up. It looks very interesting and the victory conditions look like fun. The Germans have a small setup force of mixed infantry & weapon units but have strongpoints, terrain, mud, Off-board ART and most important two platoons of Tiger I's coming on as reinforcements at some point. The Americans have a large force Infantry, Armor and off-board artillery but also a British Crocodile Flame tank unit, plus the Americans have two Engineers, one FLM unit to help clear strongpoints and city hexes. To counter the German Tigers when they arrive, they have 3 x M4/76, 4 x M4, 1 x M36 and a 57mm AT gun to help with cross-fire bonus. Now the real problem will be with the time, 20 turns in the mud to slow movement a bit. Posting #2 This was a fun scenario to play. The movement was frustrating at times, due to the Mud. I had to bring on the Americans and the British Crocodile units in two attack groups as the terrain and mud would take too long in a huge traffic-jam to try the one thrust approach. About half went down the road and the other half shirted the woods on the left flank with the clear terrain. The Germans put most of their defenses in the town hexes and a few units as road-blocks in the 40 level hills on the map before the town. The German Tiger tanks did hammer a lot of the American armor but they could not holdup in the town hexes very long, once their own infantry got thrown out. The Americans just had too many resources in Infantry and off-board artillery but needed all twenty turns to achieve their goals. Tiger tanks do not standup in assault combat in town hexes against engineers, especially not the FLM unit where pardon the pun, they really got burned. The Americans won this scenario but I needed all the time to do it. One thing I should have done differently with the German Tiger tanks, is forget helping out the German Infantry in the town hexes, but to just keep them back on the edge of the North-South road and wait out the Americans. It would have been a really close call then. Who knows? This game required maps from Battle of the Bulge, American counters from Elsenborn Ridge and four from Cassino, German counters from Cassino and one British counter from Beyond Normandy. So it wasn’t too difficult to setup. Very enjoyable scenario to try an solve. |
||||||||||||
| 0 Comments |
| A mistake punished | ||||||||||||||
|---|---|---|---|---|---|---|---|---|---|---|---|---|---|---|
This was played over two sessions on Skype v Joseph Ladd. The Germans have to defend a town and road against overwhelming Allied forces but they have the weather (mud),time and two Tiger tanks as reinforcements to assist them. The mud forces to the US to use the road as their main axis of attack. The German player's biggest decisions are over his set up, does he put up a road block of expendable units in an effort to slow the American attack or hunker down in the town and await reinforcements. In my view for what its worth, since I lost this one, is you have as the German commander to put something in the shop window if only to get the OBDA in action. I possibly erred in this game by putting a company of GREN and both 81mm as a blocking force. I lost the 81mm's very cheaply and although one platoon demoralized several Allied tanks including the Crocodile before it was wiped out I perhaps could have just used two platoons of GREN. However halfway through the game I thought I was in a strong position, my Tigers were on the board in front of the town and Joseph's units were pretty strung out. However he had pushed two Sherman's up front alone and unsupported they looked easy meat for the mighty Tiger's. I moved the German monsters up, but alas I had miscalculated and Joseph moved forward with an HMG and I&R platoon, he won the next initiative jumped on them and although lost a step managed to demoralize both tanks. I tried to rescue them by moving a GREN platoon into the assault but regrettably it was two late and US tanks picked of the Tigers as they tried to regain the safety if the town. After that it was reasonably plain sailing of the US commander who timed and managed the final assault very well. *This is a solid scenario, not much for the German player to do once the set up has been sorted but there are enough units and a good balance between time constraints and the American superiority in numbers that the result is not a forgone conclusion * |
||||||||||||||
| 0 Comments |
| Germans Revel In Unbelievable Victory Against 'Hell On Wheels' ! | ||||||||||||||
|---|---|---|---|---|---|---|---|---|---|---|---|---|---|---|
This was played over Skype with Alan Sawyer. It was another in that tough grind that was the 'West Wall'. I have to be honest here and confess that when I saw this scenario had a 0-2 advantage in wins to previous US players, and when looking at the low number of German Volksgrenadiers with a 7 morale, their less than average quality leaders having to face trained US troops with tons of tanks, leaders, OBA, engineers including flame-throwers and Crocodile tanks, I kinda had this pencilled in as a loss. What followed was, for me, a stern test and delivered an exciting result. Merzenhausen had been left to 2 coys from the half-trained 246th Volksgrenadier Division to defend. Low on morale, low on decent leaders and generally low on anything that mattered. They had been promised a bolster to defences in the guise of 2 plns of Tigers, but these were not expected till 0800 hours or after.With 2 battalions of Hell On Wheels GI’s bearing down on them, supported of course by 7 plns of Shermans and Fireflys, Flame-Throwing Crocodiles, Engineers etc, the Volksgrenadiers were being asked to hold the muddy road and Merzenhausen for 5 hours in the face of this onslaught. A tough request ! One platoon of grenadiers were placed southwards to cover the road deployed amongst pillbox positions, behind which mortars and a 75mm Inf.gun pln had been placed. Once battle was joined in earnest, the main focus of the defence would centre around Merzenhausen, and to this end, the rest of the German forces were placed. At 0700 hours, the Americans had been reported approaching from the south along the main highway through the wooded terrain of the Eifel. American I&R coys surged forward in their jeeps rather recklessly and in a well zeroed bombardment, one pln were demolished as they drove straight into the maelstrom of shell leaving a whole lot of mess across the highway. In response, American forces aggressively attacked the forward grenadier pln and pillboxes on the road. Before brushing these aside after a vicious firefight, these German conscripts launched a panzerfaust attack on supporting armoured cars and destroyed them all. For the next half hour, the US troopers had to force the forward enemy defences and this they did well, suffering only some time eaten away and a small loss of cohesion. From 0900 hours until 1000 hours, the battle now revolved around the Americans battling with muddy conditions to get an orderly attack line together. Neither side suffered casualties to speak of during this period and soon, an American line spanned the southern side of Merzenhausen. The Tiger tanks had also reached the defence of Merzenhausen. From 1000 both sides pursued their objectives in determined fashion. At first, the Americans tried to weedle out defenders without losing too many of their own, but this laudible, but ineffective plan patently did not work. There was little aggression from American armour as it suffered ‘Tiger Fright’, and US infantry attacks revolved around firepower rather than up close & personal. The Germans clung in the town, waiting each time for the GI’s to expend their initiative before hitting back with varying results. In the course of this hour, the Americans lost 3 foot steps and an M3 pln and the Germans 4 steps and a pillbox position. But it was not a fast enough erosion of the German positions. With an hour left, the Americans began to finally start ed throwing men headlong into at Merzenhausen. These attacks, supported by engineers and OBA, but not an AFV or flame-thrower in sight caused a lot of damage on the Germans without suffering as much in return. The Germans kept feeding troops into threatened and weakened sectors, and this kept the defence of Merzenhausen alive. The Tigers presence continued to keep US armour at distance and basically out of the battle. This would prove costly as in the end, the Americans ultimately came up short, capturing only half the town and still plenty of road kept open. Victory appeared to be won by using the Tigers to keep US armour away and also relied on American hesitation at losing troops. As casualties were not an issue in deciding victory, it surprised the Volksgrenadiers to find themselves not feeling the full weight of Combat Command B upon them. For me, it was this paucity of TOTAL US resources that cost the Americans victory. The few turns eaten up at the start of the scenario with the roadblock units should not be forgotten either. These may well have 'bought' as many as 3 turns..... 3 turns that I would not like to have had to hang on for at the end. Alan I believe, will blame the mud and the toughness at capturing a town, but his higher morale against conscripts, and the fact that casualties were not an issue should have led to a far more vigourous attack. Of course we spoke about this after the game, and I know Alan disagrees, but ............... ??? |
||||||||||||||
| 2 Comments |
| American quantity over German quality | ||||||||||||
|---|---|---|---|---|---|---|---|---|---|---|---|---|
This scenario is probably best played solo because, aside from the tank reinforcements, there's not much for the Germans to do except hunker down and try to hold on. I set up the Germans in small groups in the woods along the road, hoping to slow the Americans down by forcing them to attack each group separately. The Germans got a fair draw of leaders, and a poor draw of strongpoints -- none of the strongpoints had an anti-tank value. Each German strongpoint was supported by one or two platoons of infantry and a leader. The Americans entered along the road, strung out in column. They reached the first strongpoint on turn 3 and split their forces, attacking it with half and bypassing it with the other half, which moved on to the next strongpoint. The Americans overwhelmed the first two strongpoints with massive amounts of firepower and managed to cut off the retreat of the supporting infantry, keeping them from falling back to support the remaining strongpoint. In the meantime, the German reinforcement of Tiger tanks arrived and dug in on the northern map between the fields and the woods, supported by the German anti-tank guns. The Americans quickly cut off and defeated the third strongpoint just as they had the first two. After a brief pause to reorganize, the entire force closed with the Tigers, using the town, field and woods as cover and eliminating the German anti-tank guns on the way. Once they were all in place, the entire force charged the dug-in Tigers. Several platoons of infantry dropped out due to step losses and demoralizations, and the Americans lost 3 tank steps, but the numbers were just too overwhelming for the Tigers to drive them all back. The Americans tied up the Tigers with infantry assaults while their tanks fired at them from adjacent hexes with crossfire bonuses. They lost some more infantry in the assaults, but wiped out the Tigers in four turns. American victory with time to spare. The Germans were hurt by the bad strongpoint draws. The lack of German anti-tank strongpoints meant that the Americans could approach right up to them with tanks and halftracks and overwhelm them with firepower. The Germans were also hurt by the lack of open space on the maps. The Americans were able to approach the Tigers and anti-tank guns under cover, and only had to face the Tigers' firepower for one turn before tying them up in assaults. It seemed to me that the Americans have too much time, too much cover, and way too much firepower to make this scenario competitive for the Germans. If I were to try it again, I'd try to set up the strongpoints closer together so they could provide some support for each other, but I doubt it would change the outcome. |
||||||||||||
| 0 Comments |
| Interesting scenario that is stuck in the mud. | ||||||||||||||
|---|---|---|---|---|---|---|---|---|---|---|---|---|---|---|
On paper this scenario looks like a push over for the Americans, but there are several factors that that can prove difficult for them. First the conditions directly against them. The victory conditions are all on the Americans to win and the Germans to lose. Clearing the road, town and hills will require the Americans to kill all of the Germans to win as well as the American advantage of speed is limited by mud, slowing their advance and eating time in the scenario. The second set of factors depend on the deployment of the German troops. Although they are second rake troops they do have value in defense given the VC's. They will have two choices, mass together at the strongest point or disperse and fight a guerrilla battle. But given the mud and amount of American troops, guerrilla tactics would probably fail, so massing in the strongest terrain makes the most sense. So the Americans must prepare for a long mud march and then a town assault. The march consumes most of the first half of the game which is more of a logistics test as the Americans don't have enough M3's and Jeeps to get the troops forward. I need to resort to a shuttle system to get the troops across the boards. Eventually, most of them made it there, but it is a slow process. Once to the town, the Americans need to deploy to assault, but by this point the Tigers have arrived and embedded themselves into the town making is harder to deploy and despite the German desire for a heading tank charge to tackle the Tigers, this is 100% disaster for the Americans in any battle. So, it was up to the "bloody infantry again". Deploying and fixing bayonets that assault into the town. Once into the fight the assualt start to destroy German troops, but the OP and the OBA from the Germans score key hits on FLM units and leaders. This required time to recover and redeploy. Slowing the Germans are whittled down. But as always there is never enough time. |
||||||||||||||
| 1 Comment |
I guess the developer was trying to capture the weariness of the American forces through the boggy/muddy terrain during late November. It certainly bucketed it down and made conditions difficult in real-life .... It seems you could almost feel your own boots getting sucked into the quaggy !
I'm going to confess to having enjoyed this as ftf as the German. It was very tough, but a lot of fun. I do very much enjoy reading AAR's of battles I have already played.