
|
Filling the Gaps West Wall #4 |
||
|---|---|---|
| (Attacker) Germany | vs | United States (Defender) |
| Formations Involved | ||
|---|---|---|
| Germany |  |
12th Infantry Division |
| United States |  |
1st "Big Red One" Infantry Division |
| United States |  |
746th Tank Battalion |

| Total | |
|---|---|
| Side 1 | 0 |
| Draw | 1 |
| Side 2 | 4 |


| Overall Rating, 5 votes |
|---|
|
3.4
|
| Scenario Rank: 460 of 913 |
| Parent Game | West Wall |
|---|---|
| Historicity | Historical |
| Date | 1944-09-16 |
| Start Time | 10:00 |
| Turn Count | 12 |
| Visibility | Day |
| Counters | 56 |
| Net Morale | 0 |
| Net Initiative | 0 |
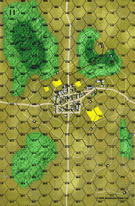
| Maps | 1: 11 |
| Layout Dimensions | 43 x 28 cm 17 x 11 in |
| Play Bounty | 145 |
| AAR Bounty | 147 |
| Total Plays | 5 |
| Total AARs | 5 |
| Battle Types |
|---|
| Inflict Enemy Casualties |
| Meeting Engagement |
| Urban Assault |
| Conditions |
|---|
| Off-board Artillery |
| Scenario Requirements & Playability | |
|---|---|
| Battle of the Bulge | Maps |
| Elsenborn Ridge | Counters |
| West Wall | Base Game |
| Introduction |
|---|
|
The German 12th Infantry Division had become known as the Wild Buffaloes for their aggressive advance in Operation Barbarossa. The division had been thought destroyed in Russia in July, but a large number of survivors worked their way back to the unit. By mid-September the unit was over-strength, with an additional 2,000 men in training. Though originally ordered to assemble fully before being committed to combat, upon arrival at Aachen the situation had turned so desperate that a convoy of civilian buses, cars and mail trucks rushed them to attack the advancing enemy. |
| Conclusion |
|---|
|
The Wild Buffaloes managed to eject the lead elements of the 1st Infantry Division from Verlautenheide and halt all forward progress there. They then pushed on to the Siegfried Line near Munsterbusch where the 9th Panzer Division had been holding out in their pillboxes. Due to his poor performance the 9th Panzer Division commander was relieved of duty and 12th Infantry assumed control. It had been a banner day for the Wild Buffaloes as they had filled a void in the German lines and would frustrate the Big Red One at Verlautenheide for another week. |

|
|
|---|
| AFV Rules Pertaining to this Scenario's Order of Battle |
|---|
|
| Heer |
|---|
|


| Army |
|---|
|


| 2 Errata Items | |
|---|---|

|
The reduced direct fire value of the Heer HMG became 5-5 starting with Fall of France. (plloyd1010
on 2015 Jul 31)
|

|
The movement allowance on the counters in Airborne is misprinted. It should be "3." (rerathbun
on 2012 Jan 30)
|
| Filling the Gaps | ||||||||||||||
|---|---|---|---|---|---|---|---|---|---|---|---|---|---|---|
This scenario was chosen as an introduction to PG for a newbie to the system but an old ASL FtF chum. I thought this scenario was better that some of the very small scenario's as a first game because there are enough units to show PG's excellent simulation of command and control, some artillery, AFV's yet still one map and just 12 turns. Also it is a bit of a slugfest as all the action will be in the large town in the middle of the map. Two fairly equal forces in a meeting engagement battle over a town on the borders of Germany. The Americans have an I&R platoon with a leader in the town, who can call artillery down on the advancing Germans, in this game this slowed the Germans enough to let the Americans into about half the town first, the game then settled down to a series of assaults with the odd little flank movement by the German's in an attempt to get behind the US forces. In the town the Panzerfaust's took out the Yanks Sherman's but the poor Grenadiers in turn were badly cut up the the tankers infantry escort. Town assaults are often slow grinds with units disrupting then recovering while new units are fed into the meat grinder. By the end of the game the US controlled two thirds of the town with assaults still going on in all but one other town hex. As we counted out the step losses which we did twice at is was so close the final result in VP was a minor US victory by 1 VP. This scenario gets a high score from me because it did what I wanted it to do, gave my friend a real taste of PG in a simple scenario. For two more veteran players the lack of subtly in game play would mark this one lower. Oh, and for the record the newbie won. |
||||||||||||||
| 0 Comments |
| Wild Buffaloes & The Westwall In A Simple Straight-Forward But Exciting Scenario | ||||||||||||||
|---|---|---|---|---|---|---|---|---|---|---|---|---|---|---|
This game was played head-to-head with Wayne Baumber over Skype and represents our eighth chronological visit to the battles on the Siegfried Line. Thus far, the previous seven had been about the Germans defending the Vaterland, but with the arrival of their famous 12th Wild Buffaloes Infantry Division, the Germans were now going to be able to add some offensive punch for a change. The battle revolves around the town of Verlautensheide (not too far from Aachen), and despite the oft heard maxim that town fighting in PG is not that exciting, this provided us with a very very entertaining scenario The scenario, like an NFL match really was split into four distinct quarters. The first quarter had both sides rushing and jostling for as much of the town as they could grab. The second quarter had the Yanks gaining the upper-hand with a particularly powerful stack doing the damage. In the third, the Germans fought back into contention and slightly ahead, with the final quarter having the Americans doing all they could to hang on for a draw and perhaps even a minor win. Perfect type of scenario really ? Quick ! Into The Town Men !About 1000 hours at Verlautensheide an American recon platoon had gone forward to scout the town. Finding it empty initially, they must have felt some shock indeed when reaching the south end of town they spotted a German battalion in strength advancing straight towards them about a kilometer away. This enemy battalion was from the Westwall’s newest arrivals, the experienced 12th Infantry Division, ‘The Wild Buffaloes’. These were here to give the Westwall defenders some offensive punch and Verlautensheide was their first target. The US recon platoon gamely stayed in place as the enemy advanced and waited on their own troops that were now racing forward to assist. As the ‘Buffaloes’ closed, the US 47th Infantry recon platoon’s fire disrupted the lead enemy engineer platoon, but these Germans were soon in the south end of the town and were swarming over the hapless recon platoon. This fight proved short and sweet as the recon troops were very soon completely over-powered. The Amis Gain The AdvantageAt the north end of town, US troops were now pouring and trying to fix-up ad-hoc offensive units to throw into the impending street-battles. Using a platoon of M4’s, a powerful group was sent into one section of Verlautensheide. The Germans, though looking well-positioned were soon under attack from the company sized American task-group, and with the help of the M4’s and supporting M3 HMG fire they were inflicting heavy losses on The Buffaloes. In fact, 4 steps were lost in between 1045-1100, a number that could not be borne for too long by the Germans. To counter this, the Germans sent in some MG and Engineer troops. Now these two opposing groups would keep each other honest for the rest of the battle, resorting to light skirmishing for fear of inflicting a mutual blood-bath on each other. The US foot platoons here had also tired after their earlier exertions and needed to re-group too. Things Begin To Even OutAround this central and pivotal face-off, the rest of Verlautensheide experienced the battle as the Germans, who now controlled the bigger portion of the town continued to push against the Amis. One area fell to the Buffaloes when accurate well-directed fire-groups completely wiped out a US platoon thus allowing the Germans to take over those particular streets and buildings. Elsewhere, a US OBA spotter section directed accurate artillery strikes on German mortar platoons situated further back in woodland practically ending the German mortars effectiveness in the battle. On the east side of town, US troops were continually harried by German fire and this left them unable to support other US efforts effectively. The Germans 'Buffaloes' Go For VictoryIn the closing stages in which the Germans could now be said to have had the edge, albeit not enough to claim victory yet, the Americans tried one more opportunistic grab at a section of the town that almost completely back-fired. Two US Infantry platoons launched a risky attack on German positions that were well-set in the buildings. It seemed a good idea initially until the German defenders must have completely outwitted the Amis in the assault, inflicting losses on them and demoralizing the rest. Now, trying to grab a last gap victory, the Buffaloes counter-attacked here. Despite their poor state, these hard-pressed GI’s must have realised how desperate the result would be. They miraculously managed to avoid any serious losses in the German counter-attack and clung on desperately despite their fragile morale. They refused to disintegrate and held on. The struggle for Verlautensheide ended in a draw with the Germans just ahead, but not enough to claim any victory. Final points tally was Germans 18 points, Americans 15 points. This scored a very high 4 from the pair of us. Though nothing special in innovation, the balance appeared good and the situation tantalisingly on edge. Especially for 2 player games There were parts of the battle where we both said "if only if", but hey ! They balance out. Introduce a newbie with this one, or better still, two newbies against each other |
||||||||||||||
| 0 Comments |
| Return to Verlautenhiede Filling the Gaps 2 | ||||||||||||||
|---|---|---|---|---|---|---|---|---|---|---|---|---|---|---|
This was a Skype FtF against Vince Hughes. I have played this before as an intro to PG for a newbie. This is a meeting engagement between two roughly equal forces played on a single map VC's are gained for town hex control and step losses. As the town is in the centre of the map the game follows a rather predictable pattern with a rush for the town followed by a short range battle of attrition. However this was an exciting and tense battle right to the last turn hence the high rating. As the US player my plan was to create a "killer stack" of a single M4,M3,HMG and INF with my best leader which would simply assault their way through the town I would feed reinforcements into this stack as required to replace INF casualties as and when required. This plan worked initially and caused the German commander to respond in kind result a stalemate eventually with both sides unable to attack for the fear of the result. I had had a lot of luck initially with German friendly fire causing casualties and coupled with my first assault being a success I was ahead by halftime (6 turns). The German commander then used his advantage in leaders (Alan had rolled for Vince a 2 morale leader and two 2 fire leaders) the former pushing German morale to 10 and the latter combing to make a strong fire group which would slowly blast away at any adjacent US force pushing them out of town hexes and causing step losses. The final turns saw some anxious VP counting on my part and I launched a late counterattack in effort to steal a town hex back or at least deny it to the enemy. This failed as in the assault all my units were demoralized thus not making the town uncontested (see Consim World PG forum for some arguments for and against this). Vince then bombarded the hex in an attempt to get more step losses, he was unlucky as both unit hung on with good morale rolls. At game end the Germans were just 2 steps short of victory thus a draw was as fair result. A great game, the only thing to step this getting a 5 rating was the scenario's predictability. |
||||||||||||||
| 0 Comments |
| Filling the Gaps WW#4 |
|---|
|
The Recon platoon set up in the southern most hex in town. Both sides entered in column. The axis lead with two companys each led by a platoon of engineers. Dispite having one platoon slow down due to being disrupted on a forced march (See PzGren optional rules on the web site.) the US were able to beat the axis into town because of winning the iniative twice. The axis had been able to get all support in place and have all the infantry adjecent to town hexes but could not enter. Opportunity fire on the advancing Americans was ineffective. Consequently the U.S. had the Axis in the open at close range. At 010.00 a special event caused one of the defending Infantry units to move to a new postion. This did not effect the main defense. The axis now assaulted the southern most town hex. Despite leading with an engineer the Axis could not dislodge the Americans. Although disrupted they were able to bring in reenforcements to hold the hex. At 1015 the Axis failed their morale check and could not assault. In the mean time the other Axis platoons were suffering point blank fire from the other US postions in the town causing several step losses and demorlizations. Over the next several turns both sides exchanged fire and reinforced the assault in the southern most town hex. The axis was having problems getting another assault organized because of all the disruptions and demorlizations. Every time one unit would recover another would get hit and fail a morale check. Although still maintaining a position adjecent to the village they just could not seem able to get enough recovered to have a go at another hex. During the strech between 010:30 and 12:30 the axis did inflict several step losses on Allied units with long range HMG fire. Unfortunatly for the Axis they had no infantry in good order next to the target to follow up with an assault. By 12:30 the axis had lost 7 steps including two engineers and the Allies had only lost three. Two of them to long range HMG fire. Although they had made no headway in the assault on the southern most town hex the Axis sent two platoons into the adjecent hex for an assault. Another step was lost and all became disrupted and demoralized. The allies only had one platoon disrupted. At this point it was 1300 with only one hour left. Due to heavy casulties the Axis retired. This scenario was decided when the US beat the Axis into the town. It left the axis in open ground right under the US guns. Had the Axis won the race into town most of the fighting would have been INSIDE the town with a much more uncertain outcome. |
| 0 Comments |
| On the outside looking in... | ||||||||||||
|---|---|---|---|---|---|---|---|---|---|---|---|---|
This scenario will almost always come down to a single roll. If the Americans win the initiative on Turn 3, the Germans will have to assault to get into the town. If the Germans win the initiative on Turn 3, you can have a battle as the Germans will occupy several of the ungarrisoned hexes of the town. The Americans start with a recon platoon in the town. The Germans start out in a large body to the south of the town. American reinforcements arrive on the first turn and some of the mechanized forces (an M4 and an M3) can get into the town to support the recon platoon on that first turn. The remainder of the American forces will rush down the road to get to town. At the end of the second turn the Germans will be closing in on the town and the American forces will be on the northern outskirts of town. Then comes the all important Turn 3 initiative roll. In my case it went to the Americans for one activation. The arriving troops fanned out throughout the town and kept the Germans from plowing in. The Shermans were particularly effective in Opportunity Fire and then received infantry support to avoid being assaulted at a disadvantage. The Germans were able to enter two town hexes but were unable to establish a strong presence. At the end of Turn 6 the score was US 22 Germans 0. With losses mounting and no firm hold anywhere (and being substantially outnumbered at that point) the Germans called off the attack. There simply was no hope of improving the situation. I give this one a "2". If the Germans had been able to enter the town on Turn 3 I think this might have ranked somewhat better. While I dislike the knife edge nature of the single die roll it certainly gave me a strong impression of what it means to lose the race to a key objective. |
||||||||||||
| 0 Comments |