
|
The Lighthorsemen Waltzing Matilda #8 |
||
|---|---|---|
| (Attacker) Japan | vs | Australia (Defender) |
| Formations Involved | ||
|---|---|---|
| Australia |  |
1st Cavalry Division |
| Japan |  |
Cavalry Group |

| Total | |
|---|---|
| Side 1 | 0 |
| Draw | 0 |
| Side 2 | 1 |


| Overall Rating, 1 vote |
|---|
|
3
|
| Scenario Rank: --- of 913 |
| Parent Game | Waltzing Matilda |
|---|---|
| Historicity | Alt-History |
| Date | 1942-10-01 |
| Start Time | 07:00 |
| Turn Count | 20 |
| Visibility | Day |
| Counters | 143 |
| Net Morale | 0 |
| Net Initiative | 0 |
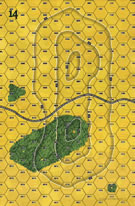
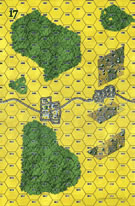
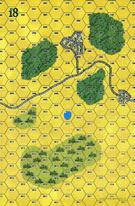
| Maps | 6: 14, 17, 18, 25, 4, 5 |
| Layout Dimensions | 86 x 84 cm 34 x 33 in |
| Play Bounty | 206 |
| AAR Bounty | 171 |
| Total Plays | 1 |
| Total AARs | 1 |
| Battle Types |
|---|
| Inflict Enemy Casualties |
| Meeting Engagement |
| Road Control |
| Conditions |
|---|
| Off-board Artillery |
| Randomly-drawn Aircraft |
| Scenario Requirements & Playability | |
|---|---|
| Afrika Korps | Counters |
| Eastern Front | Maps |
| Elsenborn Ridge | Maps |
| Guadalcanal | Counters |
| Road to Berlin | Maps |
| Waltzing Matilda | Base Game |
| Introduction |
|---|
|
While Australia's Diggers performed exceptionally well on the Western Front, it was the Light Horse that captured the public's imagination. All surviving Light Horse regiments were part of the Militia, with most of them grouped in two cavalry divisions that eventually converted to armored units. A Japanese invasion would eventually have to tackle the continent's more heavily populated areas, and there they could expect to meet even fiercer resistance. |
| Conclusion |
|---|
|
First Cavalry Division would be converted to First Motor Division in mid-1942, and later to Third Armoured Division. With Japanese invasion imminent, the lighthorsemen probably would have kept their mounts and been deployed to bar the road to Canberra. The Australian Army would not have had the luxury of time to complete the conversion and, with the already tenuous supply line to the United States cut before the invasion, would have lacked sufficient trucks to motorize the division. But the horses would have remained ready and able to ride into battle just like their sires had in Palestine. |
| Additional Notes |
|---|
|
Players should make extra copies of the both Australian and Japanese pieces from Waltzing Matilda to provide all the units needed for the scenario. |

|

|
|---|
| AFV Rules Pertaining to this Scenario's Order of Battle |
|---|
|
| Army |
|---|
|


| Imperial Japanese Army |
|---|
|


| Lighthorsemen Live Up to Their Fathers | ||||||||||||
|---|---|---|---|---|---|---|---|---|---|---|---|---|
This is a large cavalry meeting engagement where each side is trying to control the two east-west roads. Since I was playing solo and not trying to 'win,' I decided not to use the 'gamey' tactic of sending single units to 'hold' sections of the road without support. Each side would try to drive the other back rather than just running around them. Both sides spread out and raced for the center of the field to get control of as much road as possible. They met pretty much in the middle. Since the Scenario Conclusion mentions that the Lighthorsemen were being used to "bar the road to Canberra," I kept them on the defensive as the Japanese attacked. Since the Japanese did not have the leadership to win a firefight (very few Combat Bonuses among the Japanese officers), they used their off-board artillery to soften up the Aussies and charged. The charge was largely broken up by Opportunity Fire, but a goodly number of the Japanese horsemen got through. Once the cavalry mingled in assaults, it settled down to a long slogging match and neither side could really push the other back. Casualties mounted on both sides. As the cavalrymen mixed it up, the Japanese Ho-Ni's chased the Australian armored cars. The Australians had no anti-tank capability at all (unless you count off-board artillery), so the armored cars could not afford to get tied down in assisting assaults where the slower Ho-Ni's could track them down and pick them off. The Ho-Ni's kept the armored cars on the move and prevented them from supporting the cavalry. In the end, neither side was able to move the other back. The battle ended where it began, in the middle of the board with both sides blocking the other from advancing. They were pretty evenly matched. With each side holding the same amount of road, the scenario came down to casualties. Due mostly to the Japanese losses to Opportunity Fire, and some good die-rolling with the Australian off-board artillery, the Lighthorsemen were able to get the win. Minor Australian victory Despite it's being evenly matched, I ranked this as a '3.' Due to the number of units and the large field of play, I wound up with lots of groups spread out over a large area. Even with Fog of War, each turn took a long time to complete. It seemed like a lot of work for not much movement on the field. Perhaps if I'd kept the cavalry more mobile instead of tied up in assaults I'd have enjoyed it more. If you like cavalry and large scenarios, (and can handle cavalry better than I do) you'll probably enjoy this one very much. |
||||||||||||
| 0 Comments |