
|
Steel Springs Waltzing Matilda #6 |
||
|---|---|---|
| (Attacker) Japan | vs | Australia (Attacker) |
| Formations Involved | ||
|---|---|---|
| Australia |  |
1st Armoured Division |
| Japan |  |
4th Tank Division |

| Total | |
|---|---|
| Side 1 | 1 |
| Draw | 0 |
| Side 2 | 1 |


| Overall Rating, 2 votes |
|---|
|
5
|
| Scenario Rank: --- of 913 |
| Parent Game | Waltzing Matilda |
|---|---|
| Historicity | Alt-History |
| Date | 1942-09-01 |
| Start Time | 08:00 |
| Turn Count | 32 |
| Visibility | Day |
| Counters | 251 |
| Net Morale | 0 |
| Net Initiative | 1 |
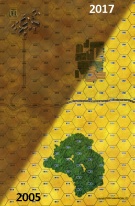
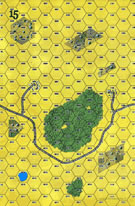
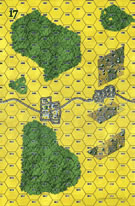
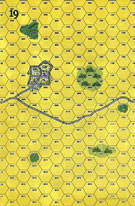
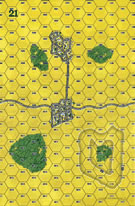
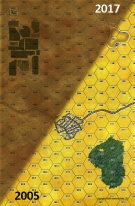
| Maps | 6: 1, 15, 17, 19, 21, 4 |
| Layout Dimensions | 86 x 84 cm 34 x 33 in |
| Play Bounty | 238 |
| AAR Bounty | 165 |
| Total Plays | 2 |
| Total AARs | 2 |
| Battle Types |
|---|
| Meeting Engagement |
| Conditions |
|---|
| Off-board Artillery |
| Randomly-drawn Aircraft |
| Scenario Requirements & Playability | |
|---|---|
| Afrika Korps | Counters |
| Eastern Front | Maps |
| Guadalcanal | Counters |
| Road to Berlin | Maps |
| Waltzing Matilda | Base Game |
| Introduction |
|---|
|
Western Australia featured two deepwater harbors: Fremantle with its major base facilities and Albany, once the state's major port but less well-defended. A Japanese lodgment there, though far from other bases, could only have been removed through a major effort. Australian forces would have to move quickly to stamp out the beachhead, while the Japanese would make an effort to expand their holdings with mobile forces. |
| Conclusion |
|---|
|
Japanese designers did not actually begin work on the Type 3 until 1943, though they completed it very quickly. With German experience on which to draw, and a commitment to increasing their mechanized forces, the tank probably could have been made ready much earlier. Whether Japanese industry could have produced enough of them to make a difference is another question. |
| Additional Notes |
|---|
|
Players should make an extra copy of the Japanese pieces from Waltzing Matilda to provide all the Japanese units needed for the scenario. |

|
|
|---|
| AFV Rules Pertaining to this Scenario's Order of Battle |
|---|
|
| Army |
|---|
|


| Imperial Japanese Army |
|---|
|


| 1 Errata Item | |
|---|---|

|
Counter K has a direct fire value of 6-5 on the step-loss side. It should be 3-5. (rerathbun
on 2011 Jan 30)
|
| Waltzing Matilda, Scenario #6: Steel Spring | ||||||||||||
|---|---|---|---|---|---|---|---|---|---|---|---|---|
Posting #1 Right now, I have Waltzing Matilda, scenario #6: Steel Spring, on the table. 6 map boards, tons of units, as the Japanese try to take Western Australia with Later model tanks, lots of Infantry and supporting units and the Australians defend with Lend-Lease American tanks, some British stuff as well and a lot of Infantry. Lots of battle area, so armies will have to divide into at least three groups each. Managing Infantry and armor in this battle while taking victory objectives and knocking out enemy units, is not going to be an easy task for either side. Well, I'll be playing this monster all week and will post as I have time. Posting #2 Try to organize my units for setup! I didn't have to make two copies of Waltzing Matilda to play, one will work, as I was only short a few Japanese trucks, which I just borrowed some Italian Truck counters. Also, my home-made counters match up great to the die-cut, in size, thickness and everything. Cool. Post #6 The next couple of turns will be very interesting. The armor will start having effects on each other. Huge amounts of Armor and Infantry on both sides and both sides are very mobile but still, so much territory for both armies to cover. The boards are evenly divided, so both sides now control 16 town hexes each. Posting #7 Really too much going on right now, on this large battle field, to get into too much detail. But the armor is fully engaged and once this whittles down a bit more, the Infantry will play a bigger part trying to secure town hexes on all the maps and maybe getting more combine arms attacks. Both side are losing armor, the Australians do have armor efficiency, helping them even out the greater quantities of Japanese armor but still, this could go either way. The Infantry units are just starting to rub against each other and both sides and are taking hits, with off & on board artillery, aircraft & each other. Man I love this stuff. Step losses and town hexes both figure into victory. I assume at some time, this large battlefield will settle down a bit and smaller strategies can be had or determined, for now, it's a head-on collision! Posting #8 Right now, I am not sure what units to leave behind to defend my existing town hexes and which units to advance and try and take more and not leave exposed openings. And this is true for both sides, as this is a head on engagement. Posting #9 No time to post any pictures tonight but I did get some playing time in. The armor on both sides, are starting to get weeded out a bit but there is still a boat load, but give it few more turns and it won't be so. The infantry are also starting to engage in a few more locations. Right now, the Japanese have the advantage in the center group, the Australians have it with the Western Group and with the Eastern Battle Groups it is anybodies game. The Australian have the overall advantage with Victory Point, gaining more step loss VP's. But if the Japanese knockout too many more Australian Armor steps, they will be able to bring more punch to their fight. This is still anybodies game. I am going to have to count total step losses after the game, as it's getting difficult to keep track of. Cool stuff! Posting #10 The battle is still raging! The last turn wasn't so good for the Australians but in the game, they still have the advantage in Victory Points. Both sides have lost about half their armor and both sides are engaging and losing Infantry & APC steps now, including a leader. There still seems to be no clear winner, but the game is still early, which makes play very interesting. Many decisions still to be made. Posting #11 The Victory points are about even currently but the Australians have lost too much armor in my view and separated too much from their Infantry while the Japanese are currently using their combined arms ARM/INF better. Of the three main battle areas, I would say the Japanese are winning two out of three. There is still too much battle to be played but the Australians need to regroup some how, they are more defensive with the exception of the large forest in the middle of the battlefield which is raging, with bullets flying. Posting #12 The main battle seems to be for the Australian controlled town in the West and the forest area in the center. I am not sure how both sides got the majority of their infantry tangled in a non-victory hex location but the Japanese are starting to get control of the forest and are breaking much of their armor away from there and heading to the western town, where the next strongest Australian battle group is. The Australians are also gathering their remaining armor in the west for one last show-down. The whole campaign could hinge on this western town but the attrition factor, as far as step losses will be a factor both sides still have to watch as well, besides the town hexes controlled, which is still even at this time but could change any turn now. In the East, the Japanese have the Australians contained. So the whole battle could ride one the next 3-5 turns. It's starting to get easier to move counters around on the board now, as there are 46 less units/counters on the board, eliminated that is. Of course the markers are more. Interesting, I had the Japanese roll a 3X result in Assault Combat against the Australians. They rolled a 6 on the dice with 20 combat factor, had a Leader modifier, a Japanese INF Modifier and in open terrain, bring the result to the far bottom right on the Assault Combat Chart, a 3 result. Talk about wiping out a stack of good Australian units with Leader. Posting #13 Oh Australia! Army Western Australia is radioing Sydney asking for reinforcement! The Japanese have the East bottled up as a toy, the Center forest group has been routed and the big town in the West is about to be streamed rolled by the Japanese released from their victories in other sectors. Those new Type 3 tanks were a nasty surprise. Maybe I can bring some rearguard Australian units up, that were guarding exposed town but that would leave them open for the Japanese to just walk right in. This could all be over in a couple more turns, even though there are many left, we’ll see? Posting #14 With the Japanese winning by a total of 144 points to 120 points, I may call the game sooner, as they have over a 21 point advantage for a major victory and they are about to take both the Western & Eastern towns on the Northern boards. I may push the counter around for a few more turns, to see what happens? I played one more turn and a few steps were lost on both sides with assault combat but the overall picture didn’t change. This one will go down as a major Japanese Victory. Very fun play! I am looking forward to playing many more from this supplement, very enjoyable. I highly recommend it, download and all. Also, you really don't need to print off two complete counters sets, as you can sub most of the extra's from other games, mostly trucks. One set will work and that is all I would ever want to make myself. The missing postings were all pictures postings. |
||||||||||||
| 0 Comments |
| A Spring Too Far | ||||||||||||
|---|---|---|---|---|---|---|---|---|---|---|---|---|
Having read Jay Townsend's AAR, I decided to try something slightly different. Both the Australians and Japanese deployed in two groups instead of three. They moved forward on the east and west wings to take advantage of the spur roads off the main east-west roads. Tanks were split between the two groups and lined up on the center side of each advancing column. Both sides advanced and quickly occupied the towns on their side of the board. Here the two sides' strategies diverged. The Japanese advanced aggressively, while the Aussies waited in the towns to receive the attack. The Japanese quickly got into the town on the west side of the board, opening assaults in two of the town hexes. The eastern town was farther away, and they advanced to threaten it without moving immediately to assault. The strategy was to hold the Australians there in place pending the success of the western assault. If the western assault was successful, they could move up and assault the town (hopefully weakened by reinforcing the western town). If the assault failed, they could cover their own eastern town and send troops to assist in holding any counterattack. Meantime, the tank forces converged on the center and opened an epic tank battle. Japanese numbers faced Australian armor efficiency. Both sides took casualties, but the Japanese got the worst of it. The Australians were helped by the heavy armor of the Grants (most of their casualties came from among the Honeys). What really hurt Japan was the difference in marksmanship. The Australians did pretty well, while the Japanese tank gunners were shooting like they'd just discovered Australian beer. Once the Australians got the edge in numbers, the battle got even more lopsided and the Japanese had to run. The Australian infantry in the town were able to hold their own on the defensive and eventually the Aussies were able to reinforce the town with tanks freed up from the tank fight in the center. Once the tanks arrived, the Australians pulled their APC's and Bren carriers out of the assault hexes and used anti-tank fire from adjacent hexes to make short work of the Japanese APC's supporting the assaults. Once the Japanese light armor was destroyed, the Australian armor moved back in and cleaned up. It took several hours (those Japanese are tough), but eventually they cleared all the town hexes. The Japanese on the right (east) wing pulled back to cover the towns in the south, but were unable to cover them all. They abandoned the two small villages in the southwest. They also lost the two towns in the center to assaults from Australian infantry and armor. They ended the game holding only the larger town in the southeast. Japanese casualties (mostly tanks) greatly outnumbered Australian casualties and, combined with the loss of the towns, resulted in a Major Australian Victory, and rock-bottom scrap metal prices for the next several years. |
||||||||||||
| 0 Comments |