
|
Dutch Treat Waltzing Matilda #3 |
||
|---|---|---|
| (Attacker) Japan | vs | Australia (Attacker) |
| Formations Involved | ||
|---|---|---|
| Australia |  |
2nd Armoured Division |
| Japan |  |
2nd "Geki" Tank Division |

| Total | |
|---|---|
| Side 1 | 0 |
| Draw | 0 |
| Side 2 | 1 |


| Overall Rating, 1 vote |
|---|
|
4
|
| Scenario Rank: --- of 913 |
| Parent Game | Waltzing Matilda |
|---|---|
| Historicity | Alt-History |
| Date | 1942-08-01 |
| Start Time | 08:00 |
| Turn Count | 30 |
| Visibility | Day |
| Counters | 227 |
| Net Morale | 0 |
| Net Initiative | 0 |
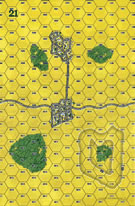
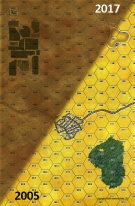
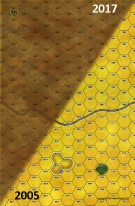
| Maps | 8: 1, 15, 18, 19, 21, 4, 5, 8 |
| Layout Dimensions | 112 x 86 cm 44 x 34 in |
| Play Bounty | 242 |
| AAR Bounty | 171 |
| Total Plays | 1 |
| Total AARs | 1 |
| Battle Types |
|---|
| Exit the Battle Area |
| Meeting Engagement |
| Conditions |
|---|
| Off-board Artillery |
| Scenario Requirements & Playability | |
|---|---|
| Afrika Korps | Counters |
| Eastern Front | Maps |
| Guadalcanal | Counters |
| Road to Berlin | Maps |
| Waltzing Matilda | Base Game |
| Introduction |
|---|
|
When the Netherlands East Indies collapsed in the spring of 1942, a shipment of light tanks purchased by the Dutch in the United States went to Australia instead. These two-man tanks, built by Marmon-Herrington, were nearly useless in battle but the Australians gratefully accepted anything they could get. Had the Japanese invaded, the little vehicles would have been thrown into battle - Japanese tanks, after all, weren't that much better. |
| Conclusion |
|---|
|
Given the huge expanse of territory, the forces involved - 10 divisions for the Japanese, nine for the Australians - would have usually fought in meeting and flanking engagements rather than frontal assaults. The doctrine of rapid movement (sokusen sokhetsu) developed in China required the Japanese to attempt encirclement of their enemies, but the Australians had their own maneuver doctrines developed in Palestine in 1918 and the Western Desert in 1940. |
| Additional Notes |
|---|
|
Players should make an extra copy of the Japanese pieces from Waltzing Matilda to provide all the Japanese trucks needed for the scenario. |

|

|
|---|
| AFV Rules Pertaining to this Scenario's Order of Battle |
|---|
|
| Army |
|---|
|


| Imperial Japanese Army |
|---|
|


| 1 Errata Item | |
|---|---|

|
Counters are misprinted "CLTS." (rerathbun
on 2011 Mar 23)
|
| Australians Treat the Japanese to a Crushing Defeat | ||||||||||||
|---|---|---|---|---|---|---|---|---|---|---|---|---|
This is by far the largest Panzer Grenadier scenario I’ve played – my first monster. Setup: Two roads run east/west over the length of the large battle area. The Japanese enter on the east side with the objective of exiting units off the west side. The Australians must prevent them. Total step losses are given at the end of each paragraph, (Australian/Japanese) Tank losses are counted double, trucks and unarmed transports are not counted. 0800-0830 The Australians quickly advance in two groups up the roads to the woods and towns near the middle of the area. They reach the middle of the area and begin to deploy on the eastern edge of the woods and in the towns. The Japanese (in slower transports) advance partway toward the Australians. Two-thirds of the Japanese advance up the northern road, the remainder on the south. The leading Japanese units disembark from their trucks and begin to spread out. The rest remain on their trucks, hoping to exploit any opening to advance past the Aussies and exit. (no casualties) 0845-930 The Australian assault a group of Japanese tanks (they moved adjacent the previous turn), destroying one step. Two Bren carriers are lost to opportunity fire while moving up to support the assault. The Japanese begin shifting their forces to the outside flanks of the Australian defenders, assaulting two hexes on the northernmost Australian positions. They lose a couple of steps to direct and opportunity fire. The exploitation force is still embarked in their trucks. The Australian tanks assault the Japanese tanks near the southern position, achieving a step loss on one and demoralizing the other, which flees. (7/10) 0945-1030 The assaults continue. The Australian right begins to pull back to block the flanking Japanese on the south side of the swamp. Having pulled the Australian left out to the north, part of the main Japanese force disembarks from their trucks to push back the Australian MkVIb tanks, which are the only Aussies holding the center. The main Japanese force disembarks and heads for the gap in the center while the leading infantry advances to tie up the Australian light tanks. The Australian move to the center, trying to block the Japanese. Both Australian and Japanese initiatives are reduced to 2. (9/12) 1045-1200 The Australians manage to plug the gap in the center, pulling in units from both flanks. The Japanese are just too slow to exploit the gap. They move up, organizing for a major assault on the Australian position. Perhaps force will do what speed could not. Firefights are intense all along the center position, with assaults on the edges of the center taking a toll on both sides. (45/30) 1215-1245 Firefights continue all along the line, with both sides holding their own. The Australians counter assault on the edges of the center position, and both sides take losses. Assaults and counter assaults take more casualties. Both sides are now down to an Initiative of zero. (52/45) 1300-1330 Firefights continue along the line. It becomes apparent that the Japanese are not going to break through in the center. The Japanese tanks begin to rally and reorganize. The Japanese on the south flank, which have been hiding in the swamp, recover from earlier disruptions and attempt to reorganize in order to break out on the southern flank. The Australians reposition to block them. (58/49) 1345 The Australians get three activations to begin the turn. In a remarkable feat of shooting, the Australian anti-tank guns take out 1½ platoons of tanks. (59/56) 1400-1430 It’s apparent that the Japanese will not be able to break the Australian center, so they begin to pull their tanks out to help the breakout on the left. The Japanese tanks begin pushing the Aussie tanks back on the south flank, but the Australians disrupt and demoralize the infantry supporting them. The Japanese center continues to suffer disruptions from direct fire. (65/62) 1445-1515 The Japanese on the south flank make a desperate attempt to break through the Australians, but the Australians pull back and continue to block the road. The rest of the Japanese try to do as much damage as possible. None of them are successful. No Japanese units are able to leave the board, and the Australians take no more casualties. (65/65) Final score: Japanese 65 points for eliminating Australian units Australia 128 points for preventing Japanese from exiting Major victory for Australia Final Notes: This scenario is more balanced than this AAR indicates. I’m usually more successful on defense, and it really shows here. If I try this one again, I will try to keep all the Japanese tanks together instead of dividing them, and use them more aggressively to punch a hole in the Australian defense. I really enjoyed the larger scenario, and will do more of them in the future. |
||||||||||||
| 0 Comments |