|
Total |
| Side 1 |
0 |
| Draw |
0 |
| Side 2 |
0 |
|
Total |
| Side 1 |
0 |
| Draw |
0 |
| Side 2 |
0 |
|
Total |
| Side 1 |
0 |
| Draw |
0 |
| Side 2 |
0 |
| Overall Rating, 0 votes |
|---|
|
|
|
Scenario Rank:
--- of 913 |
| Parent Game |
Secret Weapons |
| Historicity |
Alt-History |
| Date |
1942-02-10 |
| Start Time |
06:30 |
| Turn Count |
20 |
| Visibility |
Day |
| Counters |
104 |
| Net Morale |
1 |
| Net Initiative |
2 |
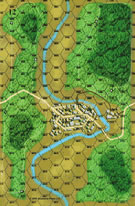
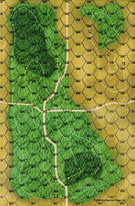
| Maps |
2: 12, 9 |
| Layout Dimensions |
56 x 43 cm
22 x 17 in |
| Play Bounty |
214 |
| AAR Bounty |
227 |
| Total Plays |
0 |
| Total AARs |
0 |
|
Introduction
|
|
On the second day of the invasion of Singapore, the Japanese made an amphibious landing near the village of Kranji. The goal was to drive Allied forces away from the demolished Johor-Singapore Causeway and establish a beachhead where construction supplies could be landed. This would allow the Japanese to repair the bridge and send their armies across the strait in overwhelming numbers to conquer the island. The Japanese landing forces had powerful artillery support from across the strait, but took heavy losses from an oil slick fire as they were crossing the Kranji River. The landing was in doubt until the Australian commander opposing the invasion ordered a withdrawal after losing communications with his headquarters. Had the Australians stayed, the landing would have hinged on accurate artillery fire keeping the defenders' heads down until enough Japanese were ashore to take the town and secure the beachhead.
|
|
Conclusion
|
|
Accurate Japanese artillery barrages ahead of the landing troops would be key to a swift advance to the Woodlands Road linking Kranji with the Causeway. The best artillery spotting platform against enemies in swamp and jungle terrain offering lots of concealment would have been the Ka-1 autogyro, which had entered production just the previous year.
|
|
Additional Notes
|
|
Use American LCVP as Japanese LCVP.
Use British Bren Carrier as Australian Bren Carrier. |
Display Relevant AFV Rules
| AFV Rules Pertaining to this Scenario's Order of Battle |
- Vulnerable to results on the Assault Combat Chart (7.25, 7.63, ACC), and may be attacked by Anti-Tank fire (11.2, DFT). Anti-Tank fire only affects the individual unit fired upon (7.62, 11.0).
- AFV's are activated by tank leaders (3.2, 3.3, 5.42, 6.8).
They may also be activated as part of an initial activating stack, but if activated in this way would need a tank
leader in order to carry out combat movement.
- AFV's do not block Direct Fire (10.1).
- Full-strength AFV's with "armor efficiency" may make two anti-tank (AT) fire attacks per turn
(either in their action segment or during opportunity fire) if they have AT fire values of 0 or more
(11.2).
- Each unit with an AT fire value of 2 or more may fire at targets at a distance of between 100% and 150% of its
printed AT range. It does so at half its AT fire value. (11.3)
- Efficient and non-efficient AFV's may conduct two opportunity fires per turn if using direct fire
(7.44, 7.64).
Units with both Direct and AT Fire values may use either type of fire in the same turn as their opportunity fire,
but not both (7.22, 13.0).
Units which can take opportunity fire twice per turn do not have to target the same unit both times (13.0).
- Demoralized AFV's are not required to flee from units that do not have AT fire values (14.3).
- Place a Wreck marker when an AFV is eliminated in a bridge or town hex (16.3).
- AFV's do not benefit from Entrenchments (16.42).
- AFV's may Dig In (16.2).
- Open-top AFV's: Immune to M, M1 and M2 results on Direct and Bombardment Fire Tables, but DO take step losses from X and #X results (7.25, 7.41, 7.61, BT, DFT). If a "2X" or "3X" result is rolled, at least one of the step losses must be taken by an open-top AFV if present.
- APC – Armored Personnel Carrier: These are Combat Units, but stack like Transports. They can transport personnel units or towed units. They are not counted as combat units for the +1 stacking modifier on the Direct Fire and Bombardment Tables (4.4). They may be activated by regular leaders and tank leaders (1.2, 3.34, 4.3, 5.43). They do not provide the +1 Assault bonus (ACC).
|
Australia Order of Battle
United States Order of Battle
| 1 Errata Item |

|
All Bren carriers should have a movement value of 7.
|