
|
Desperation Saipan 1944 #39 |
||
|---|---|---|
| (Attacker) Japan | vs | United States (Defender) |
| Formations Involved | ||
|---|---|---|
| United States |  |
105th Infantry Regiment |

| Total | |
|---|---|
| Side 1 | 2 |
| Draw | 0 |
| Side 2 | 1 |


| Overall Rating, 3 votes |
|---|
|
4.33
|
| Scenario Rank: --- of 913 |
| Parent Game | Saipan 1944 |
|---|---|
| Historicity | Historical |
| Date | 1944-07-07 |
| Start Time | 04:00 |
| Turn Count | 40 |
| Visibility | Day |
| Counters | 122 |
| Net Morale | 0 |
| Net Initiative | 1 |
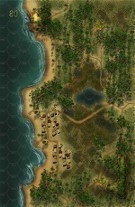
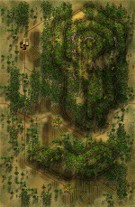
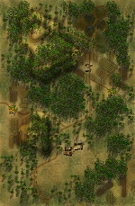
| Maps | 4: 80, 81, 82, 83 |
| Layout Dimensions | 86 x 56 cm 34 x 22 in |
| Play Bounty | 178 |
| AAR Bounty | 171 |
| Total Plays | 3 |
| Total AARs | 1 |
| Battle Types |
|---|
| Inflict Enemy Casualties |
| Conditions |
|---|
| Minefields |
| Off-board Artillery |
| Scenario Requirements & Playability | |
|---|---|
| Saipan 1944 | Base Game |
| Introduction |
|---|
|
By now, General Saito despaired of being able to drive off the Americans. Daily raking by American artillery and naval gunfire, augmented by aircraft attacks, had whittled his force down considerably. His superior, Vice Admiral Chuichi Nagumo (of Midway fame) had shot himself the night before. As his last decision, Saito directed a last grand banzai charge to be carried out before the dawn of July 7th. Too sick to lead the attack himself, the General committed hara-kiri before the actual attack. About 0400 the main attack started with between 3,000 and 4,000 men (including many civilian men and women wielding bamboo spears) divided into three main prongs. |
| Conclusion |
|---|
|
The night was filled with confusion and death. The 1st and 2nd Battalions of the 105th Infantry were overrun, as well as some of the Marine artillery battalions. House-to-house fighting encompassed the village of Tanapag. Major MacCarthy, one of the few officers to survive the attack, said "These Japs just kept coming and coming, it didn't make a difference if you shot one, five more would take his place." But in the end, the Japanese spent the last of their manpower on this attack, and 4,311 of their corpses were found in the aftermath. The 105th Infantry lost 406 men killed and 512 wounded. The 3rd Battalion, 10th Marine Regiment lost 45 Devil Dogs killed and 82 more wounded. The battle for Saipan was nearly over. |

|

|
|---|
| AFV Rules Pertaining to this Scenario's Order of Battle |
|---|
|
| Imperial Japanese Army |
|---|
|


| Imperial Japanese Navy |
|---|
|


| Army |
|---|
|


| Marine Corps |
|---|
|


| 1 Errata Item | |
|---|---|

|
LVT 4 is a one step open-topped APC. Any scenarios where units and leaders start loaded on LVT 4's and enter the board via ocean hexes do not activate in the regular manner. While at sea, all LVT 4's activate like AFV's with leaders, and move toward beach hexes. While moving toward the beach hexes they don't need to use all MPs or move in a straight line. Once they are on the beach, they must follow standard activation rules for both land and water hexes. LVT 4's that are destroyed at sea do not trigger leader decapitation. (Shad
on 2013 May 06)
|
| Saipan, scenario thirty nine: Desperation | ||||||||||||
|---|---|---|---|---|---|---|---|---|---|---|---|---|
Obviously by the conclusion you can tell I had to scale back on this scenario due to counter limitations but I did it proportionately so you could still get an excellent feel for the real battle. This was a fantastic scenario to play, with so many variables to think about. First I set my U.S. Marines & U.S. Army units back around the far south hill area of map 81 thinking the Japanese would use up most of the darkness turns trying to make contact with the American lines. I guess I could have used the optional Strategic Movement rule 17.3 but I didn’t. The Japanese SNLF and Army entered in two locations to help feed the volume of units, the trail north on map 82 and the coastal road north on map 80. It took a lot of movement for the Japanese to finally hit the American lines and they were no longer covered by darkness so some exposed units were getting blasted by heavy artillery both off and on board but many units were taking advantage of the terrain pushing through jungle or fields or towns but one group of jungle disoriented Japanese units were forced to come out on one of their own minefield counters losing a step, kind of an odd situation but very interesting as well, as my minefield finally did its job. On turn 13, the Japanese finally lost their one step of Type 95 tanks by AT fire from one the big Marines Artillery units, just like in real life where the same thing happened, leading a column of Infantry, but before that it pulled up next to a dug-in Army unit and forced them to lose their first step and later assaulted with some infantry, so the Japanese got their mileage from that unit. I thought I had setup a good defensive battle plan for the Americans, with the Marine Artillery units on the hill surrounded by dug-in Army Infantry units but maybe too spread out and there was some exposed areas in the terrain that the Japanese exploited. With the 8/8 morale that never lowers, the American can blast, demoralized, reduced steps but unless you totally destroyed the Japanese units they would be back in the fight again. Originally the American reinforcements were to arrive automatically on turn 22 but that was changed to a dice roll of 6 so mine didn’t show up until turn 27 and that would have been fine but by then I already lost 15 American unit steps plus 3 leaders giving the Japanese their victory of 18 steps as leaders counted. One of those units was a Marine 105mm Artillery unit that failed it’s recovery roll and abandoned their guns counting as two steps. The Japanese had lost more than half their steps but still had enough to keep fighting, if the armored reinforcement had arrived a little earlier or I had setup my defenses on the open areas of map 83 south, I believe the outcome could have been better. So the Japanese barely win the scenario but like in real life, they spent the last of their manpower. The best strategy for the Japanese is to keep assaulting and feeding units into the assault hexes, advantage or not, it will open up holes, and your losses don’t count anyway, so don’t worry about them, just don’t waste them, as they can disappear fast, especially if in the open. A very fun scenario to play, it should be a 6! I played it over 3 or 4 days off and on. |
||||||||||||
| 0 Comments |