

| Total | |
|---|---|
| Side 1 | 1 |
| Draw | 1 |
| Side 2 | 1 |


| Overall Rating, 3 votes |
|---|
|
3.67
|
| Scenario Rank: --- of 913 |
| Parent Game | Road to Dunkirk |
|---|---|
| Historicity | Historical |
| Date | 1940-06-04 |
| Start Time | 03:45 |
| Turn Count | 21 |
| Visibility | Day & Night |
| Counters | 23 |
| Net Morale | 0 |
| Net Initiative | 2 |
| Maps | 1: 124 |
| Layout Dimensions | 43 x 28 cm 17 x 11 in |
| Play Bounty | 143 |
| AAR Bounty | 171 |
| Total Plays | 3 |
| Total AARs | 1 |
| Battle Types |
|---|
| Inflict Enemy Casualties |
| Road Control |
| Conditions |
|---|
| Hidden Units |
| Off-board Artillery |
| Smoke |
| Scenario Requirements & Playability | |
|---|---|
| Road to Dunkirk | Base Game |
| Introduction |
|---|
|
While newly-arrived French tanks attacked along the slopes of Mont Caubert, the 153rd Brigade, on the extreme left, would attack south-eastward and capture Grand Bois on the spur overlooking Cambron. The main objective was the destruction of two 88mm guns emplaced south of Cambron and aimed at the Allied armor attacking Mont Caubert. Brigadier George Burney entrusted the operation to the 1st Gordons. |
| Conclusion |
|---|
|
The 1st Gordons proceeded to clear a stubborn enemy from well-concealed machine-gun posts amid the trees and thick undergrowth of Grand Bois. Before noon, the Gordons reached the high ground on the south-eastern edge of the woods and, although they had taken their first objective, they remained ready to go further. They had killed more than 50 Germans and had taken many prisoners at the cost of 40 killed and wounded. The battalion waited for orders to resume the advance, but no such orders came. The failure of the main attack against Abbeville bridgehead had left their right flank exposed so they had to withdraw, giving up all the ground they had won. |

|
|
|---|
| AFV Rules Pertaining to this Scenario's Order of Battle |
|---|
|
| Army |
|---|
|


| Heer |
|---|
|


| Luftwaffe |
|---|
|

| 3 Errata Items | |
|---|---|

|
Two British infantry have their full strengths printed on the back. They should both be "2-3" when reduced. (Shad
on 2010 Dec 15)
|

|
The reduced direct fire value of the Heer HMG became 5-5 starting with Fall of France. (plloyd1010
on 2015 Jul 31)
|

|
The morale and combat modifiers of German Sergeant #1614 should be "0", not "8". (Shad
on 2010 Dec 15)
|
| Searching for the 88 | ||||||||||||||
|---|---|---|---|---|---|---|---|---|---|---|---|---|---|---|
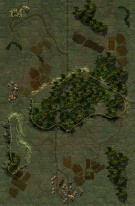
Northwest of Abbeville, there's a wide plateau between Moyenneville and the Mont Caubert heights. On the north side of the plateau, terrain drops steeply in Cambron. The plateau was a real killing ground being defended by a few 88mm AA guns (La croix qui corne, château de Cambron, Mont de Caubert). The French Somua tanks suffered greatly from these so the Scots were sent through the woods to reduce the German resistance. They were the only ones to reach their objectives, clearing the Bois de Cambron and threatening the AA guns but, in the end, they had to withdraw because their right flank remained open. I've played the scenario with a novice to teach him the rules and tactics. It was quite fun with a lot of terrible dice rolled in assault in the woods. My Scots suffered from catastrophic loss (decapitation) and very slow progression against pesky German HMGs. I took the precaution to send one of my leaders forward, as a scout, to find the location of the 88 battery (hidden). However, while my infantry platoons were embroiled in long assaults in the woods, the leader-scout was unable to find the AA guns before the very end of the game. In the end, I had just two turns of artillery (2 X 13) against the 88 to attempt to destroy it (bombardment on column 30) but both dice were 7: no result at all !! On the other end, I succeeded to kill many Germans in assault combat (lost 9 units) while keeping my own losses at 4 steps. We also had two random events ; one British aircraft and one German Stuka but both were unable to see any target. Since I managed to control one of the two trails and keep my losses under 6 steps, the game was a draw. Good fight ! |
||||||||||||||
| 0 Comments |