Panzer Grenadier Battles on April 27th:
Arctic Front Deluxe #40 - Children's Crusade Broken Axis #14 - Târgu Frumos: The Second Battle Scenario 3: Sledge Hammer of the Proletariat
Army Group South Ukraine #6 - Consternation Road to Berlin #73 - She-Wolves of the SS
Errors? Omissions? Report them!
They Wore Skirts
Road to Dunkirk #29
(Attacker) Germany vs Britain (Defender)
France (Defender)
Formations Involved
Display
Balance:


Overall balance chart for RtDk029
Total
Side 1 0
Draw 0
Side 2 3
Overall Rating, 3 votes
5
4
3
2
1
3.67
Scenario Rank: --- of 913
Parent Game Road to Dunkirk
Historicity Historical
Date 1940-05-27
Start Time 13:30
Turn Count 26
Visibility Day
Counters 130
Net Morale 0
Net Initiative 2
Maps 4: 119, 120, 125, 126
Layout Dimensions 86 x 56 cm
34 x 22 in
Play Bounty 190
AAR Bounty 171
Total Plays 3
Total AARs 1
Battle Types
Delaying Action
Exit the Battle Area
Inflict Enemy Casualties
River Crossing
Road Control
Urban Assault
Conditions
Off-board Artillery
Reinforcements
Severe Weather
Smoke
Terrain Mods
Scenario Requirements & Playability
Road to Dunkirk Base Game
Introduction

After the HaltBefehl, the panzers resumed the offensive in the afternoon of 26 May. The Germans soon gained a small bridgehead across the Canal d’Aire close to La Bassée. In the early morning a depleted company of the 1st Camerons supported by French Somua tanks counterattacked and drove the enemy back across the canal, albeit at a high cost in casualties. Although the Camerons had won their position, they could not hold it so they withdrew to form a defensive arc around the town.

Conclusion

Rommel had to order every weapon to fire from the south side of the canal on the French tanks while the engineers desperately tried to speed up the bridge work. Eventually some panzers began to cross on a shaky bridge and poured onto the north bank. Thanks to pontoons, the 7th and the 5th Panzer Divisions were soon massing across the canal. La Bassée was attacked from the west and Salomé from south. A column of tanks moved north of Violaines and surrounded the British headquarters. Although the French Somuas and the British anti-tank platoons disabled or destroyed numerous German tanks, the initiative went to the Germans and one by one the villages fell. Then came 18 tanks of the 4th/7th Royal Tank Regiment in support. Their action combined with the Somuas eventually allowed some of the trapped Scots to escape but most of the Camerons in the front-line companies were either killed, wounded or captured; the battalion only consisted of 79 men when it was evacuated from Dunkirk. On the French side, the battalion-sized 7th Recon Group lost about one hundred men. The city of Lille, Rommel’s objective, was within reach of the Germans.


Display Relevant AFV Rules

AFV Rules Pertaining to this Scenario's Order of Battle
  • Vulnerable to results on the Assault Combat Chart (7.25, 7.63, ACC), and may be attacked by Anti-Tank fire (11.2, DFT). Anti-Tank fire only affects the individual unit fired upon (7.62, 11.0).
  • AFV's are activated by tank leaders (3.2, 3.3, 5.42, 6.8). They may also be activated as part of an initial activating stack, but if activated in this way would need a tank leader in order to carry out combat movement.
  • AFV's do not block Direct Fire (10.1).
  • Full-strength AFV's with "armor efficiency" may make two anti-tank (AT) fire attacks per turn (either in their action segment or during opportunity fire) if they have AT fire values of 0 or more (11.2).
  • Each unit with an AT fire value of 2 or more may fire at targets at a distance of between 100% and 150% of its printed AT range. It does so at half its AT fire value. (11.3)
  • Efficient and non-efficient AFV's may conduct two opportunity fires per turn if using direct fire (7.44, 7.64). Units with both Direct and AT Fire values may use either type of fire in the same turn as their opportunity fire, but not both (7.22, 13.0). Units which can take opportunity fire twice per turn do not have to target the same unit both times (13.0).
  • Demoralized AFV's are not required to flee from units that do not have AT fire values (14.3).
  • Place a Wreck marker when an AFV is eliminated in a bridge or town hex (16.3).
  • AFV's do not benefit from Entrenchments (16.42).
  • AFV's may Dig In (16.2).
  • Open-top AFV's: Immune to M, M1 and M2 results on Direct and Bombardment Fire Tables, but DO take step losses from X and #X results (7.25, 7.41, 7.61, BT, DFT). If a "2X" or "3X" result is rolled, at least one of the step losses must be taken by an open-top AFV if present.
  • Closed-top AFV's: Immune to M, M1 and M2 results on Direct and Bombardment Fire Tables. Do not take step losses from Direct or Bombardment Fire. If X or #X result on Fire Table, make M morale check instead (7.25, 7.41, 7.61, BT, DFT).
  • Closed-top AFV's: Provide the +1 modifier on the Assault Table when combined with infantry. (Modifier only applies to Germans in all scenarios; Soviet Guards in scenarios taking place after 1942; Polish, US and Commonwealth in scenarios taking place after 1943.) (ACC)
  • Tank: all are closed-top and provide the +1 Assault bonus, when applicable
  • Tank Destroyer: do not provide the +1 Assault bonus, even if closed-top (SB)
  • APC – Armored Personnel Carrier: These are Combat Units, but stack like Transports. They can transport personnel units or towed units. They are not counted as combat units for the +1 stacking modifier on the Direct Fire and Bombardment Tables (4.4). They may be activated by regular leaders and tank leaders (1.2, 3.34, 4.3, 5.43). They do not provide the +1 Assault bonus (ACC).
  • Armored Cars: These are Combat Units. They are motorized instead of mechanized. All have their own armored car leaders, who can only activate armored cars (6.85). Do not provide the +1 Assault bonus (ACC).
  • Reconnaissance Vehicle: 8.23 Special Spotting Powers Both foot and vehicle mounted recce units (1.2) possess two special spotting abilities. The first ability is that they can spot enemy in limiting terrain at one hex further than the TEC specifies for other units and leaders. For example, an enemy unit in town can normally be spotted at three hexes or less, but a recce unit can spot them at four hexes.Their second ability is that they can place a Spotted marker on any one enemy unit they can spot per turn, just as if the enemy unit had "blown its cover" by firing. Such Spotted markers are removed as described earlier.
  • Portees: Trucks with mounted Anti-Tank guns, Anti-Aircraft weapons, or artillery. Stack as combat units. Move like trucks, but fire like guns. Do not limber or unlimber. Have the truck's -1 armor value. Truck and gun are treated as a single unit, and do not transport other units. (SB)

Display Order of Battle

Britain Order of Battle
Army
France Order of Battle
Armée de Terre

Display Errata (4)

4 Errata Items
Overall balance chart for 869

All Bren carriers should have a movement value of 7.

(Shad on 2010 Dec 15)
Overall balance chart for 855

Two British infantry have their full strengths printed on the back. They should both be "2-3" when reduced.

(Shad on 2010 Dec 15)
Overall balance chart for 871

Ignore the direct fire values.

(Shad on 2010 Dec 15)
Overall balance chart for 595

This is actually another ½track vehicle, simiar to the AMR33 & AMR35. It used the mechanized movement rate.

(plloyd1010 on 2013 Apr 20)

Display AARs (1)

The French didn't surrender!
Author NBGB
Method Solo
Victor Britain, France
Play Date 2019-10-18
Language English
Scenario RtDk029

I was looking for a scenario that had a lot of units and some armor. Road to Dunkirk does not have the giant tank battles you see in other PG games. This scenario has a little bit of everything. 
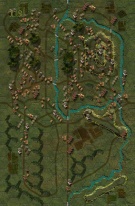
The Germans are trying to simultaneously hold a road across 2 boards, hold 2 town hexes at the same time,(one on aforementioned road and the other all the way across the board), eliminate 30+ steps, not lose more than 29 steps, and maybe move units off the north (opposite) edge of the field. They need to achieve 3 of these objectives to get even a minor victory. To do this, they face a combined British and French force. The French have some excellent armor (1 company S35 plus 1ZT2), some 25mm Portee’s and minimal infantry. They also have off board artillery 4x15 strength that can only be used on a die roll of 1 or 2. One chance per turn and counts as an activation. (Blech). The Brits field a large infantry force, about a brigade, plus a couple of 25 lb’ers. They also get some battalion size tank reinforcements on turn 9. Both British and French have average morale (8/6). The Germans have about 2 brigades worth of troops with a couple battalions worth of armor. (Half of it PZ1 and PZ2 which are bad). They also have devastating artillery. The terrain is flat (slopes, hills ignored) with one major river all the way across the Southern edge of the field. This river splits in 2 for a ways. This complicate setup as all bridges are blown. That means the Germans would have to make 2 river crossings in one area if they choose. One can be uncontested, but it still takes time. Before setup you need to take in to account the lousy visibility that starts out at 4 hexes and can go up or down at the end of each ACTION segment with a dice roll. Throw in the random events table used in this game and there is a LOT going on here for a solo scenario. On each turn you have the normal dice rolling, plus a possible random event, plus a roll after each action segment, plus fog of war when applicable. Sorry for the long opening, but this one has a lot of moving parts. The French set up to guard the western third of the river plus a few companies to offer resistance in the rear at one of the town control hexes. The British take the rest of the River to the east edge as they’re armor reinforcements come in from the east edge. All units are dug in or in the many town hexes. The Germans can set up South of the river or enter in the west edge Not much transport for the infantry so I had the Germans set up South of the river except the armor, the 88, and a few companies of infantry that could be transported. The idea was that there would be 2 crossings set up, one in the French controlled area and 1 diversionary crossing set up way east on the British left. The armor would swoop in from the West and grab the town hexes and roll up the rear. The Germans swooped in from the West and took the first town hex early. They also started the diversionary crossing right away. The Brits move up on the German bridgehead to spot for artillery and block. This started a half game long crossing attempt as both sides pounded each other with artillery and added in a lot of gunfire. This slog went on all game as the Germans were never able to break out. They did manage to finally get everyone across and occupy a sizable British contingent. The main crossings took a while for the uncontested crossing and the second ones were successful for a while and then repelled stranding a battalion of units across the river. They fought hard until the end, but it was a standoff. The French were not strong enough on their own, but Brits from center relocated about a battalion and reinforced the French. Then there were the armor battles. The Germans were not able to penetrate the Matilda 2’s armor unless they were at point blank range and using a crossfire with a Panzer 4D. This made them susceptible to CA attacks from the Matilda 1’s. Same for the S35 platoon. They were never taken out. All these battles within the battle and with FOW it was difficult to keep momentum going . The Allies got a minor victory as the Germans could not hold both town hexes, clear the road and manage not to lose 29 steps. Light tank armor with tanks counting double exacerbated this.

0 Comments
You must be a registered member and logged-in to post a comment.
Errors? Omissions? Report them!
Page generated in 0.397 seconds.