

| Total | |
|---|---|
| Side 1 | 1 |
| Draw | 0 |
| Side 2 | 3 |


| Overall Rating, 4 votes |
|---|
|
4
|
| Scenario Rank: --- of 913 |
| Parent Game | Road to Dunkirk |
|---|---|
| Historicity | Historical |
| Date | 1940-05-22 |
| Start Time | 17:00 |
| Turn Count | 16 |
| Visibility | Day |
| Counters | 52 |
| Net Morale | 1 |
| Net Initiative | 2 |
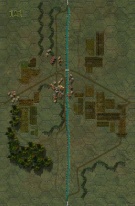
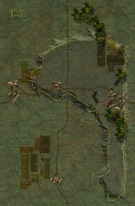
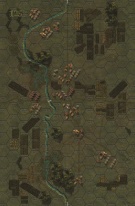
| Maps | 3: 121, 123, 125 |
| Layout Dimensions | 84 x 43 cm 33 x 17 in |
| Play Bounty | 160 |
| AAR Bounty | 171 |
| Total Plays | 4 |
| Total AARs | 1 |
| Battle Types |
|---|
| Inflict Enemy Casualties |
| Road Control |
| Urban Assault |
| Conditions |
|---|
| Off-board Artillery |
| Smoke |
| Terrain Mods |
| Scenario Requirements & Playability | |
|---|---|
| Road to Dunkirk | Base Game |
| Introduction |
|---|
|
Protecting Boulogne’s harbor, the 2nd Irish Guards battalion covered a line south of the city 3.5 kilometers long, stretching from the village of Manihen on the banks of the River Liane to positions on the coast overlooking the harbor. At 1500, the defenders spotted the first German scout vehicles on the high ground south of Outreau. |
| Conclusion |
|---|
|
On the coast road to Boulogne, the German advance had already seen tough fighting. The only route leading directly to the harbor offered little possibility of manoeuvre for tanks, and the first panzers were quickly dispatched by the Irish anti-tank guns. German motorcyclists and infantry then maneuvered around the flanks of the British. The fighting in and amongst the back gardens and hedgerows was a chaotic and confused affair, which dragged on intermittently until nightfall when firing eventually died down. |

|
|
|---|
| AFV Rules Pertaining to this Scenario's Order of Battle |
|---|
|
| Army |
|---|
|


| Heer |
|---|
|


| 3 Errata Items | |
|---|---|

|
All Bren carriers should have a movement value of 7. (Shad
on 2010 Dec 15)
|

|
Two British infantry have their full strengths printed on the back. They should both be "2-3" when reduced. (Shad
on 2010 Dec 15)
|

|
The reduced direct fire value of the Heer HMG became 5-5 starting with Fall of France. (plloyd1010
on 2015 Jul 31)
|
| A cliffhanger near the Channel |
|---|
|
The Situation: The Germans, closing in on Dunkirk, are trying to clear roads and maybe take a town. A very high-morale group of British troops stand in their way. It’s a three-map battle with low unit density; right down my alley. The Setup: The Germans start off-board, and their objectives are to clear at least on north-south road corridor and/or take a mid-size town smack in the middle of the battlefield. They can hit from a variety of locations, so I spread the Brits out to cover as many approaches as possible, building a few strongpoints around the 94mm and 6-pounders. They are spread thin, but towns, terrain and 9/8 morale(!) provide quite a lot of staying power. Summary: The Germans come in from the southwest and are concentrated, trying to force one road open instead of hitting in multiple places. Immediately they run into trouble, as a pair of British INF knock out a step of Germans and demoralize others. The 94mm, sited in a town, also takes out a Panzer II step. Through the first half the good guys more than hold their own. Eventually the Germans bring numbers and mobility to bear, slipping eastward and applying more pressure at several points, and prevent the Brits from reinforcing each other. The Germans took the bulk of their losses early, while the British were slowly worn down as they were forced to defend key positions. It all came down to the final turn, at a crossroads smack in the middle of the map. Here a multi-turn assault took place, and at the start of the final turn a half step of British infantry with a decent LT doggedly held on against a MTC, Pz I and HMG. If they held out they would deny the Germans a clear road and take home the win. But the assault succeeded on the final attempt, and the baddies got their clear road and a major victory. Final losses were seven British and eight German steps. Analysis: Road to Dunkirk has lots of small, tense scenarios, and this is among the best I’ve played to date. Very wide open and well balanced, and I could see it being a toss up every time. Highly recommend. |
| 0 Comments |