
|
A Thousand and One Road to Berlin #52 |
||
|---|---|---|
| (Attacker) Germany | vs | Soviet Union (Defender) |
| Formations Involved | ||
|---|---|---|
| Germany |  |
1001 Nights Kampfgruppe |
| Soviet Union |  |
60th Guards Rifle Division |

| Total | |
|---|---|
| Side 1 | 1 |
| Draw | 0 |
| Side 2 | 0 |


| Overall Rating, 1 vote |
|---|
|
5
|
| Scenario Rank: --- of 913 |
| Parent Game | Road to Berlin |
|---|---|
| Historicity | Historical |
| Date | 1945-03-27 |
| Start Time | 04:00 |
| Turn Count | 30 |
| Visibility | Day & Night |
| Counters | 105 |
| Net Morale | 1 |
| Net Initiative | 3 |
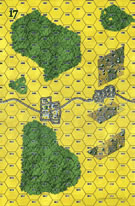
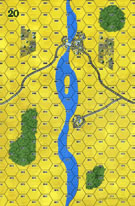
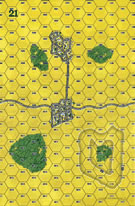
| Maps | 3: 17, 20, 21 |
| Layout Dimensions | 84 x 43 cm 33 x 17 in |
| Play Bounty | 118 |
| AAR Bounty | 171 |
| Total Plays | 1 |
| Total AARs | 1 |
| Battle Types |
|---|
| Inflict Enemy Casualties |
| Rural Assault |
| Urban Assault |
| Conditions |
|---|
| Minefields |
| Off-board Artillery |
| Randomly-drawn Aircraft |
| Scenario Requirements & Playability | |
|---|---|
| Road to Berlin | Base Game |
| Introduction |
|---|
|
Lacking a mobile reserve for counter-attacks, the German CI Corps staff had combined what assorted armored or mechanized units it had into a large battalion under SS Sturmbannfuhrer Blanchois, with several companies of Hetzer tank destroyers and assault guns drawn from both Army and SS units, the "Todt" labor organization's palace guard (heavily armed and riding late model halftracks), some anti-aircraft gunners formerly assigned to the personal protection of Albert Speer and an SS parachute company. The corps staff made the signal error of noting this "1001 Nights Battle Group" on their situation maps; upon spotting a unit bearing an armored infantry symbol, Adolf Hitler ordered it to join the attack on the Oder bridgehead near the town of Genschmar. |
| Conclusion |
|---|
|
Somehow, Blanchois had infused his weird collection with the notion that they were an elite group and they appear to have fought very well and with surprising cohesion. But flinging a battalion against a division was madness at the best of times, especially with no engineers to help with the thick Soviet minefields. The Germans lost two-thirds of their men and half their armored vehicles in the assault. |

|
|
|---|
| AFV Rules Pertaining to this Scenario's Order of Battle |
|---|
|
| Heer |
|---|
|


| Schutzstaffel |
|---|
|

")
")
")
")


| Army (RKKA) |
|---|
|

| Guards |
|---|
|


| 4 Errata Items | |
|---|---|

|
The reduced direct fire value of the Heer HMG became 5-5 starting with Fall of France. (plloyd1010
on 2015 Jul 31)
|

|
The morale and combat modifiers of German Sergeant #1614 should be "0", not "8". (Shad
on 2010 Dec 15)
|

|
All SPW 251s have an armor value of 0. (Shad
on 2010 Dec 15)
|

|
Kommissars never get morale or combat modifiers. Ignore misprints. (Shad
on 2010 Dec 15)
|
| Seems Like Old Times | ||||||||||||
|---|---|---|---|---|---|---|---|---|---|---|---|---|
The Soviets deployed INF and HMG in the large town on Map 17. In front of them was a crescent-shaped minefield laid out between the two forests to the north and south. Each end was anchored by more INF deployed in the woods. Their job was to keep the Germans busy until sunrise. As artillery spotting range increased, they were to fall back. Behind them were the Soviet AT units in an arc from north to south. They supported each other, giving many opportunities for cross fire to any German panzers crossing the wonderful tank terrain on Map 21. Along with them were the Soviet INF units and SPA's. Once the sun rose, they could go to work, as could a crippling amount of Soviet OBA. The Germans needed to move quickly, assault and take the town, then move as far as they possibly could before sunup. But first came the matter of traversing the minefield. The Germans attacked the town in three groups hitting from three directions. Two had to plow through the minefield and prepare to take point-blank DF as best they could. The southern group was to hook through the woods and assault the defending Soviet INF. The center group made it through in good order. The northern group suffered step losses and morale checks, withdrawing and regrouping. It was the southern force hitting the woods that made the difference. The defending Soviet INF buckled and soon broke. A way around the minefield was now clear for the Germans. They exploited their gain as units hooked northward to hit the town from behind while others broke right to take on the first Soviet AT position. It was soon obvious that the defenders needed to withdraw. Meanwhile the regrouped and rallied northern group began making their way through the northern woods. Their objective was to move behind the 40M hill on Map 21 and take on the next Soviet AT position. They were met by the brave but doomed Soviet SPA units. Much to their credit, the SPA's eliminated two steps of panzers before they were eliminated. While the assault on the hill continued, the Soviets withdrew in good order to a line running from the NE woods on Map 21 through both towns. The Germans kept up pressure in the south while fighting it out in the north. When the Soviet AT position was eliminated, the Germans moved on the NE woods, threatening to flank the Soviet defenses. The Soviets countered with extending their position with reserve units. The Germans managed to eliminate the Soviet AT positions with assault and some highly accurate OBA. The German panzers were free to move at will. The lengthening spotting range for the Soviet OBA proved of little help; most of their GREN targets were in APC's. As the German panzers began moving on both flanks, the Soviets began to withdraw to their final line of defense west of the river: a corner arcing from the river, through the field and to the southern woods on Map 20. A special posthumus commendation to the Soviet INF who bought time for their comrades by assaulting the German armor in the woods. The Soviets maintained good order in their final withdraw, but the massed German DF began to take its awful toll. The Soviet line began to transform into smaller groups of depleted and demoralized units. They had no armor of their own and their OBA was highly ineffective, I did s lot of soul searching and called the action off early, giving the victory to the Germans. I give this action a high rating. It's ideal for the newbie who wants to stretch out a little farther. Yet the race against sunup on the Germans' part and the need for the Soviets to delay them as much as they can should also make this a good one for the more seasoned grog. |
||||||||||||
| 2 Comments |
Hi PaperTiger! Your result seems to go completely against the historical conclusion in the scenario book:
But flinging a battalion against a division was madness at the best of times, especially with no engineers to help with the thick Soviet minefields. The Germans lost two-thirds of their men and half their armored vehicles in the assault.
Based on your play do you think your result is atypical, or did the designer over-strengthen the Germans a bit?
Shad,
I think that my result was atypical. There were a few factors that make me say this:
1) The Germans got a very early advantage when they cleared the Soviet INF that were anchoring the southern end of the minefield. It allowed the Germans a quick way past the Soviet forces that were willing to take a beating from the beginning of the scenario until sunup.
2) The Soviets made the huge tactical error of getting their SPA's eliminated early. When the Germans regrouped north of town and went through the woods, the SPA's were deployed to slip past the panzers and move against the German APC's. However, the Soviets couldn't resist the temptation of stopping to knock out a step each of Jagd and Hetzers, their "0" armor rating notwithstanding. (File that one under "Dumb!")
3) Having slipped past the Soviet first line of defense, the Germans had plenty of time in darkness to get in position on the 40M hill to hit the first of the Soviet 76 emplacements. Once the fighting on the hill was resolved, the Germans had effectively flanked the Soviet right.
4) Last but not least, the Soviet AT guns were lost at a dismaying rate, in a large part due to the ineffective fire they laid down. (They were often missing at point-blank range.) Once gone, the battlefield became a German playground.
If there was anything that overstrengthened the Germans it was the GRENS being able to spend so much time in APC's. The Soviets have some potentially crippling OBA in this scenario, but couldn't use it to its full effect.