
|
Kustrin Corridor Road to Berlin #48 |
||
|---|---|---|
| (Defender) Germany | vs | Soviet Union (Attacker) |
| Formations Involved | ||
|---|---|---|
| Germany |  |
1st SS "Leibstandarte Adolf Hitler" Division |
| Germany |  |
Muncheberg Panzer Battalion |
| Soviet Union |  |
20th Tank Brigade |
| Soviet Union |  |
47th Guards Rifle Division |

| Total | |
|---|---|
| Side 1 | 2 |
| Draw | 0 |
| Side 2 | 0 |


| Overall Rating, 2 votes |
|---|
|
4.5
|
| Scenario Rank: --- of 913 |
| Parent Game | Road to Berlin |
|---|---|
| Historicity | Historical |
| Date | 1945-03-22 |
| Start Time | 07:15 |
| Turn Count | 24 |
| Visibility | Day |
| Counters | 70 |
| Net Morale | 0 |
| Net Initiative | 1 |
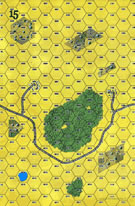
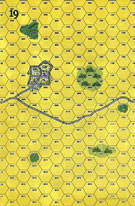
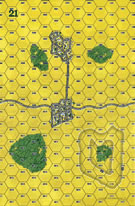
| Maps | 3: 15, 19, 21 |
| Layout Dimensions | 84 x 43 cm 33 x 17 in |
| Play Bounty | 106 |
| AAR Bounty | 171 |
| Total Plays | 2 |
| Total AARs | 1 |
| Battle Types |
|---|
| Inflict Enemy Casualties |
| Rural Assault |
| Urban Assault |
| Conditions |
|---|
| Off-board Artillery |
| Scenario Requirements & Playability | |
|---|---|
| Road to Berlin | Base Game |
| Introduction |
|---|
|
A narrow strip of German-controlled ground connected the 18th century fortress of Kustrin at the junction of the Warthe and Oder Rivers to the German lines outside Berlin. Kustrin had held out for over a month when Marshal Georgi Zhukov ordered his subordinates to finally eliminate this German bridgehead. Step one was a concerted attack on the corridor. |
| Conclusion |
|---|
|
The Disparate German formations flung randomly together in front of Berlin had little coordination (most of the SS battalion's parent division was in Hungary, for example, while the panzer battalion had a fairly random selection of mostly-new tanks and assault guns), and the Guardsmen had been heavily reinforced by 8th Guards Army. The Guards drove into the German position despite heavy tank losses to the German Panthers, and forced their way through to link up with other attacking Soviets to the north. |

|
|
|---|
| AFV Rules Pertaining to this Scenario's Order of Battle |
|---|
|
| Heer |
|---|
|


| Schutzstaffel |
|---|
|


")
")

| Army (RKKA) |
|---|
|


| Guards |
|---|
|


| 3 Errata Items | |
|---|---|

|
All SS PzIVH tanks should have a movement of 8. (Shad
on 2010 Dec 15)
|

|
The reduced direct fire value of the SS HMG is 5-5 in Beyond Normandy and Road to Berlin. (plloyd1010
on 2015 Jul 31)
|

|
These units should have a Direct Fire rating of 2-3, just like the RKKA and NKVD counterparts. (danradz
on 2011 May 04)
|
| Soviets couldn't solve the German armor | ||||||||||||||
|---|---|---|---|---|---|---|---|---|---|---|---|---|---|---|
This is really a jim-dandy of a scenario. It is perhaps worth a 5. Rich and I actually played it twice. Both times I was the Soviets, and both times I lost. The last time I checked no one had written an AAR for it. If I am indeed the first to do so it is my pleasure. The script is a really good one. The Soviets have the numbers, in both tanks and infantry. Clearly though they need to solve the problem of Germany's superior armor. They outnumber the German armor two to one, so I believe it can be done. Unfortunately, I lack the experience to know how to apply the Soviet numerical superiority to make the difference they need. Rich's Germans were fairly evenly distributed west to east on all three maps. The Panthers were in the west, and the other German armor in center and east. The first time I swept in on the west side. Soon the armor were trading shots, and I was getting the worst of it. At that point I suggested we start over, lamenting that I thought the Soviets should use their abundant OBA to target German armor. I didn't do that in this first version of the scenario. The second time I swept in on the east side. An advantage of this approach is it provides more cover to advancing infantry. Unfortunately, the Soviet OBA was almost completely ineffective. I also had an early FoW 16+ and lost an initiative roll at a critical point when I was trying to leverage my armor numbers in a decisive armor exchange. Alas, before long the Panthers and other German armor chewed up the Soviets again. I definitely want to revisit this scenario. I'd like to try the Germans since my setup would be much different than Rich's. I also want to play the Soviets again. I will however prefer to play it face-to-face. Vassal is great with a friend like Rich with whom I can rarely meet. Some scenarios, however, beg for face-to-face play. And I think FTF will help me polish my tactical skills for PG. |
||||||||||||||
| 0 Comments |