
|
Kutuzov's Heart Road to Berlin #35 |
||
|---|---|---|
| (Attacker) Germany | vs | Soviet Union (Attacker) |
| Formations Involved | ||
|---|---|---|
| Germany |  |
8th Panzer Division |
| Soviet Union |  |
51st Guards Tank Brigade |
| Soviet Union |  |
53rd Guards Tank Brigade |

| Total | |
|---|---|
| Side 1 | 2 |
| Draw | 1 |
| Side 2 | 0 |


| Overall Rating, 3 votes |
|---|
|
3.33
|
| Scenario Rank: --- of 913 |
| Parent Game | Road to Berlin |
|---|---|
| Historicity | Historical |
| Date | 1945-02-16 |
| Start Time | 10:00 |
| Turn Count | 30 |
| Visibility | Day |
| Counters | 100 |
| Net Morale | 0 |
| Net Initiative | 0 |
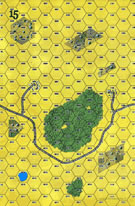
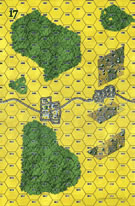
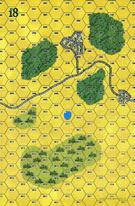
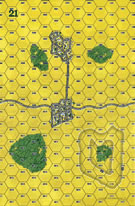
| Maps | 4: 15, 17, 18, 21 |
| Layout Dimensions | 86 x 56 cm 34 x 22 in |
| Play Bounty | 120 |
| AAR Bounty | 165 |
| Total Plays | 3 |
| Total AARs | 2 |
| Battle Types |
|---|
| Inflict Enemy Casualties |
| Meeting Engagement |
| Rural Assault |
| Urban Assault |
| Conditions |
|---|
| Off-board Artillery |
| Randomly-drawn Aircraft |
| Scenario Requirements & Playability | |
|---|---|
| Road to Berlin | Base Game |
| Introduction |
|---|
|
As Soviet troops drove into Silesia, the industrial region between Poland and Bohemia, they neared the town of Bunzlau. Marshal Mikhail Kutuzov, vanquisher of Napoleon, died there in 1813 and his heart was buried on the spot. Soviet commanders made capture of the town a top priority, hoping to reap propaganda value from the rescue of the old general's vital organ from the Nazis. Kutuzov had been resurrected as a national hero in the Great Patriotic War's propaganda effort, and now the modern Red Army's general saw themselves emulating his feats. The Germans, for their part, stood ready to deny the town to the Soviets simply because the Soviets wanted it - they do not seem to have been aware of the political significance of the site. |
| Conclusion |
|---|
|
The Soviet 6th Guards Tank Corps had already been repelled by the 1st Ski Division (Soviet sources claim this was 19th Panzer) when the fresh division struck it again. Poor handling on the part of Rybalko's elite 3rd Guard Tank Army headquarters had placed the corps in an untenable position, and it fell back with heavy losses. The old marshal's internal organs would have to wait another month for liberation. |

|
|
|---|
| AFV Rules Pertaining to this Scenario's Order of Battle |
|---|
|
| Heer |
|---|
|


| Guards |
|---|
|


| 7 Errata Items | |
|---|---|

|
The reduced direct fire value of the Heer HMG became 5-5 starting with Fall of France. (plloyd1010
on 2015 Jul 31)
|

|
All SS PzIVH tanks should have a movement of 8. (Shad
on 2010 Dec 15)
|

|
The morale and combat modifiers of German Sergeant #1614 should be "0", not "8". (Shad
on 2010 Dec 15)
|

|
All SPW 251s have an armor value of 0. (Shad
on 2010 Dec 15)
|

|
One Wespe (ID# 1201) should have an armor value of 1 on the front and back of the counter. (Shad
on 2010 Dec 15)
|

|
All Guards JS-IIs should have AT fire values of 8-8. (Shad
on 2010 Dec 15)
|

|
All Guards T-34/85 tanks should have AT fire values of 7-7. (Shad
on 2010 Dec 15)
|
| Road to Berlin, Scenario #35, Kutuzov’s Heart | ||||||||||||
|---|---|---|---|---|---|---|---|---|---|---|---|---|
A quick scenario-counter analysis as to who has the advantages. Medium-Heavy VS Heavy Tanks: German 6 x Panthers VS Russian 6 X Stalin II’s Advantage: Even Medium Tanks: German 6 X PzIVH VS Russian 12 X T-34/85 Advantage: Russian Tank Destroyers: German none VS Russian 2 X SU-100 Advantage: Russian Armored Cars: German 1 X SdKfz 234/2, 2 X SdKfz 234/3, 1 X SdKfz 234/4 VS Russian 2 X Ba64 Advantage: German Infantry & Support Weapons: German 14 X GREN, 3 X HMG, 2 X 81mm, 8 X SPW251, 6 X SPW250, 5 X Trucks VS Russian 9 X SMG Advantage: German Artillery/SP’s off board & on board: German 1 X Wespe, 2 x 16 VS Russian 3 x 12 Advantage: Even Aircraft: German none VS Russian one every turn on rolls of 5 or 6 Advantage: Russian Leaders: German 1 x COL, 1 x MAJ, 2 x CAPT, 5 x LT, 1 x SGT VS Russian 1 x LT COL, 1 x CAPT, 2 x LT Advantage: German Morale/Initiative/Terrain: Slight Advantage: to the Germans because they are closer to main board #21 victory objective. Should be a good scenario to play, with a slight German advantage overall but the first two turns Initiative rolls could play a big part. I think the key for the Russians to win this one, will be to take out the German Armor first and conserve the Russian 9 x SMG infantry units as must as possible for the second push without so much German armor around, as there is still a lot of German Infantry to over come. I noticed while setting this scenario up that I had to borrow some counters from Regular Russian Army as I only had 10 Guard T-34/85 counters and this one requires 12 counters. No big deal, as I have found most of the bigger scenarios I need to borrow from one or the other, Regular/Guard Armies to fill in. Posting #2 Ok, I got started early. It is like I thought it might be, the Germans are closer at the start of the game to Board 21, which will make it a tough nut for the Russians to crack but doable. Already I have lost 5 steps of T-34/85's, 2 steps of SU-100's & 2 steps of Ba64's VS 4 steps of Panther tanks. I think another 12 turns of an armor shoot out and then maybe some closing with the Infantry units, if enough force is left in that time frame. I am not sure this will go 30 turns, we'll see. I am starting to dwindle down the German Armor but at cost to my own as well. I hope I have enough left to push the German Infantry out of town, with my Soviet SMG's and what will remain of my Guard armor. I still hold all my Russian Infantry/SMG units out of action, until my armor has cleared the German armor, we'll see if this strategy works or fails? Then I can bring it all together and hopefully work away at the town hexes. The Russians actually have a chance to take the Northern town but I am not sure there will be enough left to take the Southern town. I have eliminated all the German Armor but I have not kept my attacking units together very well. I have finally found a use for my Soviet Ba64 Armored Cars; taking out those behind the lines German 81mm Mortars. It helps to get adjacent to them and then roll a two with the dice! The Northern Town is about to fall to the Soviets but Southern town, has long way to go. I was one town hex away from a Minor Russian victory, instead I'll have to settle for a draw. Much closer then I thought it would be, I didn't think the Russians had a chance but they would have had a minor victory or more, if I had kept my attacks together and more organized in the beginning. I just had too few Infantry units that were in good shape left to pull it off. Great scenario, it went all the way to the last turn to figure out who would win/lose/draw. The Russian Air-force was not much help, only showing up 3 times. |
||||||||||||
| 0 Comments |
| Cannon before them, cannon beside them, vollied and thundered | ||||||||||||
|---|---|---|---|---|---|---|---|---|---|---|---|---|
Pertinent house rules: Faster mechanized movement With all the objectives being on board 21, the Germans concentrated there. The bulk of the German infantry deployed in the Northern town, near the hill. The remaining infantry, about a company, moved to the hill's lower Eastern slope to prevent the town from being flanked by a Soviet infantry advance. The PzVs deployed high on the slopes to see over the town, and cover the gap in between the hill, town and woods. Most of the PzIVs went to the lower Northeast slope, while 2 deployed West of the gap between the towns. The battle opened with half-hearted skirmishes between armored cars on boards 15 & 17. German armored cars quickly retreated as the Soviet tanks move up. The bulk of the T34s move around the North via boards 15 & 17. The armored cars run through the towns. The JS2s, remaining T34s and the SU100s move down through the gap in the woods of boards 18 & 21; the SMGs ride along on the tanks. The T34s moving from the North are stopped at 5 & 6 hexes from the hill losing a couple steps to the PzIVs. A couple JS2s drop their infantry and go back around the wood to support the T34s. Soviet aircraft attack the German tanks on the hill, and manage to kill a step. Half Soviet infantry moves through the woods, the other half jumps off the tanks, 3 hexes from the town. As the Soviet infantry emerges from the woods and/or advances on the town it comes under small arms and artillery fire. The attacking SMG units are pinned down, disrupted and taking some casualties. JS2s move to the town to provide support and unstick the infantry. The PzIVs to the South-West, and the Panthers on the hill, reduce them to a line of burning steel. The Northern tank group is losing its duel with the PzIVs. A run to capture the Southern town by the SU100s and a T34 succeeds, but wrecks are left along the route. The survivor is killed when it appears in the Northern most hex of the town. While not exactly shooting fish in a barrel, it has been bad enough. Soviet air power ha not done enough damage. The infantry cannot close and is far too weak. Tanks are converted to smoking heaps when they move within 6 hexes. It is over. |
||||||||||||
| 0 Comments |