
|
Luck of the 21st Panzer Road to Berlin #32 |
||
|---|---|---|
| (Attacker) Germany | vs | Soviet Union (Attacker) |
| Formations Involved | ||
|---|---|---|
| Germany |  |
21st Panzer Division |
| Germany |  |
Kustrin Supply Convoy |
| Soviet Union |  |
44th Guards Tank Brigade |
| Soviet Union |  |
47th Guards Rifle Division |

| Total | |
|---|---|
| Side 1 | 3 |
| Draw | 1 |
| Side 2 | 0 |


| Overall Rating, 4 votes |
|---|
|
3
|
| Scenario Rank: --- of 913 |
| Parent Game | Road to Berlin |
|---|---|
| Historicity | Historical |
| Date | 1945-02-07 |
| Start Time | 03:30 |
| Turn Count | 24 |
| Visibility | Day & Night |
| Counters | 159 |
| Net Morale | 0 |
| Net Initiative | 1 |
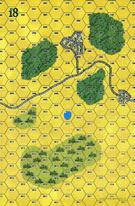
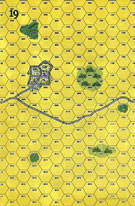
| Maps | 2: 18, 19 |
| Layout Dimensions | 56 x 43 cm 22 x 17 in |
| Play Bounty | 123 |
| AAR Bounty | 165 |
| Total Plays | 4 |
| Total AARs | 2 |
| Battle Types |
|---|
| Exit the Battle Area |
| Meeting Engagement |
| Rural Assault |
| Urban Assault |
| Conditions |
|---|
| Off-board Artillery |
| Reinforcements |
| Severe Weather |
| Scenario Requirements & Playability | |
|---|---|
| Road to Berlin | Base Game |
| Introduction |
|---|
|
Hastily issued new tanks and assault guns, rushed across Germany and unloaded on open sidings rather than at a station, Col. Hans von Luck's 1st Panzer Division received orders to immediately attack advancing Soviet forces and escort a supply convoy into the Kustrin fortress. Difficulties unloading the heavy vehicles on an open stretch of track, and roads clogged by refugees, delayed the start of the operation until the wee hours of the morning. |
| Conclusion |
|---|
|
The 21st was a veteran well-led division with new equipment; but the Soviets fought tenaciously, while rain and mud helped slow the Germans as well. The attack failed to take Gorgast and the supply convoy had no road to Kustrin. The rains would only grow heavier in coming days, halting the Soviet offensive for several weeks - a precious pause of which the Germans would make little use. |

|
|
|---|
| AFV Rules Pertaining to this Scenario's Order of Battle |
|---|
|
| Heer |
|---|
|


| Army (RKKA) |
|---|
|

| Guards |
|---|
|


| 7 Errata Items | |
|---|---|

|
The reduced direct fire value of the Heer HMG became 5-5 starting with Fall of France. (plloyd1010
on 2015 Jul 31)
|

|
All SS PzIVH tanks should have a movement of 8. (Shad
on 2010 Dec 15)
|

|
The morale and combat modifiers of German Sergeant #1614 should be "0", not "8". (Shad
on 2010 Dec 15)
|

|
All SPW 251s have an armor value of 0. (Shad
on 2010 Dec 15)
|

|
All Guards JS-IIs should have AT fire values of 8-8. (Shad
on 2010 Dec 15)
|

|
Kommissars never get morale or combat modifiers. Ignore misprints. (Shad
on 2010 Dec 15)
|

|
All Guards T-34/85 tanks should have AT fire values of 7-7. (Shad
on 2010 Dec 15)
|
| Panzer Victory | ||||||||||||||
|---|---|---|---|---|---|---|---|---|---|---|---|---|---|---|
IntroductionThis is an excellent scenario, depicting the overwhelming difficulties facing the German defenders as well as the obstacles confronting their Soviet attackers. Getting the supply convoy through is for all practical purposes impossible, but the threat of it---that instant victory---is enough to shake a Soviet Commander. Failing that, it will take superior tactics and and Luck to pull off a German Victory. The PlansThe Germans need to kill a lot of Soviets to hang onto the Town hexes and win. The convoy must also be run at some point, so running it should serve some purpose. For the Soviets, the major problems appear to be the weather and the distance, or put another way, time. The convoy is only a real threat if the Germans attack aggressively South to support it, in which case the chances of a Soviet victory are greatly increased. The German PlanThe German plan is somewhat complicated, something I generally avoid, and it includes a feint, another ploy I rarely indulge in. In this case, I'm going to run the convoy from the very first turn, drive my mobile troops down to take the exit town, and move the rest of my forces into strong defensive positions where I can draw the Soviets onto my prepared defences. The convoy and the taking of the town are a feint. Unless the Soviet player is stupid---and this one isn't---there's no way he's going to let the convoy get through. What I'm hoping is that the sight of that instant defeat will cause him to disrupt his own plan and react to mine. My troops in the exit town (Gorgast, Hex 1208) will not even dismount; at the first sign of Soviet advance in strength, they will turn and run for their own lines, leaving rearguards to slow the inevitable Soviet pursuit. The Soviet PlanThe Soviet Plan envisages two possibilities: a relatively static German defence, with the convoy not run; and a foreward defence, where the Germans drive South of the road and strive to keep the Red Army's Guards from interfering with the convoy. The Soviet's numerical advantage is offset by the long approach march, and the need to cover the possibility that the German Player will try the second alternative, as unlikely as that is (Soviet Military Intelligence has an excellent profile of the Oberst Luck's Chief of Staff). The Soviet Player decides on an advance on three axes, with major thrusts to either flank aimed principally at the town hexes North of the East-West Road. A smaller force, comprising mostly support units, will cut the road in the centre and move to assist either flank force as needed. An AsideThis was the first Game in the East for the me, after a series of almost unremitting losses in the Desert War (playing the Commonwealth Forces in Desert Rats and Afrika Corps). Prior to this fight, I had won exactly one Panzer Grenadier scenario, that being the second "Young Fascists" fight, which was ground out with great difficulty. I am very conscious of casualties, and that was not a victory condition in many of the scenarios we played. I could take an objective, but rarely could I throw my troops at prepared defences without sufficient preparation, and this meant that time ran out on me; my losses were light, but I nearly always left a victory condition unfufilled. With the German Army in the East, I was in much better conditions. And it showed. The GameThis was an overwhelming German Victory that went exactly according to plan. The immediate entry of the convoy, the capture of Gorgast (Hex 1208), and the great distance to be covered, panicked the Soviet Player into playing off-the-cuff. He threw the Soviet right flank foreward, leaving his supporting infantry behind, and ran his support force foreward to cut the road and attack the convoy proper. The Germans in Gorgast promptly departed as the Soviets drew up for an assault, leaving rear guards in the village itself and in the surrounding forests. armoured units deployed to take the road under fire, and the Jädgpanzer IV settled into a crossfire position. The convoy was duly intercepted and several trucks shot up. Important Leaders drawn for the convoy thereupon turned around and drove back to the large town on the German right flank, adding their support to the German forces of 21st panzer driving into the town. The Soviet player dawdled about shooting trucks---albeit ones loaded with supplies---instead of advancing to hit the Germans on the Soviet right flank and prevent them establishing a strong defence in advance of the Eastern town. As a result, the germans were in an excellent position by the time the Soviets were close enough to start threatening any of the German positions. By the mid-point of the game, not a single step of Soviet armour of any kind remained in play. The highest-ranking, and next-highest-ranking, Soviet Leaders had been killed, their Rifle platoons had been badly shot up, and they had managed only to re-take Gorgast and inflict light casualties on the Germans, none of which were panzer units. As the German counter-attack got under way, the Soviet Player conceded. ConclusionThe Germans had set up terrific defensive postions with mutually-supporting fires, which kept enemy Rifle platoons at arm's length and inflicted crossfire shots on Soviet armour. The late-war panzers were equal to Soviet armour, and unlike the 2-Pdr of the Commonwealth Desert forces, the 75mm L/48 and L/70 KwKs hit hard. The Soviet Player, panicked by the possibility of the convoy getting through, abandoned his plan and simply sent his units as fast as they could move at the Germans in Gorgast and at the convoy. This diverted his armour from the important German right flank with fatal results. There is no question the Germans would have driven the Soviets back, certainly recapturing Gorgast. The convoy actually retained enough vehicles to qualify for a win, but they could not have exited the board in time. Still, historically it would have been a devestating defeat for the Soviets, and doubtless won the Soviet Player a command in a penal brigade. |
||||||||||||||
| 0 Comments |
| Road to Berlin, scenario #32: Luck of the 21st Panzer | ||||||||||||
|---|---|---|---|---|---|---|---|---|---|---|---|---|
Not a bad scenario, as about half the scenario the visibility is one hex and increases to about 6 hexes by the end of the game but the movement is crawl, with mud and rain. There is another option for the Germans to win this, by bring on a convoy of supply trucks by turn four or after and exiting them off the other side of the map, so the Soviets must load up some armor with SMG Infantry and block the east-west road until the rest of the army crawls through the mud. Once this happen the next victory conditions each side can make, are who controls the most town hexes North of the east-west road but the Germans will get there first and by the time the Soviet Infantry is again in fighting formations, the Germans can spot them but the Soviet do have great numbers. I found the whole scenario somewhat interesting but there is no way the Germans will exit the supply trucks but they did hold off the Soviets from controlling to many town hexes, but what a bloody fight the Soviet armor was really shot up. The Germans took their losses as well but in the end they controlled a few more town hexes for a minor victory. The maneuvering due to the weather and special scenario rule for this, did make it frustrating at times. So for that reason, I’ll give it a 3 out of 5. |
||||||||||||
| 0 Comments |