
|
An Outstanding Performance Roer River Battles #5 |
||
|---|---|---|
| (Defender) Germany | vs | United States (Attacker) |
| Formations Involved | ||
|---|---|---|
| Germany |  |
183rd Volksgrenadier Division |
| Germany |  |
246th Volksgrenadier Division |
| United States |  |
2nd "Hell on Wheels" Armored Division |
| United States |  |
Army |

| Total | |
|---|---|
| Side 1 | 2 |
| Draw | 0 |
| Side 2 | 1 |


| Overall Rating, 3 votes |
|---|
|
3
|
| Scenario Rank: --- of 913 |
| Parent Game | Roer River Battles |
|---|---|
| Historicity | Historical |
| Date | 1944-11-16 |
| Start Time | 12:45 |
| Turn Count | 26 |
| Visibility | Day |
| Counters | 108 |
| Net Morale | 1 |
| Net Initiative | 2 |
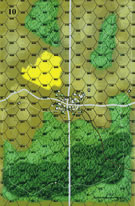
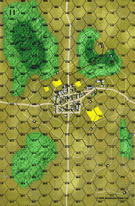
| Maps | 3: 10, 11, 22 |
| Layout Dimensions | 84 x 43 cm 33 x 17 in |
| Play Bounty | 176 |
| AAR Bounty | 171 |
| Total Plays | 3 |
| Total AARs | 1 |
| Battle Types |
|---|
| Urban Assault |
| Conditions |
|---|
| Entrenchments |
| Off-board Artillery |
| Reinforcements |
| Terrain Mods |
| Scenario Requirements & Playability | |
|---|---|
| Battle of the Bulge | Maps |
| Cassino '44 | Counters |
| Elsenborn Ridge | Maps + Counters |
| Roer River Battles | Base Game |
| Introduction |
|---|
|
Second Armored Division's initial objective was to sever the Germans' last north-south line of communication west of the Roer River. Only a small strip of land leading to Puffendorf was suitable for armored vehicles, and the constant rains had turned it muddy. After taking a tank ride to test the off-road conditions, the division commander ordered the advance. |
| Conclusion |
|---|
|
Combat Command A was held back to exploit any bridgehead over the Roer River the 29th Infantry Division could establish. This would give Combat Command B room to maneuver while not tearing up the ground as much. With over four battalions of extra infantry attached, CCB secured all objectives in addition to the high ground adjacent to Puffendorf. Losses were extremely light against weak resistance except at Apweiler, were seven Shermans had been destroyed. That night the 246th Volksgrenadier Division reported to headquarters that "the hole can no longer be mended." |

|

|
|---|
| AFV Rules Pertaining to this Scenario's Order of Battle |
|---|
|
| Heer |
|---|
|


| Army |
|---|
|


| 5 Errata Items | |
|---|---|

|
The reduced direct fire value of the Heer HMG became 5-5 starting with Fall of France. (plloyd1010
on 2015 Jul 31)
|

|
Strongpoints are single step units and can be eliminated with X results like any other single step unit. (Shad
on 2010 Dec 15)
|
|
|
The standard mix of strongpoints may be downloaded from Avalanche Press: http://www.avalanchepress.com/German_Strongpoints.php This is the standard mix found in Airborne, Airborne-IE, and Edelweiss Expanded. The strongpoint mix in Cassino '44 is different from that of other PG games. (plloyd1010
on 2012 Feb 01)
|
|
|
Strongpoints are affected by the terrain in their hex just like any other unit.
Even though they can't move, they can attack using Assault Combat if an enemy unit moves into their hex.
They may not dig in or benefit from entrenchments.
(rerathbun
on 2014 Apr 21)
|

|
The movement allowance on the counters in Airborne is misprinted. It should be "3." (rerathbun
on 2012 Jan 30)
|
| A Mediocre Performance | ||||||||||||
|---|---|---|---|---|---|---|---|---|---|---|---|---|
The US CCB, 2nd Armored, has a difficult task somewhat at variance with the Scenario title and "Conclusion." They must advance across two boards in "mud" conditions; take two significant towns and preferably the 20-m high ground on B11; and do so in the face of a defending force, which, whilst initially somewhat weaker in numbers and morale, gains essentially equality with reinforcements that can arrive beginning with turn 10 (of 26). There are extensive terrain modifications: (i) light woods => fields (this slows movement BUT, with post-harvest field rules, does not supply LT). (ii) regular wood => light woods. (see below for US use of this feature). (iii) no hill lines in effect save for the 20-m hill in the SE of B11 (n.b. this makes the approach to Puffendorf all open terrain (no -1 col shift to DF for hill terrain when US approaches). (iv) planned to use the visibility glide from Sc 1/26 (RoRB/IoG) such that Turn 16 = 10 and Turn 21 = 1 (night has fallen). The 183rd Volksgrenadier place 6xGREN in the B10 town; their remaining GREN + HMGs + ATGs in the B11 town (Puffendorf); and 5xstrongpoints (two unocc) + 75mmIG + 20mm AA (dug-in) on the 20-m hill. The last strongpoint is placed in the farm at B11/1004. US Attack Plan: Group I: 5xHMG + 4xINF + 3x81mm strike due East vs. B10 six-hex town. Group II: 14xINF + 1xENG + 3xM5 + 1xM10 through the three-hex wide swath of light woods (note mods above) centering from hex 0115 to egress at 1212. The US approach to Puffendorf is problematic: because of the large "field" to the SW of Puffendorf, the US approach axis is funneled back to the road for a direct eastward attack and/or can continue east to the south of the fields and approach north along the road. Given the time constraint regarding German reinforcements from the 246th VG division, I decided to make the more direct approach. US artillery, both OBA (4x18) and on-board mortars were not a factor in the combat for either town. Some D and DD results were attained, but there was not a single "big hit" by US artillery. Admittedly, this was difficult with the entire German force hunkered down in town hexes (or dug-in on the one hill), but, for the US, "the god of war" was a slumbering giant. B10 battle: whilst the Germans did not hurt the American force much here, US assaults struggled to get any effective result against the stalwart VGs. (much like the last scenario, the US simply kept rolling 1-3's on the 13 & 18 col with the Germans failing to break as one might expect of a 7/6 morale side). It was not until turn 14 that the last assault here was cleared. This, even though a 2xINF from Group II worked back along the trail to enter the town from the SE. The US only lost two steps (diff INF units), but lost an inordinate amount of time due to morale recoveries and assault difficulties. The slow-moving HMGs could not make it to Puffendorf by game end. The Group II action was activate-move for several turns. As the battle for the B10 town was turning frustrating, 2xINF/LT moved back NW along the trail to assist. The ground pounders huffed it towards Puffendorf as the thin-skinned US armor crews smoked cigarettes. US OBA wa unable to take out the Heer AT weapons (perhaps unaware of the inspiring presence of Leutnant Toughendorf 9-1-2). The US tried shooting it out at a range of 2 hexes in the hope of a lucky shot or some OBA support to create a hole; instead, German 105mm fire and some sharp shooting from the distant IG/AA on the 20-m rise; wrecked havoc on units D/DD'd from German OF and/or mortar fire. Three full strength INF platoons were forced to flee back to the light woods of B10 due to the long range direct fire ability of the two aforementioned guns (the US did attempt to OBA them a few times). Three other units, including the ENG had been reduced. With intelligence reports that German reinforcing elements were en-route, the US decides to make a break with its armor contingent in a run for the south board edge in hope of getting to B22 to interdict the lorry-borne 246th VG elements. Unfortunately, the 75mm AT gun was still in action and shooting sharply. The M10 is reduced and DD'd, fleeing back west; an M5 is hit by the IG! and killed upon fleeing by the ATG. Two other M5's make it to B22: the are able to hit the end of the reinforcing train (units arrived on Turn 13, ominously). The US tankers kill the (loaded) 75/41 and 81mm and their crews, but in turn fall victim to the Hetzer's return fire. So the American colonel is faced with a Puffendorf garrison essentially unharmed; two companies of grenadiers and two platoons of tank destroyers en route; his own heavy weapons platoons only able to arrive AFTER the Germans can reach the eastern parts of the town. He thinks that were this a game, I'd close the town, survive the 22/30-col OF, roll 6's on all my first assault attacks; and at least claim part of Puffendorf west of the N/S road. With night approaching, he orders his units to dig-in and await the elements moving in from B10. The Battle for Puffendorf would be fought on the morrow, but not won today. This day, the Heer could claim victory. |
||||||||||||
| 1 Comment |
PS From a game perspective, I was too cautious with the US attack on Puffendorf. With "Victory" unrelated (mostly) to step losses, the US "had" to gain the town regardless of whether a battalion was wiped out in the process (the US could DRAW if it took Puffendorf but lost 15 steps in so doing). Perhaps the "plan" to wait until a lucky DF or OBA stike generated a weak spot (as happened in WS Back to Lutrebois) to assault was too ingrained.
That US step loss German minor victory condition also make it difficult for the US to risk its thin-skinned armor. Two platoons lost either to AT fire or assault would be half of the acceptable US step loss count. The decision to risk them on the southern end-run described in the AAR was predicated on the lack of progress towards reducing the AT guns in Puffendorf and the fact that the German reinforcements needed to be carried by trucks along the road to avoid a much longer approach. Had the Germans not had the Hetzers, but only towed AT guns with the reinforcements, this "play" might have had a far better chance of a successful attack by the M5's.