
|
Corinith Parachutes Over Crete #39 |
||
|---|---|---|
| (Attacker) Germany | vs |
Australia
(Defender)
Britain (Defender) New Zealand (Defender) |
| Formations Involved |
|---|

| Total | |
|---|---|
| Side 1 | 0 |
| Draw | 0 |
| Side 2 | 1 |


| Overall Rating, 1 vote |
|---|
|
4
|
| Scenario Rank: --- of 913 |
| Parent Game | Parachutes Over Crete |
|---|---|
| Historicity | Historical |
| Date | 1941-04-26 |
| Start Time | 06:30 |
| Turn Count | 14 |
| Visibility | Day |
| Counters | 83 |
| Net Morale | 0 |
| Net Initiative | 0 |
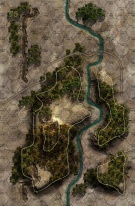
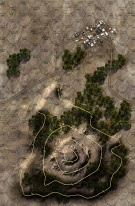
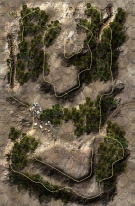
| Maps | 3: 96, 97, 98 |
| Layout Dimensions | 84 x 43 cm 33 x 17 in |
| Play Bounty | 174 |
| AAR Bounty | 171 |
| Total Plays | 1 |
| Total AARs | 1 |
| Battle Types |
|---|
| Bridge Control |
| Inflict Enemy Casualties |
| Paradrops |
| Conditions |
|---|
| Randomly-drawn Aircraft |
| Terrain Mods |
| Scenario Requirements & Playability | |
|---|---|
| Parachutes Over Crete | Base Game |
| Introduction |
|---|
|
With the Allied Force W retreating from Greece, Adolf Hitler personally ordered an airborne assault on the Corinth Canal to cut them off from the ports of southern Greece. The canal had only one bridge over its entire length and was deep with almost vertical sides. This made the bridge the only practical way to move large numbers of men over the canal. Gen. Alexander Lohr of Fourth Air Fleet quickly organized a combined parachute-glider assault to carry out the supreme leader’s directive. |
| Conclusion |
|---|
|
The bridge exploded, but just how the explosives were detonated is open to debate. The defenders made no claim for blowing the bridge even after their officers were subjected to intense interrogations by the Germans after the battle. The glider troops were cutting the fuses when they exploded, killing them and destroying the bridge. Some Germans claimed two Allied officers ran forward firing their pistols into the explosives, sacrificing their lives to destroy the bridge. British engineers maintained that even a hit from a small-caliber bullet would set the explosives off. Capturing the bridge intact was of no strategic importance, and the Germans captured over 900 Allied soldiers in the area along with 1,450 Greek soldiers who did not take part in the fighting. |
| Additional Notes |
|---|
|
Use Manx 40mm antiaircraft counters for the British 40mm antiaircraft guns. The production print of map 98 is missing 3 town hexes, Avalanche press has created a Map 98 overlay to correct this oversight. Philippe Leonard has also created a very nice overlay for map 98 on Board Game Geek. |

|
|
|---|
| AFV Rules Pertaining to this Scenario's Order of Battle |
|---|
|
| Army |
|---|
|


| Army |
|---|
|


| Luftwaffe |
|---|
|


| New Zealand Army |
|---|
|


| 1 Errata Item | |
|---|---|

|
Reduce strength direct fire value be came 5-5 in Army at Dawn. (plloyd1010
on 2015 Jul 31)
|
| No Corinthian Leather Here | ||||||||||||
|---|---|---|---|---|---|---|---|---|---|---|---|---|
With 7 special rules and a complex VC, the designer probably saved this scenario for last with good reason. At 93 counters and 3 boards, it is one the bigger scenarios in Crete. I also read the VC through 3 times ad only on the last turn did I realize that the Commonwealth had scored a Major Victory. The Germans had a small chance of scoring a victory on the last turn , but was fleeting. On the last turn two events happened to the Germans: First, no aircraft were drawn, limiting their attack on the bridge over the Corinth Canal. Second, the a FoW roll of 17 ended the game on only about the third time it was attempted on turn 14! However, this simply ended what most probably would have been a frustrating turn for the Luftwaffe paratroopers. The beginning of the game was promising for the Germans. The Commonwealth appeared to be totally outmatched, and had to setup a certain number of its force onthe south and north side of the Canal, yet blow the bridge. Thus, they had to destroy the bridge only after they consolidated their force. They would need all their troops to fight the much stronger German force. But their force on he south side was decimated by the Luftwaffe by the middle of the game. Their entire contingent of 4 Brens was destroyed, although one was vital to the defense of the bridge. This was key because the Germans tried to Assault the bridge from the south side, which featured a very weak landing by a PARA and PARA ENG. This force landed by glider on turn 3. The Brens tried to move toward the bridge, but 3 out of 4 never Mađe IT, being caught on the road on board 96 bu the Luftwaffe. However, the Assault on the bridge had mixed results. On one hand, the Commonwealth was prevented from Andy attempt to blow the bridge while the Germans occupied the bridge hex (really?). On the other hand, all of the assaulting force was wiped put, but destroyed the last Bren. In the meantime, the Australians trying to enter board 97 from the west, could not do so until turn 7 and did not enter play until turn 14;much to late to enter combat. The final score: German losses = 11 steps, 3 leaders. Commonwealth = 13 steps, 2 leaders. The bridge was never blown, but the Germans could not clear Commonwealth forces from the im međiate area surrounding the bridge. VC stipulates that as part of a Major Victory, the Commonwealth must elimate 6 German steps. VC |
||||||||||||
| 0 Comments |