
|
Guderian's Ducks Panzer Lehr #3 |
||
|---|---|---|
| (Defender) Germany | vs | Britain (Attacker) |
| Formations Involved | ||
|---|---|---|
| Britain |  |
22nd Armoured Brigade |
| Germany |  |
901st "Lehr" Panzergrenadier Regiment |

| Total | |
|---|---|
| Side 1 | 3 |
| Draw | 0 |
| Side 2 | 3 |


| Overall Rating, 6 votes |
|---|
|
3.67
|
| Scenario Rank: 280 of 913 |
| Parent Game | Panzer Lehr |
|---|---|
| Historicity | Historical |
| Date | 1944-06-10 |
| Start Time | 11:00 |
| Turn Count | 16 |
| Visibility | Day |
| Counters | 63 |
| Net Morale | 0 |
| Net Initiative | 1 |
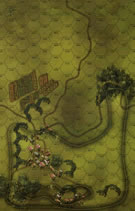
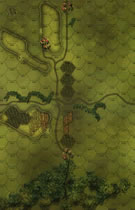
| Maps | 2: 27, 33 |
| Layout Dimensions | 86 x 28 cm 34 x 11 in |
| Play Bounty | 155 |
| AAR Bounty | 153 |
| Total Plays | 6 |
| Total AARs | 4 |
| Battle Types |
|---|
| Delaying Action |
| Exit the Battle Area |
| Inflict Enemy Casualties |
| Urban Assault |
| Conditions |
|---|
| Hidden Units |
| Off-board Artillery |
| Smoke |
| Scenario Requirements & Playability | |
|---|---|
| Beyond Normandy | Counters |
| Fall of France 1 | Maps |
| Panzer Lehr | Base Game |
| Introduction |
|---|
|
With British armor on the prowl yesterday, General Bayerlein pinpointed Ellon as the best place to meet any future incursions. However, on the field the commander disregarded orders and not only left the victorious grenadiers in Ellon but brought up his new JagdPanthers, fancifully referred to by the troops as Guderian's Ducks. Mounting the Panther's effective L/48 75mm gun and standing only a tad over 6 feet tall, the Jagdpanzer IV was a fearsome defensive weapon. |
| Conclusion |
|---|
|
Panzer Lehr boasted many veterans of the Eastern Front who were astonished at the scale of the British preliminary bombardment. But being professionals, they shook off the effects of the barrage quickly and manned their positions. Eventually five Cromwells managed to work their way to Major Zwierzynski's Headquarters where his Ducks proved their worth. When night fell things stood pretty much as they had at dawn. |

|
|
|---|
| AFV Rules Pertaining to this Scenario's Order of Battle |
|---|
|
| Army |
|---|
|


| 130th "Lehr" Panzer Division |
|---|
|


| Heer |
|---|
|


| 3 Errata Items | |
|---|---|

|
All Bren carriers should have a movement value of 7. (Shad
on 2010 Dec 15)
|

|
Counter is mislabeled, this is actually a 75/41. (rerathbun
on 2013 Mar 06)
|

|
The morale and combat modifiers of German Sergeant #1614 should be "0", not "8". (Shad
on 2010 Dec 15)
|
| Quacked Up |
|---|
|
Look, how could I pass that pun up? I'm only human. The British have a strong force supported by a number of Cromwells attacking the Germans who are holed up in a series of hilltop towns. The Germans have a number of halftracks, some AT guns and one platoon of Ducks, the Jagdpanzer IVs of the scenario title. The goal of the British is ultimately to disrupt the German defenders, take some of the towns and move aggressively through the Germans to the south. As usual, in a Panzer Lehr scenario there are hidden units. The Germans hide a number of their assets and the British, of course, come upon them by surprise. The losses from these encounters would ultimately be the difference in this scenario. The British enter the field with their infantry force in a tight group to benefit from a coule leaders with "2" morale ratings and lose some steps to artillery and mortar fire but arrive at the lower town's northern edge pretty much intact. Unfortunately the same cannot be said for the Cromwells accompanying them. Three Cromwell platoons are along for the ride to try to get some assault bonuses as they enter the town. The Ducks were waiting however, and savage the Cromwells. While this was predictable the losses were significant. As the Sappers were at the back edge of the infantry force it took an extra turn to get them into position, a turn used by the Ducks to withdraw. Another armored force of Stuarts and Cromwells bypass the towns to the east and penetrate the rear areas of the Germans. These units were ignored by the Germans and the focus put on the infantry force and holding sufficient town hexes in the north to make the southern attack inconsequential. As time went on, the British stumbled into each ambush with stunning losses and their infantry force, which had been substantially larger than the Germans became more even and the fight smaller. The end game was characterized by pinning assaults and infiltration on both sides and the Germans ended up with much the better situation. Unless you are very honest with yourself and force yourself to walk into the ambushes this is not a good one to play solo. The hidden units are essential to the German defense and playing with complete knowledge of the position of the forces will lead to substantial British advantages. While I pursued a British direct assault on the northern hill towns I can see the possibility for a larger and more strategic turning movement following the route taken by the Cromwells and Stuarts around the eastern edge of the field and attacking the German force from the rear. This is a short scenario, however and time will be a factor in such an approach. I enjoyed the play and the ambushes and give it a "4". I have been able to develop a "willing suspension of disbelief" in hidden unit scenarios and therefore am not bothered by the fact that the units are right there in front of me. I have played enough ftf to know what process I would use to screen a location and probe and use that approach in solo games. Without that ability this would be a "2". |
| 0 Comments |
| Gudarian's Ducks or No wise Quacks please! |
|---|
|
The Axis set upin town with and advance position in 9409 on bd. 27 containing 1 gren 1 Lt. & the JagPz IV and a halftrack in 0511. They also set up another position behind the hedgerow in 1116 containing the ATG platoon a gren and the prime mover. Also present were a HMG and another halftrack. The allies entered almost across the whole width of the North edge. Accurate JagPz fire knocked out 1 step of Cromwells and axis artillery got another step. Included were several disruptions and demorializations. But the Axis took their lumps too from some very accurate Allied OBA. By the time the Allies had finished their approach to the village the Allies lost another two steps to the "Ducks". This foul was indeed turning into a wise quack. Once the Allies had closed with the village it became a vicious slugging match as close quarters with both sides losing steps. After grabbing the northern most town hex cheaply a Axis gren platoon held out there in for almost the whole scenario. It suffered a number of demoralizations and disruptions but always recovered just enough to stay in play. Thus tying up 3 allied platoons and a Lt. for the whole time. Eventually the Allies were able to get a crossfire shot on the PzJag and knock out a step forcing it to retreat out of the Allied LOS. Then the deadly Allied OBA took care of the Axis ATG platoon. In the end the Axis only controled two town hexes and had take 14 step losses. Allied victory. Had the 3 platoons locked in melee won through this could have turned out very different, making the Allied victory much easier. This was a well balanced scenario that went down to the last turn. I give it a solid 4. I would like to play this again. I feel a different outcome is very probable. |
| 0 Comments |
| By the light of burning Cromwells |
|---|
|
My replay of this scenario was fast and very dynamic. British infantry swarmed down the east side of the long narrow board, quickly overwhelming a small German force in the woods there. The British armor split into two company sized formations, one proceeding through the woods and down the long ridge toward the PzJgIV platoon dug in on a hill in the center of the board, while the second company approached the town to provide close cover fire for the infantry when they broke cover and advanced on the town. The German forces in the town decided to risk an open field assault on the Cromwells, claiming 4 steps for the loss of two steps of infantry. The remaining Cromwell platoon pulled back toward their comrades to the east, just in time to be vaporized by the PzJg. The Cromwells had attempted to surround the German armor to get the crossfire, the only way they would be able to hurt the dug-in Germans. Unfortunately, 3 consecutive turns with lost initiative meant the Cromwells were wiped out without even chipping any gray paint. At this point things weren't looking good for the British. Although the Germans had lost half their infantry due to aggressive defense, they still held the town, had an impenetrable right flank (the PzJg) and an open killing field the British infantry had to cross to get at them. The British audaciously obliged, advancing in a wide, dispersed wave from the Eastern woods. German artillery and mortars disrupted many of the units, but a critical mass of engineers joined a lurking pair of Stuarts in an assault on the weak but recovering Germans defending the north end of town. The remaining German company decided to pull back to the south end of town, but the British succeeded in reaching the town all along the eastern flank, immediately engaging the Germans everywhere they could. Continuing to fall back, the Germans evacuated the town with just a platoon of infantry, the PzJg, and two platoons of mortars. Major British victory. |
| 0 Comments |
| Tenacious D |
|---|
|
The Germns set up primarily in the town hexes on Board 27, with a few units dug in outside of town, and the Jagdpanzer IV guarding the rear against any incursions by British tanks. On the very first activation the 75/41 ATG, dug in on the brow of a hill, took out a step of Stuarts - and promptly was taken out by artillery fire. Several Cromwell platoons pulled up to towns and started blasting away at the occupants, albeit with little success, while the infantry - harassed by artillery, mortars and fire from the 150mm Infantry Gun - closed in. The Jagdpanzer unit moved up to a hilltp town and engaged in a profitable duel with some Cromwells, taking out several steps before the British tankers pulled out of range and worked back towards the main battle. For the balance of the game, several assaults got into gear, though as things turned out none were resolved by game's end (the defenders were worn down some.) Artillery, in particular, took a fair toll of that infantry still in the open. The Jagdpanzer pulled up near the assault hexes, but before it could open fire on Cromwell platoons at a 2-hex range, one of the British units took out the entire TD platoon. Still, the stubborn Lehr defense held on grimly in the towns. The British did manage to send 3 steps of Cromwells to take the Board 33 towns and finish south of the east-west board. At the finish, there were 4 twon hexes still in dispute, with the Germans holding six more, while the Cromwells had been the last to occupy 2 and physically occupied one. The British lost 15 steps, of which 4 were tank steps, while the Germans lost both tank steps and 9 non-tank. With the 3 tanks steps steps south of the east-west road on Board 33, the British ended up with 25 points, to the German 31. A minor victory for Lehr. |
| 0 Comments |