
|
Chateau de Cordillon Panzer Lehr 2 #10 |
||
|---|---|---|
| (Defender) Germany | vs | Britain (Attacker) |
| Formations Involved | ||
|---|---|---|
| Britain |  |
231st Infantry Brigade |
| Britain |  |
8th Armoured Brigade |
| Germany |  |
130th "Lehr" Panzer Division |

| Total | |
|---|---|
| Side 1 | 0 |
| Draw | 0 |
| Side 2 | 0 |


| Overall Rating, 0 votes |
|---|
|
0
|
| Scenario Rank: of |
| Parent Game | Panzer Lehr 2 |
|---|---|
| Historicity | Historical |
| Date | 1944-06-18 |
| Start Time | 12:00 |
| Turn Count | 10 |
| Visibility | Day |
| Counters | 76 |
| Net Morale | 0 |
| Net Initiative | 1 |
| Maps | 1: 33 |
| Layout Dimensions | 43 x 28 cm 17 x 11 in |
| Play Bounty | 224 |
| AAR Bounty | 227 |
| Total Plays | 0 |
| Total AARs | 0 |
| Battle Types |
|---|
| Delaying Action |
| Exit the Battle Area |
| Inflict Enemy Casualties |
| Urban Assault |
| Conditions |
|---|
| Hidden Units |
| Off-board Artillery |
| Reinforcements |
| Smoke |
| Scenario Requirements & Playability | |
|---|---|
| Fall of France 1 | Maps |
| Liberation 1944 | Counters |
| Panzer Lehr 2 | Base Game |
| Introduction |
|---|
|
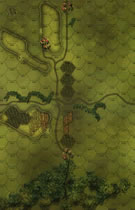
As part of the effort to finally take Tilly the Allies ordered the 231st Infantry Brigade to secure the Chateau de Cordillon. If it could be secured, the chateau would not only put pressure on the defenders in Hottot but would threaten to severe communications between the two towns. The British sent all three battalions to subdue the chateau. |
| Conclusion |
|---|
|
Despite the additional British manpower the Germans turned back the attack with the assistance of a counterattack by the ever-present Panthers. Since their arrival the Panther tanks had been thrust into many rapidly deteriorating situations, and more times than not, pulled Panzer Lehr's schnitzel out of the fire. The Allies first encountered the Panther tank a year before, and the Americans in particular seemed unconcerned about finding a way to counter them. On the other hand, when the British found the Churchill unable to mount the excellent 17 pounder, they started installing them in Sherman tanks instead. While matching the Panther's firepower, its armor and optics were still inferior. The Americans not only scorned the Firefly, but even after meeting the Panther, put no urgency into deploying the Pershing tank. The Allied tankers paid in blood for this short sightedness. |

|
|
|---|
| AFV Rules Pertaining to this Scenario's Order of Battle |
|---|
|
| Army |
|---|
|


| 130th "Lehr" Panzer Division |
|---|
|


| 5 Errata Items | |
|---|---|

|
All Bren carriers should have a movement value of 7. (Shad
on 2010 Dec 15)
|

|
The "Optional Values" for the Firefly given in an Avalanche Press Daily Content piece on the 17-Pdr Anti-Tank gun (and printed on a replacement counter sheet Download) are now the Official Ratings, published in games like Cassino '44, Grossdeutschland 1946, and Indian Unity. These are: 5-5 / 8-8 Full Strength and 3-5 / 8-8 Reduced Strength. (caryn
on 2012 May 03)
|

|
Leaders for the Panzer Lehr Division appear in the second release. Players with the first release should use the ILS for selection and substitute regular Heers leaders, if not using the Heers leaders originally specified. (plloyd1010
on 2016 Jul 13)
|

|
Leaders for the Panzer Lehr Division appear in the second release. Players with the first release should use the ILS for selection and substitute regular Heers leaders, if not using the Heers leaders originally specified. (plloyd1010
on 2016 Jul 13)
|

|
Leaders for the Panzer Lehr Division appear in the second release. Players with the first release should use the ILS for selection and substitute regular Heers leaders, if not using the Heers leaders originally specified. (plloyd1010
on 2016 Jul 13)
|