
|
Guderian's Ducks Panzer Lehr 2 #3 |
||
|---|---|---|
| (Defender) Germany | vs | Britain (Attacker) |
| Formations Involved | ||
|---|---|---|
| Britain |  |
22nd Armoured Brigade |
| Germany |  |
901st "Lehr" Panzergrenadier Regiment |

| Total | |
|---|---|
| Side 1 | 1 |
| Draw | 0 |
| Side 2 | 0 |


| Overall Rating, 1 vote |
|---|
|
3
|
| Scenario Rank: --- of 913 |
| Parent Game | Panzer Lehr 2 |
|---|---|
| Historicity | Historical |
| Date | 1944-06-10 |
| Start Time | 11:00 |
| Turn Count | 16 |
| Visibility | Day |
| Counters | 63 |
| Net Morale | 0 |
| Net Initiative | 1 |
| Maps | 2: 27, 33 |
| Layout Dimensions | 86 x 28 cm 34 x 11 in |
| Play Bounty | 177 |
| AAR Bounty | 171 |
| Total Plays | 1 |
| Total AARs | 1 |
| Battle Types |
|---|
| Delaying Action |
| Exit the Battle Area |
| Inflict Enemy Casualties |
| Urban Assault |
| Conditions |
|---|
| Hidden Units |
| Off-board Artillery |
| Smoke |
| Scenario Requirements & Playability | |
|---|---|
| Fall of France 1 | Maps |
| Liberation 1944 | Counters |
| Panzer Lehr 2 | Base Game |
| Introduction |
|---|
|
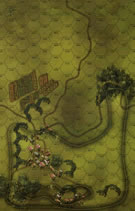
With British armor on the prowl yesterday, General Bayerlein pinpointed Ellon as the best place to meet any future incursions. However, on the field the commander disregarded orders and not only left the victorious grenadiers in Ellon but brought up his new JagdPanthers, fancifully referred to by the troops as Guderian's Ducks. Mounting the Panther's effective L/48 75mm gun and standing only a tad over 6 feet tall, the Jagdpanzer IV was a fearsome defensive weapon. |
| Conclusion |
|---|
|
Panzer Lehr boasted many veterans of the Eastern Front who were astonished at the scale of the British preliminary bombardment. But being professionals, they shook off the effects of the barrage quickly and manned their positions. Eventually five Cromwells managed to work their way to Major Zwierzynski's Headquarters where his Ducks proved their worth. When night fell things stood pretty much as they had at dawn. |

|
|
|---|
| AFV Rules Pertaining to this Scenario's Order of Battle |
|---|
|
| Army |
|---|
|


| 130th "Lehr" Panzer Division |
|---|
|


| 6 Errata Items | |
|---|---|

|
All Bren carriers should have a movement value of 7. (Shad
on 2010 Dec 15)
|

|
Counter is mislabeled, this is actually a 75/41. (rerathbun
on 2013 Mar 06)
|

|
Leaders for the Panzer Lehr Division appear in the second release. Players with the first release should use the ILS for selection and substitute regular Heers leaders, if not using the Heers leaders originally specified. (plloyd1010
on 2016 Jul 13)
|

|
Leaders for the Panzer Lehr Division appear in the second release. Players with the first release should use the ILS for selection and substitute regular Heers leaders, if not using the Heers leaders originally specified. (plloyd1010
on 2016 Jul 13)
|

|
Leaders for the Panzer Lehr Division appear in the second release. Players with the first release should use the ILS for selection and substitute regular Heers leaders, if not using the Heers leaders originally specified. (plloyd1010
on 2016 Jul 13)
|

|
Leaders for the Panzer Lehr Division appear in the second release. Players with the first release should use the ILS for selection and substitute regular Heers leaders, if not using the Heers leaders originally specified. (plloyd1010
on 2016 Jul 13)
|
| Whoops! | ||||||||||||
|---|---|---|---|---|---|---|---|---|---|---|---|---|
The British Commander made a catastrophic error right at the beginning of the scenario... he supercharged his tanks right up the middle and was shot to pieces by "the ducks" and the entire attack didn't do well after that fiasco. With the AT gun firing support (and crossfire)... it was really bad. (Note: I really should pay attention to those AT values more.) By the time the British were ready to take a village hex or two they were so far behind in points it really didn't matter anymore. |
||||||||||||
| 0 Comments |