
|
The Burauen Raid, Wa Operation Nihon Silk #5 |
||
|---|---|---|
| (Defender) Japan | vs | United States (Defender) |
| Formations Involved | ||
|---|---|---|
| Japan |  |
3rd Raiding Regiment |
| Japan |  |
4th Raiding Regiment |
| United States |  |
11th "Angels" Airborne Division |

| Total | |
|---|---|
| Side 1 | 0 |
| Draw | 0 |
| Side 2 | 4 |


| Overall Rating, 5 votes |
|---|
|
3.8
|
| Scenario Rank: 207 of 913 |
| Parent Game | Nihon Silk |
|---|---|
| Historicity | Historical |
| Date | 1944-12-06 |
| Start Time | 16:00 |
| Turn Count | 26 |
| Visibility | Day & Night |
| Counters | 68 |
| Net Morale | 0 |
| Net Initiative | 0 |
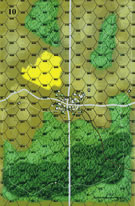
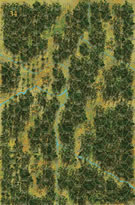
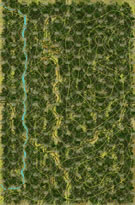
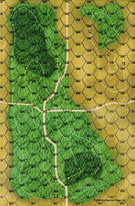
| Maps | 4: 10, 34, 35, 9 |
| Layout Dimensions | 86 x 56 cm 34 x 22 in |
| Play Bounty | 174 |
| AAR Bounty | 159 |
| Total Plays | 4 |
| Total AARs | 3 |
| Battle Types |
|---|
| Airfield Control |
| Inflict Enemy Casualties |
| Paradrops |
| Conditions |
|---|
| Off-board Artillery |
| Terrain Mods |
| Scenario Requirements & Playability | |
|---|---|
| Battle of the Bulge | Maps + Counters |
| Kokoda Trail | Maps |
| Nihon Silk | Base Game |
| Introduction |
|---|
|
The IJA desperately sought a stop-gap measure to eject the Americans from Leyte. Their solution formed around a combined parachute and air transport landing on the Burauen South airfield, Burauen North airfield, San Pablo airstrip, Dulag airfield and the Tacloban airfield on Leyte. In addition, the Japanese ground force in Ormoc would maneuver to link up with the paratroopers. At this point in the war, the IJA armed a portion of its paratroopers with a 30-round sub-machinegun. Scatted elements of the US 11th Airborne Division defended these targets areas, including a high proportion of support units like engineers, quartermaster, signal corps, division artillery HQ, and AA units. |
| Conclusion |
|---|
|
The Japanese parachute drop caused some initial confusion among the Americans, but no panic. Scratch units formed, like 60 US supply men and ground crews who dug in on the south side of Bayug strip and held out all night. In another example, the 127th Engineers counter-attacked the San Pablo strip and successfully held it. |

|
|
|---|
| AFV Rules Pertaining to this Scenario's Order of Battle |
|---|
|
| Imperial Japanese Army |
|---|
|


| Airborne |
|---|
|


| Army |
|---|
|


| Nihon Silk, scenario #5: The Burauen Raid, Wa Operation | ||||||||||||
|---|---|---|---|---|---|---|---|---|---|---|---|---|
Posting #1 *This scenario, after just one turn is looking to be a blast, pardon the pun. It starts out with some interesting setup decisions for the Americans and interesting Assembly Point/Drop Zone decisions for the Japanese as well. There are 5 airfields but 8 airfield markers, as three of the airfields are larger. The Japanese get three points for every airfield marker under their control and the Americans get points for every Japanese step eliminated and that is it. *The terrain is a real factor so the Japanese choose only three areas to drop in, that are more in the open and half their group come in by Gliders and the other half by parachute drop. In fact, 5 out of the 10 scenarios in Nihon Silk are actual airdrops/glider landings. The Landings by air usually take 1-4 turns as there are delays and AP’s new drop rules are excellent. *After the first turn almost half of the Japanese landing force will be delayed, either one, two or three turns. They have lost two steps in the landing so far and have 4 disrupted units and two demoralized units and the airdrop units are scattered more then the glider units and the Americans are already taking pot shots and ranging some artillery on them but the Americans are weaker in force but dug-in with some supporting heavy weapons units, like the M16, 40mm AA gun and some on and off board artillery. It will take the Japanese 3-4 turns to get seriously organized but they have more units coming and the American are very scattered as well, defending all those airfields that they thought were safe in the rear area. This looks like it will be a very fun scenario to play out. Posting #2 *After four turns, the Japanese are all landed and the units that landed in earlier turns have already advanced on the three nearest airfields, saving the other two for later. Only one looks pretty good so far, the larger one on map 10 in the more open terrain where most of the Japanese have concentrated. But even though they control one airfield marker so far, they have lost 4 steps total and they cannot afford too many more 3 point airfield hexes for 4 points of unit losses. Now they are starting to get more organized so who knows how this will go over the remaining 22 turns. *Now what to do with the American units, reinforce the airfields under attack, pulling out the small units guarding their own airfield and risking major point losses or just try to hold on inflicting as many step losses as possible on the Japanese before pulling back, as the Japanese do not receive victory point for eliminated American units. *Also, are the Japanese attacking too many airfields at once, should they just concentrate on one or two at a time but if they do that, they won’t have enough time to secure enough of them, to win? Posting #3 The battle in the middle is turning into a quagmire and up north where is another smaller battle going on. The two airfields on the peripheral are still on touched by battle. The Japanese overran and American Artillery 105mm battery but paid the price for it later, as an adjacent American Para Infantry unit unleashed rifle fire and rolled a 12. Go stuff so far but the Americans are still leading by three points but it looks like a few more airfields may fall some, so it is anyone game at this point. Posting #4 *This battle had a little bit of everything as far as decision making. There was a lot of maneuver and I enjoyed the whole battle right to the conclusion. The Japanese took four airfield markers for 12 points but the Americans received 23 points for destroyed Japanese steps, while the Japanese do not receive points for eliminated American steps. So the point difference was 11 points, so a Major American Victory. There were two American airfields that were contested and with a turn or two more the Japanese would have had a draw with 12 more points. *The American M16 is very deadly with a 24-7 direct fire value. It was responsible for at least 4 Japanese step losses and I recommend placing it by one of the airfields in the open terrain area as this is a great asset to have. Just get adjacent to it will really cost the enemy. The Japanese needed to move some units out of the controlled airfields sooner to and they would have had a better chance of controlling more of them and winning. Also, the Americans did pull some units out of uncontested areas, to help out against contested airfields, as time was on their side when they made these decisions. Lastly, visibility goes down to one hex at some point in the game. *This is a great scenario to play! |
||||||||||||
| 0 Comments |
| Burauen Operation Wa |
|---|
|
I can't begin to tell everyone everything that happened in this scenario. It would take a book. It ended as a Allied major victory but it did not feel like it. The Axis contested two airfield hexes at game's end and had sole possession of one. (Hex 1205 on bd 5). The losses incurred buy the Axis during and immediately after the drop retarded Axis attacks during the whole rest of the scenario. Even with a random hidden solitaire method both Allied AA batteries were perfectly placed to oppose an airborne drop. On the first two turns the Axis lost a total of 7 steps to landing difficulties and Allied fire. In addition there were a number of disruptions & demoralizations and a leader loss. (9-1-0 Lt.) The fight for 1105-1106 on bd 9 with the glider troops was especially bitter. Both sides would loose steps as they fed troops into the ongoing Axis assault in hex 1106. The same goes for 0506 and 0507 on bd 10. Here the Axis managed to contest the runway hex. Hex 0507 fell early to the Axis & was held until game's end. At the end the Axis managed to contest two different airfield hexes. Giving the Axis points for the "control" of these hexes, even though contested, would still yield a point differential the Axis could not overcome due to their step losses during the scenario. Rating 4. ON A PERSONAL NOTE: I suppose that this scenario would be the very closest Panzergrenadier will come to recreating an action that my Dad was involved in. He was a Medic in the 6th Ranger Battalion. According to a type written newspaper or wire service story that was among my Dad's discharge papers the writer describes the following Ranger operation: (The author's name escapes me but I'll look it up if anyone cares enough.) The story starts right after the Japanese retreat from their raid. They scattered to all points of the compass. The 6th Rangers were at the time acting as "Palace Guard" for the 6th Army HQ. They were infantry and they were at hand so they were chosen to organize a number of "pursuit elements" (author's term). These elements usually made up to platoon to Company size were set out after the Japanese groups of unknown size. Once organized some local guerrillas were attached to each element to act as scouts and guides. Evidently Dad was with one of these groups. They chased the Japanese into the mountains for 17 days. (That IS correct 17.) They finally cornered the Japanese in a cave. It was not known how many soldiers the Japanese had in the cave but some were assumed to be wounded during the air drop operation or on this pursuit. After the Japanese had refused surrender, the Allies assaulted. They wiped out the remaining soldiers in the cave and then looked for other openings. Dad summed up the whole operation with: "Made flank attack and patrolled area." which is exactly how you attack a cave, from the flank. Once the cave is overcome you patrol for other openings. Gee six words for, in the end, what was more than three weeks "behind the lines." as he puts it. That was not the only time. There were 3 other times besides the Prisoner rescue where he spent varying times "behind the lines" ranging from 3 to 15 days. To answer to anyone who wants to know, yes he was on the Cabanatuan raid. He helped to rescue 510 (or 511 or 512 depending on the source) prisoners from the Japanese on Luzon in January of 1945 and was awarded the Bronze Star for Valor. But that is another story. I also had a cousin in the 11th Airborne Div. but I am not sure of his record except that he was wounded on Luzon. Also in the Battle of the Bulge game there is a scenario which features the actual company my late step brother served in. Unfortunately he had been killed earlier in the Mortain counter offensive in August of 1944. He was in the 12th Regt, 3rd Bn. I Co. |
| 2 Comments |
| Can't Understand the High Rating for this One | ||||||||||||||
|---|---|---|---|---|---|---|---|---|---|---|---|---|---|---|
We starteded this game some time back in late-January on my gaming table at home, but it became disarrayed due to a couple of pet overun attacks! We ended up switching to Vassal and reconstructing the setup after the 6th game turn. We may well have lost something in translation, but I think that pretty much anything that the Japanese paratrooper player does will be in vain. Too unbalanced for shared play is my opinion of this scenario. I was the player for Japan, against the high-speed-killing-machine that is the Treadasaurus - in full war cry - (its rodeo season in Southern Arizona - Yeehah!) who led the American defenders. We both drew average leaders, maybe a bit better on the American side, and reluctantly played with the FOW optional rule and also the excess initiative rule. We used these two house rules: 1) Road Movement for Mechanized & Foot Units All FOOT & MECHANIZED units may move on roads at the rate of 1/2 a Movement Point (MP) per road hex, just like MOTORIZED units, and 2) Standardized Movement for Mechanized Units All mechanized units may move through clear hexes at a movement cost of only 1 movement point (MP) per hex, instead of 1 1/2. Add one to this cost if moving up, across, or down slopes hexes. These simplified play considerably for the math challenged players involved! Others have reviewed this scenario positively, so let me just say that it was an Allied major victory, which felt inevitable to me. The Emperor's troops could only (barely) hold a pair of contested two airfield hexes by game end. This came at a very high cost in step losses, partly resulting from bad and delayed landings by the Japanese paratroops into the teeth of the heavy American AA fire, that was very well positioned by my honorable opponent. Loss of the senior Nipponese Commander really hurt Japanese prospects in only the 4th turn! I enjoyed playing this one with good company and lots of beer which helped to ease the pain of losing almost the entire Japanese force. I give this one a generous rating of 2, simply because it was fun to play. I can't account for it having such a high rating. The Japanese paras are doomed from the beginning, IMHO, with no real chance of a win, against the well-armed GIs led by an experienced player. This battle is better played as a solitaire adventure. Good luck as the Emperor's Chosen One in this doomed operation. |
||||||||||||||
| 2 Comments |
This one was also too long, and I agree with my honorable opponent, that it is overrated and only suitable for SOLO play.
It helps that the game designer rated their own creation a 5, a little Subliminal suggestion never hurts.