
|
Palembang Nihon Silk #4 |
||
|---|---|---|
| (Attacker) Japan | vs |
Britain
(Defender)
Netherlands (Defender) |
| Formations Involved | ||
|---|---|---|
| Britain |  |
6th Heavy Anti-aircraft Artillery Regiment |
| Japan |  |
2nd Raiding Regiment |
| Netherlands |  |
South Sumatra Territorial Command |

| Total | |
|---|---|
| Side 1 | 5 |
| Draw | 0 |
| Side 2 | 0 |


| Overall Rating, 7 votes |
|---|
|
3
|
| Scenario Rank: 746 of 913 |
| Parent Game | Nihon Silk |
|---|---|
| Historicity | Historical |
| Date | 1942-02-14 |
| Start Time | 11:00 |
| Turn Count | 30 |
| Visibility | Day |
| Counters | 64 |
| Net Morale | 0 |
| Net Initiative | 1 |
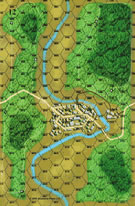
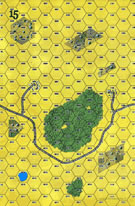
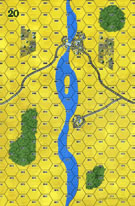
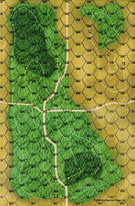
| Maps | 4: 12, 15, 20, 9 |
| Layout Dimensions | 86 x 56 cm 34 x 22 in |
| Play Bounty | 172 |
| AAR Bounty | 153 |
| Total Plays | 5 |
| Total AARs | 4 |
| Battle Types |
|---|
| Airfield Control |
| Inflict Enemy Casualties |
| Paradrops |
| Conditions |
|---|
| Hidden Units |
| Off-board Artillery |
| Terrain Mods |
| Scenario Requirements & Playability | |
|---|---|
| Afrika Korps | Counters |
| Battle of the Bulge | Maps |
| Nihon Silk | Base Game |
| Road to Berlin | Maps |
| Introduction |
|---|
|
Palembang served as the capital of Sumatra in the Netherlands East Indies. Its value derived largely from two very huge oil refineries and the Pangkalanbenteng airfield eight miles north of town along the banks of Musi River. The Imperial Japanese Army dropped the 2nd Raiding Regiment on the airfield to secure it, while they sent the 229th Japanese Infantry Regiment up the Musi River in landing barges to relieve the paratroops. Securing the refineries would follow, and hopefully before the Allies torched them. The Dutch and the British both deployed forces to challenge this obvious plan, the IJA paratroopers' first combat jump. |
| Conclusion |
|---|
|
The swift assault led to a brief fight and the loss of only one refinery, thus ensuring success for the IJA's first airborne operation, and arguably the most significant victory for Japanese parachute troops. General Terauchi was appreciative of the Teishin Shudan 1st Raiding Brigade's effectiveness. The Allies abandoned Palembang and the 229th Infantry landed upriver by barges ahead of schedule on the February 15th. |

|
|
|---|
| AFV Rules Pertaining to this Scenario's Order of Battle |
|---|
|
| Army |
|---|
|


| Imperial Japanese Army |
|---|
|


")
| East Indies Army |
|---|
|


| 2 Errata Items | |
|---|---|

|
Two British infantry have their full strengths printed on the back. They should both be "2-3" when reduced. (Shad
on 2010 Dec 15)
|

|
Ignore the direct fire values. (Shad
on 2010 Dec 15)
|
| Nihon Silk, scenario # 4: Palembang | ||||||||||||
|---|---|---|---|---|---|---|---|---|---|---|---|---|
*This scenario has actual Refinery & Airfield counters and the mostly Dutch with a few British units in support vs. the Japanese. This scenario also actually has a parachute drop. 5 out of the 10 scenarios have parachute or glider landings or mix of both. Besides step losses as victory point, the Airfields in the southwest and the refineries in the Northeast are where the main points are. *At first I wasn’t sure about what AP did with my parachute drop & glider landing rules, as they seem more involved then I wanted but after using them, I really enjoyed that part of the game. There is more to keep track of the first couple of turns but is gives the Allied units with the weaker morale a better chance in 1942, as the Japanese have a very high morale in 1942 which falls off a bit in the 1944-45 scenarios. *With the new drop rules, the Japanese really start off scattered around, some in demoralized or disrupted state and one lost a step and about half made the actual drop zone area. Some came on latter turns then planned, so it took me at least four turns to get everybody in some sort or organized fighting condition for the Japanese side, as few units were able to go forward right way. This was kind of a new fun twist in PG. *The Allies had three forces, some Dutch at the airfield, some Dutch at the town of Palembang, required by setup and smaller detachment of the British Anti-aircraft, Infantry and some Dutch Engineers up in the refinery area. When the landing came, the Dutch sent their units in Palembang to reinforce their units at the airfield. The problem was, the Dutch at the airfield shouldn’t have waited around for reinforcement and just attacked the scattered, demoralized and disrupted Japanese paratrooper right away before they got organized. Once the Japanese got organized, time was on their side with the higher morale and took the airfield after about 15 turns, with most of the Dutch units in that area eliminated, demoralized or in the jungle south but still the Japanese had to leave units around the airfield, as there were just enough Dutch to take it back again if they left, so only a few could pull out and help their brothers still fighting in the north at the refineries. *The refineries were kind of a different story, as the Japanese did really not have enough forces there and the British have a higher morale then the Dutch not to mention a big 40mm Anti-aircraft gun, that with some of their reduced infantry and some nasty Dutch Engineers made their lives difficult in the North. They lost over half their casualties there and one Japanese Lieutenant deserted and the other had a morale of only 7. How did I draw that counter? Being leaderless for a while, there wasn’t much for the Japanese to do but take pot-shots. *Once the Japanese sent reinforcements to the north, the Dutch Engineers blow all the refineries up, denying the Japanese points and resources but also losing those victory points to themselves as well. *The Japanese won a major victory, 24 points to 7 point a 17 point difference. Originally in my design the Allies would have received 3 points for each refinery destroyed and this would have changed the outcome to a minor Japanese victory but AP dropped this in the scenario but still allowed blowing them up for point denial. *With such a higher morale, the Allies should have tried three different tactics to maybe change the outcome. One as I mentioned before, attack the Japanese right away, when they are scattered all over the place. Two, maybe blowup the refineries right away and sent those Northern units south to help defend the airfield or three, abandoned the airfield and defend the refineries. I am not sure the Allies can defend both areas unless they have luck in the beginning attacking disorganized Japanese units. Fun to play but with some of the changed victory conditions, I think it favors the Japanese a bit unless you use my counter strategies. |
||||||||||||
| 0 Comments |
| Palembang |
|---|
|
For the Axis the assembly points were bd. 22 hex 1008 and bd 15 hex 0802. These assembly points were picked so as to be almost certain that no Allied AA battery would be near the DZ. The drop was on time and split between the two Dzs. Many units landed out of the Dz but none scattered off board. There were many demoralizaitons and disruptions but amazingly no step losses. Slowly but surely the Axis come together to attacked their objectives. The Allies managed to blow two objective refineries but the Axis captured the third and garrisoned it well. This was all accomplished by 1600. At the airfield one end of the field was contested in assault. The other hex of the airfield had only the flak battery defending. The Axis mobile force consisted of the armored car platoon and platoons of Infantry mounted on trucks. Because of there being no road link between the refineries by the time the reinforcements arrived the last refinery hex was captured by the Allies. (hex 0804) The reinforcements would still be vastly outnumbered so they reversed course back to the airfield. The airfield fell at 16:15. by 17:45 all opposition was eliminated or neutralized. A last minute assault on a refinery at hex 0804 on bd 20 by the Allies was beaten back with loss. Meanwhile back at the at the airfield the Axis had managed to push athe Allies back to the treeline on the southside of bd 12, well away from teh airfield. The Allied battey position on bd 12, hex 0303 was never silenced all during the scenario. It provided support the both the airfield postion and the 3 refineries. Rating 3. |
| 0 Comments |
| Hold the Refineries as Long as You Can | ||||||||||||||
|---|---|---|---|---|---|---|---|---|---|---|---|---|---|---|
This scenario was played face-to-face in 8 sessions with the ferocious and canny Treadasaurus leading the high-morale, attacking Japanese contingent. I lost the card draw and played the hard-pressed Allies in this one-sided and overlong scenario that was all about holding some widely-scattered, airfields and refineries. My opponent did not the overly complicated paradrop rules, and I didn't like the poor play balance, which I guess was at least realistic for this dark time in early 1942. Others have filed AARs on this scenario, so I will only mention a few highlights. The Emperor's paras arrived piecemeal, in different stages of morale, and mostly scattered. They took at least 5 turns to get organized and consolidated. I probably should have rushed them as soon as possible, but hung back thinking that It was more important to let them come to my dug-in, and town-or-airfield-holding garrison defenders. I also should have blown up the refineries as the first order of business, to free up troops to try and flank the advancing Sons of Nippon. Time was only on the side of that Japanese, and though we had 8 FOW-shortened turns, the Allies could have used many more. I lost key leaders in counter attacks that devolved into very costly, multi-turn close assaults. Only in the north quadrant of the battle map did I have success at inflicting significant step losses on the invaders. In the end, the Japanese won a major victory, 28 points to 6 in this rather awful, lop-sided battle, that could use a rewrite. This scenario is much better suited to solitaire play, IMHO. |
||||||||||||||
| 0 Comments |
| Long Day's Journey into...well, more day. | ||||||||||||||
|---|---|---|---|---|---|---|---|---|---|---|---|---|---|---|
Daniel and I were intrigued by this scenario given the mix of units (Dutch!, Japanese paratroopers, the ability to use the "oil field" counters, etc.), the air drop and glider landing mechanics, and the sheer scope of the Japanese assault and Dutch response. Sadly, the scenario as developed has a significant flaw which takes quite a bit of suspense out of the play. You see, the Dutch/British force really doesn't have any power to it (the 40mm AA gun is the only unit with any oomph to it and being immobile it is prone to getting destroyed by getting demoralized. Having said that my Dutch colonials acquitted themselves quite well, knocking off at least 8 steps of highly trained and very expensive paratroopers. In addition, the intrepid Dutch engineers, despite close assaults happening in their own hex, were able to successfully blow all three hexes of oil refineries, a significant improvement over the historical record. What wasn't an improvement over the historical record was the near destruction of the entire Allied force. You see the only unit which even has an even morale situation, and that is only against reduced Japanese paratroopers, is the 40mm AA gun. Every other unit on the Allied OB is at a deficit when it comes to morale. Add to that the fact that the Japanese force is primarily infantry with a few HMGs thrown in (and one incongruous AT gun to use against the Overvalwagens (armored cars) should they choose to stick their noses out. Therefore most Japanese assaults had at least three column shifts (morale, leader and Japanese infantry) and these three were usually quickly followed by one for demoralized defender. My favorite is the reduced Dutch who have a morale of "5" and when demoralized a "4". I put a smaller Allied force with the engineers in the oil field area while I saved a lot of my force around the airfield for a last stand. Once placed, however, it would be suicide to venture too far into the rest of the battlefield as any Allied force caught outside of the dug in positions risks being assaulted and destroyed in detail. Now to the problem with the scenario, it is just too darn long for the Allies to have any chance at all. There was a fix that Daniel and I thought up about at turn 10 which was that this would be a very suspenseful 12-16 turn scenario. Unfortunately it is written as a 30 turn scenario which gives the Japanese ample time to capture the airfield (and get the victory points for that) and destroy enough Allied steps to make the oil refineries moot. The other idea, which I came to later, was to increase the VPs for Japanese step losses to 2 per step, giving the Allies a reason to continue to engage. In such a circumstance I would extend the game as noted above to 20 turns, still well less than the advertised 30. Having said all of this I gave the scenario a "2" since the Allied player really never has the operational initiative, has few choices once he has placed his troops and is forced to hope that he doesn't take too many losses on the 18-30 assault columns. We did have fun (I am reminded of the statement about a "bad day's fishing" being better than a day in the office anytime)and enjoyed the mechanics and techniques of working with an airborne force but it was just a little too off kilter for me. |
||||||||||||||
| 0 Comments |