
|
Armored Reconnaissance Group Marianas 1944 #23 |
||
|---|---|---|
| (Defender) Japan | vs | United States (Attacker) |
| Formations Involved | ||
|---|---|---|
| Japan |  |
321st Independent Infantry Battalion |
| Japan |  |
322nd Independent Infantry Battalion |
| Japan |  |
9th Tank Regiment |
| United States |  |
9th Marine Regiment |

| Total | |
|---|---|
| Side 1 | 1 |
| Draw | 1 |
| Side 2 | 1 |


| Overall Rating, 3 votes |
|---|
|
4
|
| Scenario Rank: --- of 913 |
| Parent Game | Marianas 1944 |
|---|---|
| Historicity | Historical |
| Date | 1944-08-03 |
| Start Time | 15:00 |
| Turn Count | 12 |
| Visibility | Day |
| Counters | 27 |
| Net Morale | 0 |
| Net Initiative | 1 |
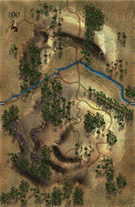
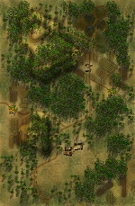
| Maps | 2: 100, 83 |
| Layout Dimensions | 86 x 28 cm 34 x 11 in |
| Play Bounty | 142 |
| AAR Bounty | 165 |
| Total Plays | 3 |
| Total AARs | 2 |
| Battle Types |
|---|
| Exit the Battle Area |
| Inflict Enemy Casualties |
| Scenario Requirements & Playability | |
|---|---|
| Marianas 1944 | Base Game |
| Saipan 1944 | Maps + Counters |
| Introduction |
|---|
|
Headquarters wanted a recon mission to explore the Finegayan-Mt. Santa Rosa Road area, but it took so long to organize the Reconnaissance Company and find available trucks that the unit requested to postpone the run until morning. Headquarters denied the request, and ordered the recon to proceed immediately and return by 1800. |
| Conclusion |
|---|
|
Confused by the road markings, some vehicles missed the left fork of RJ 177. They stumbled into an ambush and under heavy enemy fire they lost one halftrack, abandoned one truck, one tank suffered damaged, and the men suffered one killed and 14 wounded. However, they dealt some damage in return destroying two 75mm guns, one tank, several machineguns, and an undetermined number of enemy soldiers killed before making it back to camp that night. These armored recon missions were common practice for both the Marine and Army units in northern Guam, as neither could figure out where the bulk of enemy lay hiding. |
| Additional Notes |
|---|
|
American morale and initiative are transposed |

|
|
|---|
| AFV Rules Pertaining to this Scenario's Order of Battle |
|---|
|
| Imperial Japanese Army |
|---|
|


| Marine Corps |
|---|
|


| 1 Errata Item | |
|---|---|

|
The 8-3 Marine Infantry counter appears in most of the Saipan 1944 and Marianas 1944 scenarios, replacing the 10-3 DF valued Marine counters for those scenarios and is currently published in the most recent Saipan printing. (JayTownsend
on 2015 Dec 26)
|
| Marianas 1944, scenario #23: Armored Reconnaissance Group | ||||||||||||
|---|---|---|---|---|---|---|---|---|---|---|---|---|
Marianas 1944, scenario #23: Armored Reconnaissance Group This scenario is pretty straight forward as the Americans, exit as many units as possible or at least seven steps worth off the north edge of the map. The Japanese only have to prevent this or eliminate three or more steps. Two maps, a low unit count and only a twelve turn time limit which will put some pressure on the Marines to move fast. The Japanese setup mostly on or adjacent to the main road heading north along the two maps in key terrain areas or main intersections. The Americans enter the south edge of the map with their armor leading the way which consisted of platoon of M4 Sherman Tanks and a Platoon of M3/75mm Halftracks followed by trucks and jeeps loaded with infantry and engineers in a small convoy. With the lead armor group stopping on first enemy contact, which was followed by a Japanese assault with Infantry, HMG, Type 97 Tank and one Leader, resulting in a bad die roll for the Americans and a good one for the Japanese. The American loss one step of Sherman Tanks and the M3/75mm halftrack becomes demoralized. Not a good start for my Marine convoy! I had to unload some Infantry of the engineer type to reinforce this roadblock assault and pull the demoralized armor out, to set the situation straight all taking up valuable time. The rest of the convoy went around this engagement but latter down the road 75mm Japanese guns started firing the American trucks, forcing another group to unload and so it went. The end results were a complete Japanese victory, not only did they prevent the Marines from exiting seven steps but they eliminated four steps as well, as trucks and jeeps count in this scenario. The Americans eliminated some Japanese steps but that doesn’t help them achieve their victory condition but they were only able to exit three steps: two Infantry, one truck and a leader. Not good enough! This scenario is very difficult for the Americans to win, not impossible but difficult, as 12 turn with two maps setup lengthwise gives very little room or time to mess up. I should never have pulled my armor adjacent to the Japanese units thinking I could destroy them the next turn, as I failed and it bottlenecked the whole convoy. It would have been interesting to see would of happened if this situation hadn’t unfolded the way it did but still there were three more ambushes setup by the Japanese, so who knows? Maybe I should have made this a 15-18 turn scenario but I was trying to keep this within the timeline of the history event, which was about three hours in length. I would say 80% of the time the Japanese will win this one but still that chance of a 20% win as the Americans, makes this scenario interesting. I will certainly try a new strategy next time with this scenario. Another fun puzzle to try and solve! |
||||||||||||
| 0 Comments |
| Hey, You Can't Do That! | ||||||||||||
|---|---|---|---|---|---|---|---|---|---|---|---|---|
One of the things I try hard to do in solo play is to play both sides as though I'm playing face-to-face, and I could see somebody getting a bit testy with my solution to this scenario, but in reading and re-reading, I don't see anything wrong with taking to the relatively open board edge to get the Marine soft-skins and the troops they carry around the Japanese troops while the armor ties up the ranged weapons. After being bogged down with the Marine armor in a duel with an HMG and leader in a town hex, while a 75mm gun awaits a clear shot from the jungle on the hill to the west, it struck me that taking a little chance with a few op fire shots might be just the thing to do. And it worked. Between turns 6 and 12 there was just exactly enough movement left for the trucks and jeep to work their way around the east edge and bypass the worst of the traps laid out for them. The Japanese moved infantry and another HMG towards the east just in time to get one more op fire attempt, which also missed, and from there on, there was nothing to stop the wheel express. In the exchange with the 75mm on the hill, the Japanese took out the halftrack but was unable to scratch the Sherman. This game showed me two things. First, as the Japanese, it isn't as easy to set up and defend as it might first appear, especially if you don't assume everything is going to come up that road. Second, as the Marine, it might be a bit gamey, but there was nothing in my own old recon days to say the recon has to stick with the road when faced with lots of ambushes and roadblocks, especially when higher HQ demanded that the recon be conducted by a certain time, and it might be nice if most of us survived to achieve that goal. This could just as easily failed with better Japanese fire results. Three op fires failed to achieve anything more than a morale check, which the Marines had no problem passing. An interesting puzzle to solve. |
||||||||||||
| 0 Comments |