
|
The Beaches of Agat Marianas 1944 #13 |
||
|---|---|---|
| (Defender) Japan | vs | United States (Attacker) |
| Formations Involved | ||
|---|---|---|
| Japan |  |
38th Infantry Regiment |
| United States |  |
1st Provisional Marine Brigade |

| Total | |
|---|---|
| Side 1 | 0 |
| Draw | 0 |
| Side 2 | 4 |


| Overall Rating, 3 votes |
|---|
|
4.33
|
| Scenario Rank: --- of 913 |
| Parent Game | Marianas 1944 |
|---|---|
| Historicity | Historical |
| Date | 1944-07-21 |
| Start Time | 08:30 |
| Turn Count | 28 |
| Visibility | Day |
| Counters | 128 |
| Net Morale | 0 |
| Net Initiative | 1 |
| Maps | 2: 101, 81 |
| Layout Dimensions | 86 x 28 cm 34 x 11 in |
| Play Bounty | 173 |
| AAR Bounty | 165 |
| Total Plays | 4 |
| Total AARs | 2 |
| Battle Types |
|---|
| Amphibious Landing |
| Inflict Enemy Casualties |
| Urban Assault |
| Beach Control |
| Entrenchment Control |
| Conditions |
|---|
| Entrenchments |
| Off-board Artillery |
| Scenario Requirements & Playability | |
|---|---|
| Marianas 1944 | Base Game |
| Saipan 1944 | Maps + Counters |
| Introduction |
|---|
|
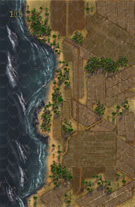
The 1st Provisional Marine Brigade landed on the Yellow and White beaches on the southwest side of the island, right behind the final rounds of naval gunfire. A wide reef protected the shore, and the Japanese exploited the natural obstacles with a brutal mortar and artillery fire, pounding the approaching waves of LVT’s. The Japanese did not pull back here, contesting the Marine advance with numerous casemates and guns sprinkled across the beaches and coral outcroppings. |
| Conclusion |
|---|
|
The Marines suffered considerable casualties coming ashore at Agat. They tried to push on to the D-1 line, but murderous enemy fire held them at bay the rest of the day. As dusk approached, the dogged Japanese defenders saw their enemy digging in across a wide but fairly shallow frontage. Tomorrow they'd give it another try. |
| Additional Notes |
|---|
|
American morale and initiative are transposed |

|

|
|---|
| AFV Rules Pertaining to this Scenario's Order of Battle |
|---|
|
| Imperial Japanese Army |
|---|
|


| Imperial Japanese Navy |
|---|
|


| Marine Corps |
|---|
|


| Navy |
|---|
|
")
| 1 Errata Item | |
|---|---|

|
The 8-3 Marine Infantry counter appears in most of the Saipan 1944 and Marianas 1944 scenarios, replacing the 10-3 DF valued Marine counters for those scenarios and is currently published in the most recent Saipan printing. (JayTownsend
on 2015 Dec 26)
|
| Tough Day for LVT Crews | ||||||||||||
|---|---|---|---|---|---|---|---|---|---|---|---|---|
This scenario has a Marine battalion plus 2 Engineers, 5 HMGs and 4 LVT A1s against an entrenched Japanese force holding the length of boards 81 and 101, dug in with 3 infantry companies, 5 HMGs, 6 casemates, 3 entrenchments, a 120mm naval gun, a 75/88, a 20mm and 25mm AA, a 37mm AT and 3 mortars. It's tough to cover the whole beach with this force, and up to 3 units can start on the beach, so I placed 3 of the casemates along the beach, spread out pretty evenly, with the rest of the casemates in light jungle a hex inland. The big guns were entrenched on the hilltops of board 101 where they could use their AT value against LTVs, hoping to catch a few still loaded, and the AT gun and AAs were set up, the AT in heavy jungle 1 hex inland, one AA entrenched further back but within range of the beach, and the last AA gun in heavy jungle to the north of the northern board 81. OBA for the Marines is 3x30, and a mix for the Japanese, 2x8, 2x10 1x16. The US could pound even the entrenchments once spotted, but the Japanese bravely opened fire but missed everything until the troops were able to unload. As the Marine side, I chose to leave the northern section for mopping up and shoved everything ashore on the southern half. This overwhelmed the Japanese defenses right from the beginning. I was able to detail company elements to the town on the Marine right flank, taking it in 2 turns, using the naval gunfire to take out the entrenched Japanese naval gun fairly early and demoralize the 75/88 for long enough that Marines were able to assault and take the hilltop with few casualties. By turn 22, the Marines had taken the whole of board 101, with only the Japanese Col, SGT and the SNLF LT left to flee to the north and call in OBA shots anytime they could. Marines chased but didn't succeed in catching them. I called it a game at the end of turn 22, as every Japanese infantry and HMG unit had been eliminated by then, the Marines had just succeeded in assaulting the Japanese mortar on board 81, the gunboat was working on the next-to-last casemate, and Marines were ready to assault the Japanese AT gun. All the leaders on the northern board had moved south with their infantry and HMGs and then been eliminated there, so there was absolutely nothing left to stop the Marines except possibly their own poor luck with future dice rolls, so the game ended with 71 points for the Marines to 23 points for the Japanese. Most of that was from LVT A1s and a single LVT4, the Marine LT that died not counting. I used the 10-3 Marine infantry, but nearly everything was adjacent hex fire with LVTs 6 DF mixed with infantry and HMGs, so I don't really think that the reduced DF of the newer release Marine infantry would have had that much effect. Once you have a 30+ column or more, the overkill doesn't really matter. Really enjoyable game, and one that I want to do face-to-face and try again with the new Marines as I want to run through the whole Marianas book again with them and see how they go. |
||||||||||||
| 0 Comments |
| Marianas 1944: scenario #13, The Beaches of Agat | ||||||||||||
|---|---|---|---|---|---|---|---|---|---|---|---|---|
Marianas 1944: scenario #13, The Beaches of Agat I love amphibious landing scenarios and WWII Pacific games have the best ones. I haven’t played this one for years so here I go again! I setup just about all my Japanese units as close to the beaches as possible including the three units on the beach. Only the mortars and a few reserve Infantry units stayed back into the depths of the map. I figured, even if I spread out my Japanese units but in three clusters I had a chance to really sink as many loaded American LVT 4s and LVT A1s as possible with my Japanese 20mm, 37mm, 75mm, 75/88 and 120/10 guns as possible. As I have learned, I can’t let that kind of large Marine force land unopposed. In the beginning my Japanese strategy paid off, as they eliminated four loaded LVT 4s, two LVT A1s, with these I also lost 8 steps of INF and one leader for a total of 20 points, as the LVT A1 steps are worth double. When I shoot at a stack of two Infantry loaded LVT 4s with a leader in one, to make it fair, if I get a hit, I roll the dice again, on a result of 1-3 the top unit gets hit, on a result of 4-6 the bottom unit gets hit, that way I can’t target loaded LVT4s with Leaders and it makes solitary play much better. After losing 20 points in steps, I was concerned as the Marine player but I managed to overcome those losses and land in two good points along the beaches of Agat. The Marines did loses another 15 steps but the Japanese lost a total of 50 points in steps losses and entrenchments giving the Americans a 50 to 35 advantage and winning by 15 point and thus a Major Victory. If I had to redesign this scenario to make it more balanced, I would only give the Americans that awesome naval fire power of 3 x 30 for the first eight turns. I would make this scenario only 20 turns to put more pressure on the Americans. And I believe these two simple fixes would balance this scenario out a lot more. |
||||||||||||
| 0 Comments |