|
Blue Beach Marianas 1944 #12 |
||
|---|---|---|
| (Defender) Japan | vs | United States (Attacker) |
| Formations Involved | ||
|---|---|---|
| Japan |  |
320th Independent Infantry Battalion |
| United States |  |
9th Marine Regiment |

| Total | |
|---|---|
| Side 1 | 0 |
| Draw | 0 |
| Side 2 | 3 |
| Overall Rating, 3 votes |
|---|
|
4
|
| Scenario Rank: --- of 913 |
| Parent Game | Marianas 1944 |
|---|---|
| Historicity | Historical |
| Date | 1944-07-21 |
| Start Time | 08:30 |
| Turn Count | 36 |
| Visibility | Day |
| Counters | 122 |
| Net Morale | 0 |
| Net Initiative | 2 |
| Maps | 2: 81, 82 |
| Layout Dimensions | 56 x 43 cm 22 x 17 in |
| Play Bounty | 175 |
| AAR Bounty | 165 |
| Total Plays | 3 |
| Total AARs | 2 |
| Battle Types |
|---|
| Amphibious Landing |
| Inflict Enemy Casualties |
| Urban Assault |
| Beach Control |
| Cave Control |
| Entrenchment Control |
| Conditions |
|---|
| Caves |
| Entrenchments |
| Off-board Artillery |
| Smoke |
| Scenario Requirements & Playability | |
|---|---|
| Marianas 1944 | Base Game |
| Saipan 1944 | Maps + Counters |
| Introduction |
|---|
|
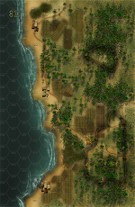
A little over two and a half years after losing the island to the Japanese, the Americans returned to reclaim Guam. The Marines assaulted four beaches north of Apra Harbor called Red 1, Red 2, Green, and Blue. More Marines landed south of the Orote Peninsula on beaches called Yellow 1, Yellow 2, White 1, and White 2. Each beach provided its own challenges, and days elapsed before the two forces could link up. The traditional naval bombardment preceded the Marine beach assault, this time on Blue beach. |
| Conclusion |
|---|
|
The Marines needed to call in some armor to help with the overhead fire, but after that their swift advance threw the enemy off balance. During the move forward the Marines discovered three abandoned 8-inch naval guns in concrete emplacements. At what point in the battle the Japanese left them is not known. The Marines continued to push inland until they hit enemy occupied caves about 400 yards short of the D-2 line. All units then dug in for the night. The 9th Marines logged a successful first day, though they tallied 231 casualties, including 20 officers. |
| Additional Notes |
|---|
|
Use Limited Intelligence optional rule from fourth edition rulebook. |
| AFV Rules Pertaining to this Scenario's Order of Battle |
|---|
|
| 1 Errata Item | |
|---|---|

|
The 8-3 Marine Infantry counter appears in most of the Saipan 1944 and Marianas 1944 scenarios, replacing the 10-3 DF valued Marine counters for those scenarios and is currently published in the most recent Saipan printing. (JayTownsend
on 2015 Dec 26)
|
| Japanese Quaker Guns | ||||||||||||
|---|---|---|---|---|---|---|---|---|---|---|---|---|
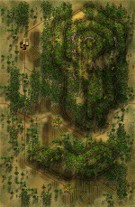
I played using the standard Saipan 10-3 Marines. Japanese have limited numbers - 10 infantry and 6 HMGs, but lots of big guns, to hold a board length by 2 boards deep, trying to keep the Marines out of 2 entrenchments and 2 caves and also trying to grab a beach hex or two along the line. The scenario rules say to flip the 200mm Japanese gun and if it lands tails up, it occupies the entrenchment but does not fire. Playing solo, I waited until it would have had a shot before flipping it, and naturally it landed tails up, so no big gunfire there, hence the title of Quaker Guns, denoting the fake guns entrenched during the American Civil War. The scenario is set to run 36 turns, but the Marines got off the beach quickly and the added Shermans entering from the beach on turn 5 just added a little to the momentum. The beach board had been cleared with little loss by turn 8, and the caves and entrenchments by turn 16, and the last turns were spent chasing a demoralized single HMG step and a few remaining Japanese leaders. This is definitely one to replay with the lower value Marine infantry and see if the Japanese can hold. In my play of the Japanese, I traded space for time, avoiding contact with the infantry if it looked like the Marines would be able to hit them from 2 or more adjacent hexes. As they came into view, the Marine direct fire tore them up, so nearly half of the Japanese infantry and half of the HMGs were lost as the beach board fell. OBA, while the Japanese had a 30 column total, the Marines had 3 times that, and dice were certainly on the US side, as OBA rolled a 2 when firing on one of the Japanese entrenched guns, taking it out in one shot and leaving the unharmed leader scratching his head. Japanese caused a few disruptions but had to shift fire each turn and couldn't use that fire to do further damage to the same target. In the end, Marines lost 4 steps, Japanese lost 39, and points wise, the Marines had all town and village hexes, caves and entrenchments, so an actual tally seemed like a bit of a waste. Really enjoyed this game and will enjoy more with a face-to-face play. |
||||||||||||
| 0 Comments |
| Marianas 1944, scenario #12: Guam 1944, Blue Beach | ||||||||||||
|---|---|---|---|---|---|---|---|---|---|---|---|---|
Marianas 1944, scenario #12: Guam 1944, Blue Beach I was in the mood for a Pacific amphibious landing scenario so this hit the spot. I actually setup my Americans first, off-board on the edge of the ocean hexes and made them come on in that order regardless of how the Japanese setup, to give the scenario some more realism and give the Japanese a better chance. Also for the Americans, most of my stacks of LVTs had two LVT4s with two Infantry type and a Leader, so when a Japanese heavy gun hit a stack of these in the ocean, I rolled one die and if it was a result of 1-3 it hit the top loaded LVT and if it was a result of 4-6 it hit the bottom LVT, that way leaders couldn’t be targeted. My Japanese 200mm gun was active on the battle and after playing this one, I recommend that it is always active, to better balance the scenario. For the first time in my game play I actually lost one step of LCI(G), though the Japanese would have better off targeting a different type of unit. In this scenario my battle turned into two phases, the Landings and gun emplacement section followed by the Jungle and Cave actions. Kind of fun to play two types of operations. In the first four turns I was ready to start over, as I thought the Marines got slaughter in the landing’s operations with four loaded LVT 4s with 8 Infantry steps and three leaders all dead but I decided to continue, as I had a very large landing force. Once I got my American Marines inland and situated and supported by 90 points of off-board artillery I was able to defeat the SNLF and Japanese Army gun emplacements, casemates and Infantry units. I did lose some LVT 4s and some LVT A1s, as they have very weak armor and even the smallest Japanese gun can do damages against these vehicles. I also lost a few more Infantry steps but far fewer compared to the Invasion phase. The Japanese forward units crumbled against the weight of the U.S. Marine numbers. The second phase was not very eventful and not needed but for the fun of taking those last victory objective caves I went ahead. The Marines did lose two more steps but completely controlled all their objectives and both maps at the end of game play. Only a step of Japanese HMG and two leaders remained running around in the jungle. My heaviest Marine loses were mostly in the beginning as mentioned but their total loses were 10 Infantry steps, 3 WPN steps, 1 LCI(G) steps, 8 steps of LVT 4s, 2 steps of LVT A1s and 3 Leaders, giving the Japanese 28 points. But the Marines eliminated 20 steps of Japanese Infantry, 11 steps of HMG, 2 steps of 150mm and 200mm guns, 7 steps of small guns and weapon types, 2 Casemates and 9 SNLF & Army Leaders giving the Americans 44 point, plus the Americans controlled all the town hexes, caves and Entrenchment counter and all of map 81 for another 34 points for a total of 78 American points to 28 Japanese point, for a Major American victory. If I had to redesign this scenario’s victory conditions, I would say, the Americans must win by 40 or more points to achieve their victory. But with that said, I had a blast playing this scenario. It was great for solitary play but for FtF you will have to use my mentioned scenario victory conditions for balance. |
||||||||||||
| 0 Comments |

 MARI011


