
|
L Company and Mt. Maga Marianas 1944 #5 |
||
|---|---|---|
| (Defender) Japan | vs | United States (Attacker) |
| Formations Involved | ||
|---|---|---|
| Japan |  |
135th Infantry Regiment |
| Japan |  |
50th Infantry Regiment |
| United States |  |
25th Marine Regiment |

| Total | |
|---|---|
| Side 1 | 0 |
| Draw | 2 |
| Side 2 | 1 |


| Overall Rating, 3 votes |
|---|
|
4.67
|
| Scenario Rank: --- of 913 |
| Parent Game | Marianas 1944 |
|---|---|
| Historicity | Historical |
| Date | 1944-07-25 |
| Start Time | 10:00 |
| Turn Count | 30 |
| Visibility | Day |
| Counters | 37 |
| Net Morale | 0 |
| Net Initiative | 1 |
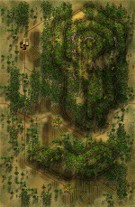
| Maps | 2: 82, 83 |
| Layout Dimensions | 56 x 43 cm 22 x 17 in |
| Play Bounty | 150 |
| AAR Bounty | 165 |
| Total Plays | 3 |
| Total AARs | 2 |
| Battle Types |
|---|
| Inflict Enemy Casualties |
| Entrenchment Control |
| Conditions |
|---|
| Entrenchments |
| Off-board Artillery |
| Randomly-drawn Aircraft |
| Reinforcements |
| Scenario Requirements & Playability | |
|---|---|
| Marianas 1944 | Base Game |
| Saipan 1944 | Maps + Counters |
| Introduction |
|---|
|
After repulsing the Japanese banzai counterattacks the first night, the whole Marine front shifted back over to offense again. Company L received orders as part of a larger pincer move against Mt. Maga. Once at the mountain they were to continue to the western slope to take out enemy artillery emplacements. Unknown to them, infantry with mortar support also held those positions, leading Lt. Colonel Cambers to send tanks, combat engineers carrying flame-throwers, bazookas, and demolition teams to assist the attack. |
| Conclusion |
|---|
|
Once the combination of all the Marine assets kicked in, Japanese resistance quickly became sporadic. Shortly thereafter the Marines destroyed all three weapon emplacements. By this point in the war the Marines displayed a solid mastery of combined arms tactics, and it really paid off in areas where they could employ their armor. |

|
|
|---|
| AFV Rules Pertaining to this Scenario's Order of Battle |
|---|
|
| Imperial Japanese Army |
|---|
|


| Marine Corps |
|---|
|


| 1 Errata Item | |
|---|---|

|
The 8-3 Marine Infantry counter appears in most of the Saipan 1944 and Marianas 1944 scenarios, replacing the 10-3 DF valued Marine counters for those scenarios and is currently published in the most recent Saipan printing. (JayTownsend
on 2015 Dec 26)
|
| Always Double Check | ||||||||||||
|---|---|---|---|---|---|---|---|---|---|---|---|---|
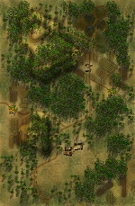
This 30-turn scenario has a company of Marines trying to take 3 entrenchments against a Japanese force little more than double their size, which really isn't that large a force when they are dispersed over a wide area trying to slow down and stop that Marine force. But in turn 5, the Marines bring in 3 tanks, including one of the Satan flame throwing Stuarts, plus an engineer and engineer flame unit with their own LTs. The Japanese infantry and an 81mm mortar must start on the western board and the entrenchments, a 45mm AT gun, a 70mm gun and an HMG must start on the eastern board, with entrenchments on east-west road hexes. I set up Japanese outposts with a full platoon and a reduced platoon or an HMG and a reduced infantry platoon in the northern and southern towns and in jungle hexes in the center so that just about any move made by the Marines would have to either go way out of the way to north or south or get close enough to risk an assault. The Marine major, an LT and the SGT took infantry and an HMG along the northern edge to avoid any of these outposts, and the Marine SGT split off from them to provide a spotter for the OBA, while on the southern half, the Marine CPT and LT brought up the rest of the infantry and the 60mm mortar, while another LT took up position on the southern hill where he could also spot for OBA. The LT in the south started the OBA fire on turn 2 at the Japanese in the southern town to pin them and hopefully soften them up for a few turns while waiting for the Marine armor and engineers to join them while the Major leads his merry band slowly along the north. The attempts to pin down the southern group of Japanese works well and the first Japanese steps are lost to OBA, the surviving Japanese moving back to the northernmost hex of the southern town to get out of spotting range. Continued OBA and direct fire demoralize the Japanese in that town until a combined arms force with the engineer, flame and Satan tanks can assault and easily take the town, leaving one surviving Japanese LT to hang out in the jungle and provide a spotter for the Japanese OBA. The Marines need to avoid losing 4 steps to win in addition to taking the 3 entrenchments, so even with 30 turns, they can't dawdle. The Japanese OBA slows down a stack with the Captain by disrupting 2 of the 3 infantry platoons in his stack, but other leaders move their stacks around the Captain and continue to move east, chasing the Japanese LT for several turns before they finally catch up to him and the Japanese have no spotter for their OBA for a few turns. The combination of tanks and engineers go on to beat severely one of the stacks of Japanese infantry in a jungle hex, forcing them to try to regain their morale but in several turns of direct fire and OBA, the second stack of Japanese troops is eliminated. The Japanese have now lost their initiative numbers and are trying to fall back to the entrenchments as the Marines continue to move east. Marines take the first westernmost entrenchment easily with the combination of flame and engineers again, but moving on to the southern entrenchment just down the road they run into trouble and the Satan takes a step loss. It's then that I discover I've had the reduced side up and using that reduced firepower all this time, not that it would have made that big a difference to previous assaults, but in this one, it might have made some difference. Marine armor and engineers spend the next turn regrouping and regaining their morale, while the Japanese to the north succeed in getting to their entrenchment along the road near the top of the larger hill mass and the Marines move adjacent in the jungle to try to reduce the Japanese strength by direct fire. Marine armor redeploys north along the road network trying to get some support to those guys in the northeast while the Marine Captain brings more troops to the south of that Japanese entrenchment, the regrouped Marines in the southern entrenchment now getting the rolls to finish off the Japanese 70mm gun and LT in that hex. In turn 25, the Marines have finally eliminated all but the Japanese SGT in the northern entrenchment and proceed to chase him for two turns while he calls in OBA with little more than harassing fire until the Marines catch and eliminate him. US win with just enough loss to keep them humble. And I am reminded to check my counters when setting up the game. |
||||||||||||
| 0 Comments |
| Marianas 1944, scenario #5: L Company and Mt. Maga | ||||||||||||
|---|---|---|---|---|---|---|---|---|---|---|---|---|
Marianas 1944, scenario #5: L Company and Mt. Maga This was one of the funner scenarios I have played in a while and it is a game scenario to learn just about every type of combat. The Japanese setup up their first group of combatants on the western map #83 where the American must enter and they setup their second group of heavy weapons and guns, entrenched on map #82. The American enter map #83 in two group, first the L Company reinforced enter on turn one followed on turn five with their second group of armor and combat engineers. Both sides get some off-board artillery and the Americans get air-support on 00 turns. The Americans win if they control all the entrenchments on map #82 and the Japanese win if the Americans lose 4 or more steps in the process of getting to and eliminating the Japanese in those entrenchments, if both sides achieve their victory conditions it is a Draw. Fighting through the initial Japanese Infantry, in towns, roads and jungles was a slow process on map #83 until my armor, flaming throwing armor and combat engineers arrive to lend a hand. After losing one Marine Infantry unit but clearing most of the Japanese Infantry the fight carried over to map #82 where the Japanese heavy weapons awaited. My only Marine HMG got demoralized in earlier fighting and took forever to recover, which didn’t help my advance but I had 30 turns, so I was in no hurry in the first 20 turns. I had this nice stack of three Marine armor units: M4, M5 & Satan FLM, which helped me conquer the town hex on map #83 and so I thought it would also be good to lead the way into those Japanese gun entrenchments but the Satan Flame tank is great for assaults but very weak in armor protection with only a one factor. The Japanese targeted it with both the 47mm AT guns and the 70mm guns and after two turns destroyed both steps, which counted double, plus with the early infantry step lost, this gave the Japanese a victory by eliminating 5 steps, as they only needed 4 steps to achieve this victory. However, there was never any doubt the Americans were going to clear all three Japanese entrenchment counters, for their victory conditions as well. So the battle ended in a Draw. I should have led the entrenchment assaults with the FLM and PIO infantry units, which actually were already assaulting the Japanese HMG entrenchment and held the armor out of AT-Fire range, as I think I had enough time. The Japanese had pulled back some of their infantry from the other map to reinforce some of the guns. It would be fun to try and play this scenario again, but win instead of draw as the Marine player. It was really a fun scenario to play, with a low unit count but a nice mix of unit types, to try may different combat types, Bombardments, Dire-Fire, Assaults, Opportunity Fire, Anti-Tank Fire and Engineer and Flame throwing unit assaults. Good stuff her! |
||||||||||||
| 0 Comments |