
|
Left Flank Counterattack Marianas 1944 #2 |
||
|---|---|---|
| (Attacker) Japan | vs | United States (Defender) |
| Formations Involved | ||
|---|---|---|
| Japan |  |
56th Naval Guard Force |
| United States |  |
24th Marine Regiment |

| Total | |
|---|---|
| Side 1 | 1 |
| Draw | 0 |
| Side 2 | 4 |


| Overall Rating, 6 votes |
|---|
|
3.67
|
| Scenario Rank: 287 of 913 |
| Parent Game | Marianas 1944 |
|---|---|
| Historicity | Historical |
| Date | 1944-07-25 |
| Start Time | 02:00 |
| Turn Count | 16 |
| Visibility | Night |
| Counters | 63 |
| Net Morale | 0 |
| Net Initiative | 1 |
| Maps | 0: 101, 83 |
| Layout Dimensions | 43 x 28 cm 17 x 11 in |
| Play Bounty | 146 |
| AAR Bounty | 153 |
| Total Plays | 5 |
| Total AARs | 4 |
| Battle Types |
|---|
| Inflict Enemy Casualties |
| Beach Control |
| Conditions |
|---|
| Off-board Artillery |
| Reinforcements |
| Illumination |
| Scenario Requirements & Playability | |
|---|---|
| Marianas 1944 | Base Game |
| Saipan 1944 | Maps + Counters |
| Introduction |
|---|
|
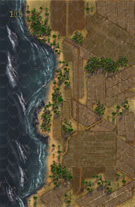
From experience on Saipan the Marines knew the Japanese normally counter-attacked at night to minimize American advantages in airpower and artillery and to maximize the shock of their attack. General Clifton B. Cates, commander of the 4th Marine Division, ordered the regiments to stop their advance on defensible terrain and prepare their defenses. The Japanese did not disappoint, making their assaults in three areas on this moonless night; the left flank, the center, and the right flank, though the left flank hit first. |
| Conclusion |
|---|
|
Approximately 600 screaming Japanese SNLF troops charged the American lines. Of the three counter attacks that night, this one lasted the longest. The Marines responded with a wall of fire. The attack continued throughout the night, see-sawing back and forth, but shortly before 0600 the vigor of the enemy effort broke, perhaps due to the rising of the sun or the arrival of American tanks. |
| Additional Notes |
|---|
|
Americans cannot move until the Japanese are spotted or fire. |

|
|
|---|
| AFV Rules Pertaining to this Scenario's Order of Battle |
|---|
|
| Imperial Japanese Army |
|---|
|

| Imperial Japanese Navy |
|---|
|


| Marine Corps |
|---|
|


| 1 Errata Item | |
|---|---|

|
The 8-3 Marine Infantry counter appears in most of the Saipan 1944 and Marianas 1944 scenarios, replacing the 10-3 DF valued Marine counters for those scenarios and is currently published in the most recent Saipan printing. (JayTownsend
on 2015 Dec 26)
|
| More Butt Kicking | ||||||||||||
|---|---|---|---|---|---|---|---|---|---|---|---|---|
This 16-turn scenario has Japanese SNLF attacking at night against dug-in Marines. Japanese have to get to within 5 hexes of any beach hex or eliminate 8 steps of Marines. I tend to balance my stacks so they have INF and HMG and a leader, and when playing the Japanese, this loses that +1 for an all INF force, and probably would make it better to have some assault stacks of all INF with supporting stacks of HMGs staying close but not entering assault. The DF of the balanced stacks is good but the loss to the assault column can be a problem. Worth looking at further in the next games. The Marines formed a line so that the Japanese can't sneak through without being adjacent to at least one dug-in unit or a unit in heavy jungle, which makes for a good opportunity fire and call for an illumination shot. I placed the Japanese into 2 assault groups using the chain of command to try to keep 3 or 4 stacks moving together. 3 moves in, as the first stacks prepared to enter into assaults, this broke down as point blank fire killed or disrupted a central stack in each group. Mortars popped illumination allowing for the massed OBA fire to kill stacks just outside of point blank but well within the illuminated area. Marine firepower did it's job and killed unit after unit, and leader loss rolls weighed heavily in the Marine's favor as the northern most assault wave lost all of their leaders by turn 10. The southern group managed to keep one leader and one undemoralized leader for some time but lost that on turn 14, just as the Marine Sherman joined the battle. It all came down to one surviving SNLF Ensign and a stack of 2 steps of infantry and 2 HMG (one full platoon) trying to get to within the 5 hexes of the beach. Illumination and OBA disrupted and demoralized the HMG and one step of infantry but the Ensign and one step continued on the last turn, only to have close range Marine firepower eliminate that final step of SNLF and disrupt the Ensign at the 5 hex mark. Final death toll, 30 steps lost to the Japanese, to a loss of only 2 steps of Marines. The Japanese could have shared a draw had they not lost that last step on that last turn. Great game. |
||||||||||||
| 0 Comments |
| Marianas 1944, scenario #2: Left Flank Counterattack | ||||||||||||
|---|---|---|---|---|---|---|---|---|---|---|---|---|
Marianas 1944, scenario #2: Left Flank Counterattack I like to mix it up a bit with different games played and in no scenario order accept I am trying to finish off some of my own designs without recorded plays, so I went back to the Pacific. When you look at this one on paper you think easy American victory but Japanese, in the night in assaults, with 8/8 morale and a different victory objective, are no push overs. My first big mistake was setting up my U.S. Marines too far back thinking they could easily repel any Japanese that moved into their lines and then move forward. The Japanese hit in three places along the Marine lines to keep the Marines spread-out but it felt like hitting a brick wall until finally a small opening where some Japanese units funneled in. Now it was a battle of attrition! An interesting note, usually the 37mm AT guns are useless against Infantry with their 2-3 Direct Five value but I saw this demoralized Japanese Infantry unit in range and fire at it, rolling a 3 on the dice and it did a morale check and rolled a 12 on the dice, the step is removed and that result rarely happens, so it was worth mentioning. Ok back to the game, it literally took the last turn, the last dice roll to see who was going to win. The Japanese still had one undemoralized unit within five hexes of the beach but not within two hexes of the beach, it had to be demoralized for the Americans to win. With and assault force of two Infantry units and one Sherman Tank unit that arrived the previous turn I was able to demoralize that Japanese Infantry unit for an American victory but I had to sweat it out until the last dice roll. The Japanese lost 23 steps and 4 leaders, the Americans lost 4 steps and 1 leader. A nail biter! |
||||||||||||
| 0 Comments |
| A near miss! | ||||||||||||
|---|---|---|---|---|---|---|---|---|---|---|---|---|
While the Marines were stretched a bit thin, the Japanese Commander thought it a good time to Banzai his way to the beach and attacked where he thought the defenses were the weakest. The Naval fire stopped them cold, but not before inflicting almost a couple of catastrophic friendly fire incidents which almost cost the Marines the line. Fortunately, reinforcements came in the nick of time to bolster what was left of the line and between the troops and supporting fire it made short work of the Japanese. It was well fought on both sides and almost got a victory for the Japanese. |
||||||||||||
| 0 Comments |
| Too Much Firepower to Overcome | ||||||||||||||
|---|---|---|---|---|---|---|---|---|---|---|---|---|---|---|
This was a 5-session play-through in face-to-face mode with the fierce & warlike, Tambu, Commanding the invading US Marines. I played the doomed-but-dogged, counter-attacking Japanese. We avoided the fog of war rule, but used the smoke and excess initiative rules. Sessions 1-5 were all about the Japanese SNLF Task Force attacking the powerful, dug-in Marine positions in the dark. After some fumbling about in the movement-to-contact, I made the mistake of stacking the Japanese attackers with both INF and HMG units. Unfortunately, if one does this, the +1 column shift for AN ALL INFANTRY assault force is lost. Visibility was very poor, so I sent in the supporting HMG with the INF instead of moving them adjacent to the target under attack to create adjacent-hex bases of fire. Sometimes this combination worked if the dice cooperated. Most times, no. Oops! Throughout this play-through, the high-powered, Marines were in a defensive line to block infiltrating Japanese units. With star shells and in heavy jungle, the Marines benefited from great opportunity fires. This made all the difference to the hard-pressed Marines and ultimately won the game for the American side, as the Japanese assault stacks were methodically collapsed whenever they moved adjacent to the dug-in Marine platoons. Japanese approach marches were no better as the overwhelming US OBA was very stout and accurate. By the end of turn 14, nearly all the Japanese leaders had been eliminated, or were demoralized. At the end of turn 16, the Japanese had lost 27 steps in their brazenly reckless close assaults, compared to a mere 4 steps of Marines. This was a major US victory as the Japanese failed to penetrate to within 5 hexes of any beach hex, or eliminate the required 8 steps of Marines. I give this historically accurate, but significantly unbalanced scenario a 3, mostly on the strength of how much bloody fun it was to play with a fellow rookie PG player. |
||||||||||||||
| 0 Comments |