
|
Imahori’s Blockhouse Leyte '44 #41 |
||
|---|---|---|
| (Defender) Japan | vs | United States (Attacker) |
| Formations Involved |
|---|

| Total | |
|---|---|
| Side 1 | 0 |
| Draw | 0 |
| Side 2 | 1 |


| Overall Rating, 0 votes |
|---|
|
0
|
| Scenario Rank: of |
| Parent Game | Leyte '44 |
|---|---|
| Historicity | Historical |
| Date | 1944-12-14 |
| Start Time | 10:00 |
| Turn Count | 20 |
| Visibility | Day |
| Counters | 112 |
| Net Morale | 0 |
| Net Initiative | 1 |
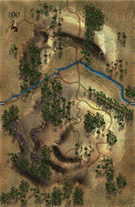
| Maps | 1: 100 |
| Layout Dimensions | 43 x 28 cm 17 x 11 in |
| Play Bounty | 176 |
| AAR Bounty | 171 |
| Total Plays | 1 |
| Total AARs | 1 |
| Battle Types |
|---|
| Inflict Enemy Casualties |
| Road Control |
| Entrenchment Control |
| Conditions |
|---|
| Entrenchments |
| Off-board Artillery |
| Reinforcements |
| Smoke |
| Scenario Requirements & Playability | |
|---|---|
| Leyte '44 | Base Game |
| Marianas 1944 | Maps |
| Saipan 1944 | Counters |
| Introduction |
|---|
|
The Japanese position along the Antilao had defied American attacks for days. A three-story concrete building had been turned into a fortress which withstood all types of fire including a concentrated bombardment by all four of the 77th Infantry Division’s artillery battalions. Maj. Gen. Andrew Bruce, commanding the American division, had been saddled with a War Department “observer” who he now sent to the front to command a special attack force to take out the seemingly-impregnable blockhouse. |
| Conclusion |
|---|
|
In what amounted to a brutal frontal assault, the Americans fought their way forward practically yard by yard. Col. Paul Freeman, tossed into the front lines, brought his ad hoc force to the edge of the entrenchments surrounding the concrete building but could not break in. At that point Lt. Robert Nett rose and led his men in a wild bayonet charge through heavy machine-gun fire and into the Japanese trenches where he personally bayonetted seven Japanese. Wounded three times, Nett shot and stabbed his way into the building, where his men wiped out the Japanese. Freeman gave him a direct order to seek medical treatment, but the lieutenant refused a stretcher and walked away unaided. He would receive the Medal of Honor and a promotion to captain. |

|
|
|---|
| AFV Rules Pertaining to this Scenario's Order of Battle |
|---|
|
| Imperial Japanese Army |
|---|
|


| Army |
|---|
|


| Leyte 1944, Scenario Forty-One: Imahori’s Blockhouse | ||||||||||||
|---|---|---|---|---|---|---|---|---|---|---|---|---|
Leyte 1944, Scenario Forty-One: Imahori’s Blockhouse An interesting start to a bloody battle as both sides start staring across the river from each other. Not for long as the American send a green wave of troops at the Japanese positions led by a massive creeping artillery barrage. Planned better than my recent scenarios and the Americans with an 8/6 morale, plenty of support weapons, some armor, two Engineer Flame units and two plan Engineer units to help take entrenchments and dug-in Japanese troops. The Americans start to get the upper hand right away when on turn 8 Japanese reinforcements enter from the north and for the first time in my PG career two RCN infantry units from both sides exchange direct fire with each but in the end the American’s massive green wave of units and off-board artillery pushed the Japanese off the northern road and giving the Americans a Major Victory, achieving all three of their objectives. The Japanese lost 23 steps, while the Americans lost 6 steps. |
||||||||||||
| 0 Comments |