
|
Hill 380 Leyte '44 #32 |
||
|---|---|---|
| (Defender) Japan | vs | United States (Attacker) |
| Formations Involved |
|---|

| Total | |
|---|---|
| Side 1 | 2 |
| Draw | 0 |
| Side 2 | 0 |


| Overall Rating, 3 votes |
|---|
|
3
|
| Scenario Rank: --- of 913 |
| Parent Game | Leyte '44 |
|---|---|
| Historicity | Historical |
| Date | 1944-12-06 |
| Start Time | 08:00 |
| Turn Count | 16 |
| Visibility | Day |
| Counters | 56 |
| Net Morale | 0 |
| Net Initiative | 1 |
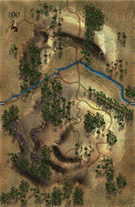
| Maps | 1: 100 |
| Layout Dimensions | 43 x 28 cm 17 x 11 in |
| Play Bounty | 159 |
| AAR Bounty | 165 |
| Total Plays | 2 |
| Total AARs | 2 |
| Battle Types |
|---|
| Hill Control |
| Inflict Enemy Casualties |
| Road Control |
| Conditions |
|---|
| Entrenchments |
| Minefields |
| Off-board Artillery |
| Smoke |
| Scenario Requirements & Playability | |
|---|---|
| Leyte '44 | Base Game |
| Marianas 1944 | Maps |
| Saipan 1944 | Counters |
| Introduction |
|---|
|
Hill 380 anchored the inland flank of the Japanese line facing south against the advancing U.S. 7th Infantry Division. The Japanese 35th Army emphasized its defense not only as the position’s linchpin, but to protect the road leading inland across the mountains to the American-held airfields around Burauen. The American 17th Infantry Regiment approached the hill to meet a storm of machine-gun fire. |
| Conclusion |
|---|
|
The Japanese held their ground, driving off the Americans in some confusion. Even as the Japanese finally launched their airborne counter-attack, the Americans landed yet another fresh division on the coast between Ormoc and the Japanese blocking position. Now in danger of encirclement, the 26th Infantry Division had no need for Hill 380 and pulled out quickly. When the Americans attacked again on the 7th they found the hill occupied by a dozen Japanese soldiers too badly concussed by artillery fire to accompany the withdrawal. |

|
|
|---|
| AFV Rules Pertaining to this Scenario's Order of Battle |
|---|
|
| Imperial Japanese Army |
|---|
|


| Army |
|---|
|


| Leyte 1944, Scenario Thirty-Two: Hill 380 | ||||||||||||
|---|---|---|---|---|---|---|---|---|---|---|---|---|
Leyte 1944, Scenario Thirty-Two: Hill 380 It seemed like a pretty straight forward scenario, take the 60-meter hill mass, clear the east-west road and have a two to one step lose advantage as the Americans. However, the American’s FLM Engineer gets demoralized in the first assault, the Japanese off-board artillery is just as deadly as the Americans and the minefields forces the American armor to skate around terrain and get clogged up in that terrain. The Americans manage to clear the east-west road but they do not control the hills and have actually lost mores steps than the Japanese. The Japanese lost 10 steps and 1 leader, while the Americans lost 12 steps and 1 leader, giving the Japanese a minor victory. |
||||||||||||
| 0 Comments |
| An American Debacle on Leyte | ||||||||||||||
|---|---|---|---|---|---|---|---|---|---|---|---|---|---|---|
This play-through was a 3-session, online exercise in frustration for both sides. Playing the Japanese side, I was surprised that my honorable, American-side opponent, was advised by a long-time, experienced PG player (observer) to concede the game at the end of the 7th game turn. Using the dreaded FOW rule, shortened 3 turns in this short play-through and ended up substantially helping the Japanese hold the the 60-meter hill mass, while also causing a fair amount of chaos on the east-west road due to turn-shortened, disorganization of US assault sequencing. This scenario turned into an unpleasant slog once it was clear that the Americans were experiencing a long string of bad luck in die rolling, especially as regards morale checks and close assault combat die rolls. As reported elsewhere, both sides OBA was relatively effective, and the American armor had serious movement issues in difficult terrain trying to avoid Japanese minefields. Shockingly, the powerful US flame-throwing combat engineer platoon was eliminated in a close assault on Turn 4. All ended abruptly when my opponent retired after taking 4 step losses in a single turn trying to clear the east-west road of infiltrating Japanese platoons. At that point in the play-through, the US-side has lost more steps that the Japanese, by a margin of almost 2-to-1. At the sudden-death ending; the Japanese had lost 8 steps and 1 leader; and the Americans had lost 15 steps and 2 leaders. The early concession gave the Japanese what, IMHO, was an undeserved minor victory. I made far more tactical mistakes than my honorable opponent did -- notably by forcing close assaults before softening up the opposing force with disruptions & demoralizations through bombardment and direct fire. The Americans just lost more units than I did, mostly in close assaults, and their command structure lost cohesion and became distracted. |
||||||||||||||
| 0 Comments |