Panzer Grenadier Battles on April 27th:
Arctic Front Deluxe #40 - Children's Crusade Broken Axis #14 - Târgu Frumos: The Second Battle Scenario 3: Sledge Hammer of the Proletariat
Army Group South Ukraine #6 - Consternation Road to Berlin #73 - She-Wolves of the SS
Errors? Omissions? Report them!
Breakneck Ridge
Leyte '44 #24
(Defender) Japan vs United States (Attacker)
Formations Involved
Display
Balance:


Overall balance chart for Leyt024
Total
Side 1 1
Draw 0
Side 2 1
Overall Rating, 2 votes
5
4
3
2
1
4
Scenario Rank: --- of 913
Parent Game Leyte '44
Historicity Historical
Date 1944-11-07
Start Time 07:00
Turn Count 24
Visibility Day
Counters 78
Net Morale 0
Net Initiative 0
Maps 2: 100, 82
Layout Dimensions 56 x 43 cm
22 x 17 in
Play Bounty 173
AAR Bounty 171
Total Plays 2
Total AARs 1
Battle Types
Inflict Enemy Casualties
Road Control
Cave Control
Entrenchment Control
Conditions
Caves
Entrenchments
Hidden Units
Minefields
Off-board Artillery
Smoke
Scenario Requirements & Playability
Leyte '44 Base Game
Marianas 1944 Maps
Saipan 1944 Maps + Counters
Introduction

The Japanese 1st Infantry Division’s staff considered their outfit the best in the Imperial Army, despite not having seen large-scale combat since the Russo-Japanese War (though it did try to overthrow the government in 1936, earning it exile to Manchuria). The Americans did not detect its movement from Manchuria to Leyte until they encountered its troops dug in along a feature dubbed Breakneck Ridge that commanded the northern entrance to the Ormoc Valley. Several days of attacks brought no success, and the Americans tried again with a fresh regiment (21st Infantry), tanks and flamethrowers.

Conclusion

First Infantry Division had used the pause granted by the American command’s obsession with amphibious landings to fortify what they called the “Yamashita Line” in the rough terrain of the ridge. The Japanese would hold Breakneck Ridge for another week, repelling repeated American attacks. The Americans deployed their heavy artillery, but for once the Japanese answered with surprisingly strong artillery support of their own.


Display Relevant AFV Rules

AFV Rules Pertaining to this Scenario's Order of Battle
  • Vulnerable to results on the Assault Combat Chart (7.25, 7.63, ACC), and may be attacked by Anti-Tank fire (11.2, DFT). Anti-Tank fire only affects the individual unit fired upon (7.62, 11.0).
  • AFV's are activated by tank leaders (3.2, 3.3, 5.42, 6.8). They may also be activated as part of an initial activating stack, but if activated in this way would need a tank leader in order to carry out combat movement.
  • AFV's do not block Direct Fire (10.1).
  • Full-strength AFV's with "armor efficiency" may make two anti-tank (AT) fire attacks per turn (either in their action segment or during opportunity fire) if they have AT fire values of 0 or more (11.2).
  • Each unit with an AT fire value of 2 or more may fire at targets at a distance of between 100% and 150% of its printed AT range. It does so at half its AT fire value. (11.3)
  • Efficient and non-efficient AFV's may conduct two opportunity fires per turn if using direct fire (7.44, 7.64). Units with both Direct and AT Fire values may use either type of fire in the same turn as their opportunity fire, but not both (7.22, 13.0). Units which can take opportunity fire twice per turn do not have to target the same unit both times (13.0).
  • Demoralized AFV's are not required to flee from units that do not have AT fire values (14.3).
  • Place a Wreck marker when an AFV is eliminated in a bridge or town hex (16.3).
  • AFV's do not benefit from Entrenchments (16.42).
  • AFV's may Dig In (16.2).
  • Open-top AFV's: Immune to M, M1 and M2 results on Direct and Bombardment Fire Tables, but DO take step losses from X and #X results (7.25, 7.41, 7.61, BT, DFT). If a "2X" or "3X" result is rolled, at least one of the step losses must be taken by an open-top AFV if present.
  • Closed-top AFV's: Immune to M, M1 and M2 results on Direct and Bombardment Fire Tables. Do not take step losses from Direct or Bombardment Fire. If X or #X result on Fire Table, make M morale check instead (7.25, 7.41, 7.61, BT, DFT).
  • Closed-top AFV's: Provide the +1 modifier on the Assault Table when combined with infantry. (Modifier only applies to Germans in all scenarios; Soviet Guards in scenarios taking place after 1942; Polish, US and Commonwealth in scenarios taking place after 1943.) (ACC)
  • Tank: all are closed-top and provide the +1 Assault bonus, when applicable
  • Tank Destroyer: do not provide the +1 Assault bonus, even if closed-top (SB)
  • APC – Armored Personnel Carrier: These are Combat Units, but stack like Transports. They can transport personnel units or towed units. They are not counted as combat units for the +1 stacking modifier on the Direct Fire and Bombardment Tables (4.4). They may be activated by regular leaders and tank leaders (1.2, 3.34, 4.3, 5.43). They do not provide the +1 Assault bonus (ACC).

Display Order of Battle

Japan Order of Battle
Imperial Japanese Army
  • Misc
United States Order of Battle
Army

Display AARs (1)

Leyte 1944, Scenario Twenty-Four: Breakneck Ridge
Author JayTownsend
Method Solo
Victor Japan
Play Date 2020-12-21
Language English
Scenario Leyt024

Leyte 1944, Scenario Twenty-Four: Breakneck Ridge

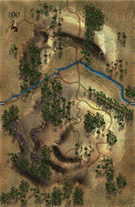
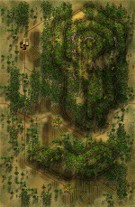
I found out, there is a reason they called this Breakneck Ridge on the Yamashita Line. After my last game play, I learned how to best setup my Japanese defenses. In this scenario I setup a nice position west of the river on map 100 on the hills overlooking the approach of the Americans with a line of minefields, behind that entrenchments with AT-Guns and Machine gun in them, flanked by caves, which were flanked by a few casemates and dug-in Infantry and a few units forward on map 100 to call in artillery on the Americans as they enter the map, as the Japanese have a fair amount of off board Artillery but the American have more. On map 82 I decided to defend the north-south road in that narrow jungle terrain with Japanese Infantry and one HMG unit and one 20mm gun and one casemate unit to support the Infantry. The units not dug-in on the road were in the adjacent jungle hexes in support.

The Americans also had to attack in two groups with the main attack going against the fortified hills on map 100 and the secondary attack going on map 82 against the jungle north-south road the Japanese blocked. I divided my two American groups according to the Birdseye view of the situation. The Americans got hammed right out of the gate entering the map with a 32 value of off map artillery bombardment and a two on the dice roll for a 2X result. Not a great start! The Americans on map 100 ran into a buzz-saw and Japanese Anti-Tank artillery hammered the American armor even getting a crossfire bonus in one case and before this game was over I would lose three steps of Sherman tanks, two steps of M10 Tank Destroyers and one step of Scott tanks. The Infantry on both maps took huge casualties and were so disorganized morale wise and with losses that I finally gave up on map 100 trying to control the enemy entrenchments and caves as even the Engineer-Flame unit lost a step in the minefields and ran off into the jungle.

So at this point I knew the Japanese at least had a minor victory but maybe I could deny them a major victory by taking the north-south road from them, as they only defended it on map 82 but with a nice force and the battle wasn’t going very well there either but I gave it one more attempt until the Japanese assaulted my best stack of American units achieving a 2x result.

The situation with still 6 turn left was hopeless for the Americans to achieve any of their three objectives and I threw in the towel and conceded the Japanese a major victory. The Americans at this point had lost 22 steps and one Lt. Colonel, 12 steps being Armor and 10 Infantry while the Japanese only lost 11 steps and two leaders and were still sitting pretty. Usually my results are the other way around but the Japanese really did have the ultimate defense setup in this scenario. With that said, this was a really fun scenario to play and I’ll be interested to see how other players do. Very enjoyable scenario to play!

0 Comments
You must be a registered member and logged-in to post a comment.
Errors? Omissions? Report them!
Page generated in 0.452 seconds.