
|
Road to Dagami Leyte '44 #16 |
||
|---|---|---|
| (Defender) Japan | vs | United States (Attacker) |
| Formations Involved |
|---|

| Total | |
|---|---|
| Side 1 | 0 |
| Draw | 0 |
| Side 2 | 1 |


| Overall Rating, 0 votes |
|---|
|
0
|
| Scenario Rank: of |
| Parent Game | Leyte '44 |
|---|---|
| Historicity | Historical |
| Date | 1944-10-29 |
| Start Time | 07:30 |
| Turn Count | 24 |
| Visibility | Day |
| Counters | 96 |
| Net Morale | 0 |
| Net Initiative | 1 |
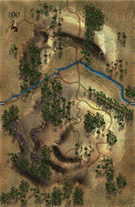
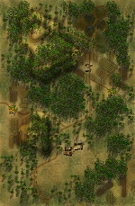
| Maps | 2: 100, 83 |
| Layout Dimensions | 86 x 28 cm 34 x 11 in |
| Play Bounty | 178 |
| AAR Bounty | 171 |
| Total Plays | 1 |
| Total AARs | 1 |
| Battle Types |
|---|
| Exit the Battle Area |
| Inflict Enemy Casualties |
| Road Control |
| Conditions |
|---|
| Entrenchments |
| Off-board Artillery |
| Scenario Requirements & Playability | |
|---|---|
| Leyte '44 | Base Game |
| Marianas 1944 | Maps |
| Saipan 1944 | Maps + Counters |
| Introduction |
|---|
|
Prisoner interrogations revealed that the Japanese planned to make a stand at Dagami, a crossroads town where troops retreating from several directions had gathered. Seventh Infantry Division moved northward up the road from Buri with its 17th Infantry Regiment in the lead with tanks, engineers and heavy chemical mortars in support. |
| Conclusion |
|---|
|
Lt. Col. Francis Pachler sent his battalions up the road in column order, one following another, with all of the support elements attached to the 2nd Battalion in the lead. The tanks raced off ahead of the infantry, which made them vulnerable to Japanese anti-tank guns though in this battle the Japanese did not employ their suicidal anti-tank teams. The Americans faced a determined enemy defending a narrow front, but berserk heroism by the grenade-tossing Private Leonard C. Brostrom and BAR-wielding PFC John F. Thorston helped break the fortified line. Brostrom collapsed after multiple bullet and bayonet wounds, still throwing grenades as he died, while Thorston threw himself on a Japanese hand grenade to protect his squad-mates. Both received posthumous Medals of Honor. |

|
|
|---|
| AFV Rules Pertaining to this Scenario's Order of Battle |
|---|
|
| Imperial Japanese Army |
|---|
|


| Army |
|---|
|


| Leyte 1944, Scenario Sixteen: Road to Dagami | ||||||||||||
|---|---|---|---|---|---|---|---|---|---|---|---|---|
Leyte 1944, Scenario Sixteen: Road to Dagami I should have called this one, The Long Road to Dagami. The Japanese place one of the wrecks on the bridge hex on map 100, setup two defensive lines, a strong one on the hills overlooking the approaches on map 100 with one entrenchment there and the second line of defense along the road and town hexes on map 83 and a entrenchment in that area as well. The Casemates buffered the entrenchments and the 47mm AT Guns were in the entrenchments with supporting Infantry and weapons. It took the Americans a long time to get through the Japanese first line of defense and at one point late in the game I decided I wouldn’t be able to control all the north-south road hexes and I better get units of the north edge of the map as I had a two to one advantage already in step loses and I better go for at least a minor victory instead of a loss. So just barely on the last turn the Americans exited steps 17 and 18, for a Minor American Victory, by a hair at that. |
||||||||||||
| 0 Comments |