
|
Flying Wedge Leyte '44 #12 |
||
|---|---|---|
| (Defender) Japan | vs | United States (Attacker) |
| Formations Involved |
|---|

| Total | |
|---|---|
| Side 1 | 1 |
| Draw | 0 |
| Side 2 | 0 |


| Overall Rating, 0 votes |
|---|
|
0
|
| Scenario Rank: of |
| Parent Game | Leyte '44 |
|---|---|
| Historicity | Historical |
| Date | 1944-10-24 |
| Start Time | 07:00 |
| Turn Count | 18 |
| Visibility | Day |
| Counters | 52 |
| Net Morale | 0 |
| Net Initiative | 1 |
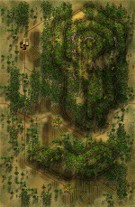
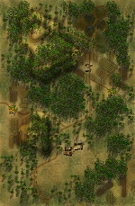
| Maps | 2: 82, 83 |
| Layout Dimensions | 56 x 43 cm 22 x 17 in |
| Play Bounty | 165 |
| AAR Bounty | 171 |
| Total Plays | 1 |
| Total AARs | 1 |
| Battle Types |
|---|
| Airfield Control |
| Inflict Enemy Casualties |
| Road Control |
| Conditions |
|---|
| Entrenchments |
| Hidden Units |
| Minefields |
| Off-board Artillery |
| Terrain Mods |
| Scenario Requirements & Playability | |
|---|---|
| Elsenborn Ridge | Counters |
| Leyte '44 | Base Game |
| Saipan 1944 | Maps + Counters |
| Introduction |
|---|
|
During the American campaigns against the Japanese, armor support usually consisted of platoon-sized packets of tanks attached to infantry companies or battalions. Maj. Gen. Archibald Arnold decided to use his attached 767th Tank Battalion in what he called a “flying wedge” aimed right at San Pablo, its airfield and the town of Burauen. The Japanese met them with suicidal anti-tank squads bearing explosive charges and anti-tank mines. |
| Conclusion |
|---|
|
The tanks initially had some success, but the operation quickly showed why other commanders had deployed their tanks by the platoon or at most the company. The Shermans had trouble maneuvering in the jungle, rice paddies and wet fields, and were confined to the road and the hard ground on either side of it. With the armor funneled into a predictable corridor, the Japanese rained down artillery fire and deployed their suicide attack teams. The tanks managed to overrun Bayug Airfield, but without infantry support they withdrew before nightfall. |
| Additional Notes |
|---|
|
Airborne, Battle of the Bulge, Cassino and Invasion 1944 also have the counter from Elsenborn needed for this scenario. |

|
|
|---|
| AFV Rules Pertaining to this Scenario's Order of Battle |
|---|
|
| Imperial Japanese Army |
|---|
|


| Army |
|---|
|


| Leyte 1944, Scenario Twelve: Flying Wedge | ||||||||||||
|---|---|---|---|---|---|---|---|---|---|---|---|---|
Leyte 1944, Scenario Twelve: Flying Wedge This is great scenario and I’ll give Mike Bennighof the credit on this one, as it is one of his converted scenarios. Three of the most important thing on this scenario are the placement of minefields with covering Japanese Infantry fire in the narrow corridor road on map 82 and some on the rice paddies forcing the American to have to clear the mines or risk going through them with your armor, as the terrain is too tough to go around. The Americans must protect their most valuable asset, their lone engineer unit. The Japanese also have a nice amount of artillery to separate the American Infantry from the armor, which happens anyway as the American try to move around the clogged road jam. The Japanese now have time to assault lone stacks of American armor getting the scenario #3 special rule bonus for their anti-tank teams. In fact, for a change, I actually lost more American steps than Japanese step, because the lost armor steps count double, so out of the 15 American steps I lost, 10 were armor. The Japanese only lost 14 steps. As the battle finally progress west, there is no time to send leaders back east to pick up demoralize, disrupted and recovered Infantry units, as the Americans run out of time trying to achieve their three victory objectives and blast through Japanese obstacles. In the end, the Americans achieved none of their three objectives: control of all the east-west road, control of the airfield hex and have a two to one step loss ratio. The Japanese win a Major Victory! With that said, this is one the funniest scenarios I have ever played. The terrain on maps 83 and 82 are a fun puzzle to try and solve. I highly recommend this scenario. |
||||||||||||
| 0 Comments |