
|
Drive for Carigara Leyte '44 #9 |
||
|---|---|---|
| (Defender) Japan | vs | United States (Attacker) |
| Formations Involved |
|---|

| Total | |
|---|---|
| Side 1 | 0 |
| Draw | 0 |
| Side 2 | 1 |


| Overall Rating, 0 votes |
|---|
|
0
|
| Scenario Rank: of |
| Parent Game | Leyte '44 |
|---|---|
| Historicity | Historical |
| Date | 1944-10-31 |
| Start Time | 08:00 |
| Turn Count | 32 |
| Visibility | Day |
| Counters | 74 |
| Net Morale | 0 |
| Net Initiative | 1 |
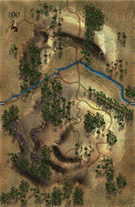
| Maps | 3: 100, 82, 83 |
| Layout Dimensions | 84 x 43 cm 33 x 17 in |
| Play Bounty | 180 |
| AAR Bounty | 171 |
| Total Plays | 1 |
| Total AARs | 1 |
| Battle Types |
|---|
| Inflict Enemy Casualties |
| Road Control |
| Urban Assault |
| Conditions |
|---|
| Off-board Artillery |
| Reinforcements |
| Scenario Requirements & Playability | |
|---|---|
| Leyte '44 | Base Game |
| Marianas 1944 | Maps |
| Saipan 1944 | Maps + Counters |
| Introduction |
|---|
|
In the afternoon of the 30th the 34th Infantry tried again with another battalion joining the assault, and this attempt likewise failed. The 24th Infantry Division staff committed three battalions of artillery plus long-range heavy howitzers from X Corps to plaster the hills with a night-long heavy bombardment. When morning came, the 34th moved forward again. |
| Conclusion |
|---|
|
The overnight bombardment failed to suppress the Japanese defenders, who enthusiastically greeted the Americans with a curtain of rifle, machine-gun and mortar fire. The Americans countered by deploying M7 105mm self-propelled howitzers directly at the front, but the Japanese seemed unimpressed. At nightfall most of the hill country remained in Japanese hands, but now they pulled out on their own lest they be trapped there by the 1st Cavalry Division’s advance along the coastline. |

|
|
|---|
| AFV Rules Pertaining to this Scenario's Order of Battle |
|---|
|
| Imperial Japanese Army |
|---|
|


| Army |
|---|
|


| Leyte 1944, scenario Nine: Drive for Carigara | ||||||||||||
|---|---|---|---|---|---|---|---|---|---|---|---|---|
Leyte 1944, scenario Nine: Drive for Carigara This scenario is kind a continuation of scenario 8 but the next day with a lot more artillery support and ground units for the Americans. This is the first time I got to use the American M7 self-propelled gun in the Pacific theater but not to be confused with the Marine M7 Rocket Truck or Mk-7. With all that mentioned about it, the M7 SP got too close to the action and was eliminated in my game. Maybe that was the highlight for the Japanese as they lost this scenario as the American gained a Major Victory achieving all three of their objectives. I will say the artillery off-board on both sides was murderess! At the end of this bloody contest, the Americans had lost 12 steps and a leader, while the Japanese lost 26 steps and 6 leaders and the game. |
||||||||||||
| 0 Comments |