
|
Hill 522 Leyte '44 #4 |
||
|---|---|---|
| (Defender) Japan | vs | United States (Attacker) |
| Formations Involved |
|---|

| Total | |
|---|---|
| Side 1 | 0 |
| Draw | 0 |
| Side 2 | 2 |


| Overall Rating, 2 votes |
|---|
|
4.5
|
| Scenario Rank: --- of 913 |
| Parent Game | Leyte '44 |
|---|---|
| Historicity | Historical |
| Date | 1944-10-20 |
| Start Time | 14:30 |
| Turn Count | 16 |
| Visibility | Day |
| Counters | 50 |
| Net Morale | 0 |
| Net Initiative | 1 |
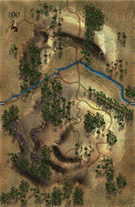
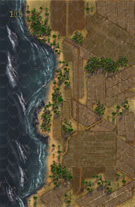
| Maps | 2: 100, 101 |
| Layout Dimensions | 56 x 43 cm 22 x 17 in |
| Play Bounty | 163 |
| AAR Bounty | 171 |
| Total Plays | 2 |
| Total AARs | 1 |
| Battle Types |
|---|
| Hill Control |
| Inflict Enemy Casualties |
| Cave Control |
| Entrenchment Control |
| Conditions |
|---|
| Caves |
| Entrenchments |
| Minefields |
| Off-board Artillery |
| Randomly-drawn Aircraft |
| Reinforcements |
| Scenario Requirements & Playability | |
|---|---|
| Leyte '44 | Base Game |
| Marianas 1944 | Maps |
| Saipan 1944 | Counters |
| Introduction |
|---|
|
During the months leading up to the American landings, the Japanese 16th Infantry Division’s command staff had impressed the entire population of the nearby town of Palo to turn a rise just north of the town into a fortress with concrete pillboxes, trenches and tunnels. Hill 522, as the Americans named it, dominated the routes inland and the Japanese could hold up their advance for some time if given the opportunity to reinforce the hill. The American timetable demanded that the hill be taken before the Japanese could move more troops there. |
| Conclusion |
|---|
|
The Japanese actually came off the hill to fight the 19th Infantry’s 1st Battalion during the approach to the objective, apparently hoping to catch them unawares. They had some success, but American naval guns blasted the hill and the infantry fought their way through the ambushes and small-scale counter-attacks. Scouting parties found a way up the hill and the Americans reached the crest, where they engaged in a sharp fight with Japanese troops coming up the other side to meet them. The action cost the Japanese fifty dead and the Americans 14 dead and 95 wounded, but left the hill in American hands. |

|
|
|---|
| AFV Rules Pertaining to this Scenario's Order of Battle |
|---|
|
| Imperial Japanese Army |
|---|
|


| Army |
|---|
|


| Leyte 1944, Scenario Four: Hill 522 | ||||||||||||
|---|---|---|---|---|---|---|---|---|---|---|---|---|
Leyte 1944, Scenario Four: Hill 522 I wanted to get back into the meat of the Pacific War again, with caves, entrenchments, minefields, specialty weapons, massive artillery strikes, air-support and assault combat, so I jumped into this scenario, not too large but not too smaller either, it hit the spot. The Japanese defended mostly on the 60-meter hexes on map 100 with what I thought was good placement of their defensive positions but with that early heavy American artillery on the first four turns, things shifted a bit. The airstrikes were only effective on two out of six turns but still nice to have, so it boiled down to the boots on the ground. It was bloody combat especially for the caves and entrenchments. I had two sets of connecting caves that the Japanese could shift units around without getting shot by opportunity fire, which was pretty cool. Also on one assault the Japanese lost more units in a cave but instead of retreating and getting a free shot by the Americans they moved/retreated through to the connecting cave. Adds a new realistic twist to the game which happened a lot in the actually Pacific battles. So many different things happen in the battle/scenario that kept the game interesting. The Americans won a Major Victory on paper but it was a lot closer than it looked and if a few things happened differently the results could have come out much different. The Japanese lost 19 steps with the two Casemates counting double while the Americans lost a surprisingly high 10 steps. Neither side controlled enough/ten of the 60-meter hill hexes to get those 6 points but the Americans controlled 4 of the entrenchments & caves hexes to the Japanese 2, resulting in the 8 points for the Americans and 4 points for the Japanese. Finally score, Americans 27, Japanese 14. But as I mentioned before, a few different strategies and dice rolls and the outcome would have been very different. Fun scenario to play! |
||||||||||||
| 0 Comments |