
|
Red’s Beach Leyte '44 #2 |
||
|---|---|---|
| (Defender) Japan | vs | United States (Attacker) |
| Formations Involved |
|---|

| Total | |
|---|---|
| Side 1 | 3 |
| Draw | 0 |
| Side 2 | 1 |


| Overall Rating, 4 votes |
|---|
|
3.75
|
| Scenario Rank: --- of 913 |
| Parent Game | Leyte '44 |
|---|---|
| Historicity | Historical |
| Date | 1944-10-20 |
| Start Time | 08:00 |
| Turn Count | 18 |
| Visibility | Day |
| Counters | 127 |
| Net Morale | 0 |
| Net Initiative | 1 |
| Maps | 2: 101, 81 |
| Layout Dimensions | 86 x 28 cm 34 x 11 in |
| Play Bounty | 183 |
| AAR Bounty | 159 |
| Total Plays | 4 |
| Total AARs | 3 |
| Battle Types |
|---|
| Amphibious Landing |
| Inflict Enemy Casualties |
| Beach Control |
| Conditions |
|---|
| Anti-infantry Wire |
| Entrenchments |
| Minefields |
| Off-board Artillery |
| Randomly-drawn Aircraft |
| Reinforcements |
| Scenario Requirements & Playability | |
|---|---|
| Leyte '44 | Base Game |
| Marianas 1944 | Maps |
| Saipan 1944 | Maps + Counters |
| Introduction |
|---|
|
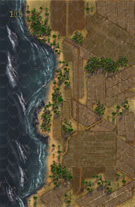
While the Japanese put up little resistance to the American landings at most locations, the 24th Infantry Division came under heavy fire at its assigned Red Beaches south of the 1st Cavalry Division’s landing sites. The two American regiments came ashore tangled together, only to be pinned down by the enemy. The 34th Infantry’s commander Col. Aubrey “Red” Newman, stalked through the fire shouting at his men to “get the hell off the beach!” |
| Conclusion |
|---|
|
American firepower steadily made a difference, with the Japanese unable to stop the M8 Scott assault guns - a light tank mounting a 75mm short-barreled gun in an open-top turret. By nightfall the Americans had reached Highway 1 and the Japanese had begun to pull back into the hills behind the beach. |

|

|
|---|
| AFV Rules Pertaining to this Scenario's Order of Battle |
|---|
|
| Imperial Japanese Army |
|---|
|


| Army |
|---|
|


| Navy |
|---|
|
")
")

| 3 Errata Items | |
|---|---|

|
LVT 4 is a one step open-topped APC. Any scenarios where units and leaders start loaded on LVT 4's and enter the board via ocean hexes do not activate in the regular manner. While at sea, all LVT 4's activate like AFV's with leaders, and move toward beach hexes. While moving toward the beach hexes they don't need to use all MPs or move in a straight line. Once they are on the beach, they must follow standard activation rules for both land and water hexes. LVT 4's that are destroyed at sea do not trigger leader decapitation. (Shad
on 2013 May 06)
|

|
The A1 has an inherent leader and two combat steps. Its counter should have been given an amphibious armor symbol. (Shad
on 2013 May 06)
|

|
The A4 has an inherent leader and two combat steps. Its counter should have been given an amphibious armor symbol. (Shad
on 2013 May 06)
|
| Leyte 1944, Scenario Two: Red’s Beach | ||||||||||||
|---|---|---|---|---|---|---|---|---|---|---|---|---|
Leyte 1944, Scenario Two: Red’s Beach One of the things years ago that I always want in PG was amphibious landings, that is why my Pacific Game designs and even one of my Korean War designs have them. They fun actions and add unique situations and all kind of new unit types. I also like scenarios with actual parachute drops. Panzer Grenadier has all this now. Red’s Beach if Leyte not to be confused with Red Beach in Saipan adds another great amphibious scenario to the PG mix and got me in the mood again to play a lot of PG Pacific action. In this scenario you might have to barrow some wire markers, I had them but I do not know from what version of the game they came from. My initial first wave landing group came under heavy and the Japanese rolled well on the dice and cause some good damage on the first wave sinking a number of loaded LVT-4 including one with very critical Flame Engineer, to help overcome entrenchments, casemates and dug-in enemy troops. When I have a stack of two loaded LVT-4s and they take a hit, I roll a die and on a result of 1-3 the top unit is hit and on a result of 4-6 the bottom unit is hit. The second wave was sorely needed and by the first four turns I had already lost 14 American steps. To put that in perspective, only 6 more were lost the rest of the game but with 20 step losses, the Americans already put one victory object one of reach. I misread or forgot the number of beach and adjacent hexes in an unbroken line in needed, thinking it was 22, which was actually the number of Japanese steps I had to eliminate, which I did with eliminating 25 in fact. Seeing at the end of play I only had 23 unbroken hexes with stubborn Japanese units still holding one town hex, on 24 of my unbroken line of hexes, I have now only achieved one of my three objectives, giving the Japanese a Minor Victory. If I had realized this earlier maybe I could have adjusted a bit but maybe not, that town hex was real pain the whole game and the heavy artillery fire from both sides early in the game makes things real dicey. Great fun scenario to play, it has everything you want in and amphibious scenario! |
||||||||||||
| 0 Comments |
| A real messy one! | ||||||||||||
|---|---|---|---|---|---|---|---|---|---|---|---|---|
The Japanese Commander, realizing that he didn't have enough force to adequately cover the entire coastline, sacrificed the flanks and built his defense along the middle of the east coast, leaving around 5-8 exes at both the North and the South end barren. The American Commander, thought he would take on the Japanese by an original landing at the Southern two villages on Board 81, then, once the battle was well underway, sneak in a landing at the far South on Board 101. The initial landings went well as could be expected going into the teeth of the enemy defenses.... However (and there ALWAYS seems to be a "however"), the secondary landing ran into a snag (or two) and could not make the headway that they were expected to. The Japanese Commander simply ran a good defense long enough to keep the Americans from a victory. (Notes: Beach Landings are ALWAYS messy. Coordination of Tracks with the Infantry is difficult, particularly with the mixed terrain on Board 81. Sometimes it doesn't take much to stifle the advance of an entire Battalion.) This was an interesting scenario. |
||||||||||||
| 0 Comments |
| One of theses Days A successful Beach will be used | ||||||||||||||
|---|---|---|---|---|---|---|---|---|---|---|---|---|---|---|
I spread out the guns along the beach. Left around 6 hexes empty at both ends. I feel from a historical point of view that beaches would not have gaps. There is an end of the world effect. Next invasion scenario I am going to give up 8 to 10 hexes from each edge of the board. Put the guns with in the remaining space. May achieve better overlapping fire. I got one victory condition or kept the US Army from achieving all 3. I eliminated 23 or more steps. I did defend 3 hexes away from the beach. Then the theory was to ooze back to the beach ti prevent the 24 contiguous beach hexes.Did not work. The are against me. Units recover on snake eyes when it should have been saved that roll for assault. Oh well. If one does not put units near the beach, better group them 6+ hexes back in jungle? This avoids the naval bombardment and the planes can not spot units in jungle. The nits in the rear go towards either the top or bottom third of the map to occupy the beaches. Going to play these solo to find out if I can do better. |
||||||||||||||
| 0 Comments |