
|
Collision Course Liberation 1944 #3 |
||
|---|---|---|
| (Attacker) Germany | vs | Britain (Defender) |
| Formations Involved | ||
|---|---|---|
| Britain |  |
4th/7th Dragoon Guards |
| Britain |  |
6th Durham Light Infantry |
| Germany |  |
352nd Infantry Division |

| Total | |
|---|---|
| Side 1 | 6 |
| Draw | 0 |
| Side 2 | 1 |


| Overall Rating, 8 votes |
|---|
|
3.75
|
| Scenario Rank: 233 of 913 |
| Parent Game | Liberation 1944 |
|---|---|
| Historicity | Historical |
| Date | 1944-06-06 |
| Start Time | 16:00 |
| Turn Count | 18 |
| Visibility | Day |
| Counters | 83 |
| Net Morale | 1 |
| Net Initiative | 0 |
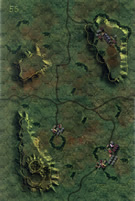
| Maps | 2: 56, 57 |
| Layout Dimensions | 86 x 28 cm 34 x 11 in |
| Play Bounty | 151 |
| AAR Bounty | 165 |
| Total Plays | 7 |
| Total AARs | 2 |
| Battle Types |
|---|
| Breakout |
| Delaying Action |
| Inflict Enemy Casualties |
| Urban Assault |
| Conditions |
|---|
| Hidden Units |
| Off-board Artillery |
| Randomly-drawn Aircraft |
| Smoke |
| Scenario Requirements & Playability | |
|---|---|
| Liberation 1944 | Base Game |
| Introduction |
|---|
|
On King Beach the flail tanks and AVREs landed with the first wave on schedule, clearing the beach in an orderly manner. The only rough spot appeared when the left-hand battalion briefly stalled at the seawall, but a call to the supporting naval vessels quickly straightened that out. Afternoon found the 6th Durham Light Infantry and their supporting armor passing through Villiers le Sec and turning west toward Bayeux. This put them on a collision course with Kampfgruppe Meyer who, after a futile attempt to locate American paratroopers around Carentan, had returned and attacked toward Crepon. |
| Conclusion |
|---|
|
Before Kampfgruppe Meyer could move eastward they detached their Sturmgeschütz and an infantry battalion to deal with problems at Omaha Beach. Without these forces Kampfgruppe Meyer failed to stop the British despite pressing home the attack. When the smoke had cleared their commander was dead and the infantry was driven over the Suelles River (just to the south of the map) with heavy loss of life. Some German accounts say less than ninety men worked their way back to friendly lines. |

|

|
|---|
| AFV Rules Pertaining to this Scenario's Order of Battle |
|---|
|
| Army |
|---|
|


| Heer |
|---|
|


| 3 Errata Items | |
|---|---|

|
All Bren carriers should have a movement value of 7. (Shad
on 2010 Dec 15)
|

|
The reduced direct fire value of the Heer HMG became 5-5 starting with Fall of France. (plloyd1010
on 2015 Jul 31)
|

|
The morale and combat modifiers of German Sergeant #1614 should be "0", not "8". (Shad
on 2010 Dec 15)
|
| Smash Mouth in Normandy | ||||||||||||
|---|---|---|---|---|---|---|---|---|---|---|---|---|
I had the British forces move to and defend the eastern portion of Board 57 by taking the hills and village. the intent was to fight hard for the Village to keep the Germans from getting the Village VC. I conceded the north village on Board 56 thinking it would spread the British force out to try to get I. When the time was right, mounted infantry on Shermans would dash for the East Board edge using the falling darkness as cover. I played the Germans aggressively moving out to capture the villages while leaving the Marders, ATGs and some scattered infantry to stop any British attempt to get off board. The Germans fought for an took the NE Hill to use that as a base of fire for the attack on the east village of Bd 57. But their attack on the Village was stopped by combined direct and indirect fires from the British. As dusk started to fall, the British moved out with tank mounted infantry across the North edge to get off the board. Starshells popped up and direct and indirect fire hurt much of the British mounted infantry (I had some issues with the Bombardment and morale rules against tank riders)but the tanks pressed on only to be finally hammered by cross fire from ATGs and one remaining Marder platoon. The Germans won on Turn 17 after achieving two VCs: stopping the British form getting ten steps off the board and killing more 10 or more British Steps. I liked this scenario, there are many courses of action each side could take to win. |
||||||||||||
| 0 Comments |
| An odd one |
|---|
|
I found the victory conditions for this one somewhat hard to wrap my head around. There are multiple conditions for the Germans to accomplish, and the number they succeed with determines the level of victory for both sides. But the conditions are slightly contradictory, or slightly incompatible, or slightly...something. I guess it was more me than anything, I couldn't quite commit to what each side should try for. The Germans were initially trying to hold the high ground on either flank of the board center, while pushing for the only remaining town up the middle. The British decided to defend on high ground on either side of the town to hit any attacking force in the flanks. The German attack sputtered due to their low morale, the British attempted a counterattack on their right, followed by a feint on the left to take out some exposed AT guns, followed by commitment of their armor, then a withdrawal on the right. It was like shadowboxing, with neither side really making a decisive move , but a flurry of moves and countermoves that did very little. In the end the British earned a minor victory because German morale made it impossible to actually succeed in any attack. |
| 0 Comments |