
|
Surprise at Le Hamel Liberation 1944 #1 |
||
|---|---|---|
| (Defender) Germany | vs | Britain (Attacker) |
| Formations Involved | ||
|---|---|---|
| Britain |  |
231st Infantry Brigade |
| Britain |  |
79th Armoured Division |
| Germany |  |
915th Volksgrenadier Regiment |

| Total | |
|---|---|
| Side 1 | 2 |
| Draw | 2 |
| Side 2 | 9 |


| Overall Rating, 15 votes |
|---|
|
3.6
|
| Scenario Rank: 339 of 913 |
| Parent Game | Liberation 1944 |
|---|---|
| Historicity | Historical |
| Date | 1944-06-06 |
| Start Time | 10:00 |
| Turn Count | 20 |
| Visibility | Day |
| Counters | 75 |
| Net Morale | 0 |
| Net Initiative | 2 |
| Maps | 2: 57, 58 |
| Layout Dimensions | 86 x 28 cm 34 x 11 in |
| Play Bounty | 144 |
| AAR Bounty | 153 |
| Total Plays | 13 |
| Total AARs | 4 |
| Battle Types |
|---|
| Breakout |
| Delaying Action |
| Inflict Enemy Casualties |
| Urban Assault |
| Entrenchment Control |
| Conditions |
|---|
| Entrenchments |
| Hidden Units |
| Minefields |
| Naval Bombardment |
| Off-board Artillery |
| Randomly-drawn Aircraft |
| Smoke |
| Terrain Mods |
| Scenario Requirements & Playability | |
|---|---|
| Liberation 1944 | Base Game |
| Introduction |
|---|
|
The Planners for Operation Overlord considered the possession of Le Hamel essential to securing Gold Beach. The plan called for the 1st Hampshires to hit the beach then move quickly to subdue the village aided by some armor. In the confusion of battle the infantry arrived in good shape five minutes ahead of schedule, but the tanks ran into difficulties and only a handful supported the attack. |
| Conclusion |
|---|
|
The massive preliminary bombardment spared Le Hamel to a great extent, and the Germans made generous use of mines in fortifying the area. To make matters worse, the defenders were not the inexperienced volksgrenadiers the Brits expected, but rather veterans of the 352nd Infantry Division. The Germans turned back the first attack of the 1st Hampshires, killing their commander and second in command. After regrouping and receiving an infantry company from the second wave as reinforcements as well as some late-arriving armor, they launched another attack. This time they gradually forced back the Germans, and by 1600 La Hamel fell into British hands. After a short break, the British advanced further westward and seized Arromanches before calling it a day. |

|

|
|---|
| AFV Rules Pertaining to this Scenario's Order of Battle |
|---|
|
| Army |
|---|
|


| Heer |
|---|
|


| Luftwaffe |
|---|
|

| 4 Errata Items | |
|---|---|

|
All Bren carriers should have a movement value of 7. (Shad
on 2010 Dec 15)
|

|
Ignore the direct fire values. (Shad
on 2010 Dec 15)
|

|
The reduced direct fire value of the Heer HMG became 5-5 starting with Fall of France. (plloyd1010
on 2015 Jul 31)
|

|
The movement allowance on the counters in Airborne is misprinted. It should be "3." (rerathbun
on 2012 Jan 30)
|
| Liberation, Scenario One: Surprise at Le Hamel | ||||||||||||
|---|---|---|---|---|---|---|---|---|---|---|---|---|
Liberation, Scenario One: Surprise at Le Hamel I felt in the mood to play something from Liberation and picked this scenario to get the British on the offensive and with a ton of Naval and airport and cool AVRE & Crab units to boot. The British led with their infantry and keep their vehicles out of harm way of the nasty 88mm German gun. Once that gun was taken out all forces moved dead ahead and the German tried to defend too many objectives and were spread too thin and got mauled and overrun. In the end the British had 35 points to the Germans 6 points for a Major British Victory. By the end of the scenario the Germans had lost 26 steps & 4 Leaders while the British had only lost only 3 steps. That Air and Naval support was devastating! Even though it was lopsided, I enjoyed a scenario where the British could win big time for change and using those engineer type armor vehicles was fun. |
||||||||||||
| 0 Comments |
| Very Balanced and Historically Accurate | ||||||||||||||
|---|---|---|---|---|---|---|---|---|---|---|---|---|---|---|
This is an AAR from a game played quite a few years ago. Overall, this was a very good and balanced scenario. We had to call the game before it was fully completed due to time constraints. However, we agreed that the game could have gone either way and was very balanced. This is why I chose to call this one a "DRAW". Was a very fun afternoon of gaming with this particular scenario! AAR NOTE I am just now pulling these games off the shelf and recording our shared play results with my gaming buddy here in town where I live. Unfortunately, I can't remember the exact date of play on some of these games. However, I do know if we played them "pre-pandemic" vs. coming "right out of the pandemic lockdowns". If you see a play date of 2019-06-01, this is for a pre-pandemic game and AAR. 2022-06-01 is for our post-pandemic gaming reboots at our local game and magic card store. |
||||||||||||||
| 0 Comments |
| Tommy & Jerry |
|---|
|
This was a fun, smallish battle where the Germans held a tough but thin defensive line of entrenchments. The British took half the game to crack the line, but infiltrated units past the german positions which forced a fall-back and then rout of the German defenders. |
| 0 Comments |
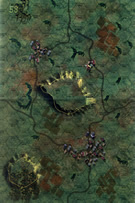
| Ok game, bad Maps |
|---|
|
This was a fun game once it got going. The Brits were up against a rather strong force of German infantry well supported by heavy weapons, mines, trench’s, you get the picture. The Brits get some weak artillery, an occasional Naval bombardment and some air power on the hour and half hour. It’s a take the town kind of scenario, with German infantry holding tight and proving to be tough customers. Not a bad exercise, but one that is repeated frequently in this series. However, the maps leave much to be desired. Very dark, very green. It’s very hard to distinguish the woods from the “clear” terrain, and hedgerows seem to be big green blobs between hexes. I’m not a fan of the hill structure either, looks very much like a desert type hill, not Normandy. Also, using 4th edition rules, what’s the difference between a village and a town??? The number of hexes they occupy? In the end, the Brits manage a marginal victory. A so so game. |
| 1 Comment |
"4th edition rules, what’s the difference between a village and a town??? The number of hexes they occupy?"
There are no village hexes in Liberation '44, only town hexes. You seem to have been confused by the narrative. For an example of a village hex, get out your Kokoda Campaign/Trail or Saipan maps. Board 34, hex 0507 is a village hex on a Kokoda map. Board 80, hex 1015 is a village hex on a Saipan map.