
|
Ember: Point 134 La Campagne de Tunisie #12 |
||
|---|---|---|
|
(Defender)
France
(Defender) Germany |
vs | Britain (Attacker) |
| Formations Involved | ||
|---|---|---|
| Britain |  |
Grenadier Guards |
| Germany |  |
334th Infantry Division |

| Total | |
|---|---|
| Side 1 | 3 |
| Draw | 0 |
| Side 2 | 2 |


| Overall Rating, 5 votes |
|---|
|
3.2
|
| Scenario Rank: 622 of 913 |
| Parent Game | La Campagne de Tunisie |
|---|---|
| Historicity | Historical |
| Date | 1943-04-23 |
| Start Time | 03:00 |
| Turn Count | 18 |
| Visibility | Day & Night |
| Counters | 25 |
| Net Morale | 1 |
| Net Initiative | 2 |
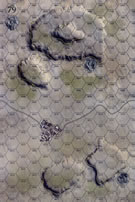
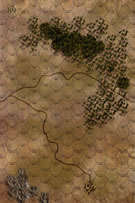
| Maps | 2: 79, 89 |
| Layout Dimensions | 56 x 43 cm 22 x 17 in |
| Play Bounty | 149 |
| AAR Bounty | 165 |
| Total Plays | 5 |
| Total AARs | 2 |
| Battle Types |
|---|
| Urban Assault |
| Conditions |
|---|
| Off-board Artillery |
| Smoke |
| Illumination |
| Scenario Requirements & Playability | |
|---|---|
| An Army at Dawn | Maps + Counters |
| Conquest of Ethiopia | Maps |
| La Campagne de Tunisie | Base Game |
| Introduction |
|---|
|
Armed with a melange of French and German weaponry, wearing French uniforms with German helmets and greatcoats; the Phalange Africaine joined in the fighting toward the very end of the campaign. The 334th Infantry Division deployed this odd reinforcement on the hills to the north-east of Medjez-el-Bab, facing toward Djebel Bou Aoukaz. |
| Conclusion |
|---|
|
It was a wet and very dark night, and the British advanced through fields of waist-high corn sodden with rain. The men covered the larger part of the three-mile approach march in complete silence. Through the dim light, the assault began following a heavy bombardment. After severe hand-to-hand fighting, Point 134 and the neighboring hillocks were firmly in British hands when light grew. The British then dug fresh trenches and detached an infantry company and seven Churchill tanks to mop up the system of hills and wadis round the village of Grich el Oued. |
| Additional Notes |
|---|
|
Maps from Africa Orientale Italiana are the same as those from Conquest of Ethiopia, and thus may be used in there place. |

|
|
|---|
| AFV Rules Pertaining to this Scenario's Order of Battle |
|---|
|
| Army |
|---|
|


| Armée de Terre |
|---|
|


| Heer |
|---|
|


| 3 Errata Items | |
|---|---|
| Scen 12 |
The time for Dawn in April is not shown in the Special Rules, but it should occur at 0630. (Schoenwulf
on 2016 Sep 24)
|

|
All Bren carriers should have a movement value of 7. (Shad
on 2010 Dec 15)
|

|
Two British infantry have their full strengths printed on the back. They should both be "2-3" when reduced. (Shad
on 2010 Dec 15)
|
| In the Still of the Night | ||||||||||||
|---|---|---|---|---|---|---|---|---|---|---|---|---|
In the early morning hours of April 23, 1943, British forces of the Grenadier Guards, 1st Guards Brigade advanced along a road leading to the town of Grich el Oued. Two Churchill VII platoons were east of the road, while 3-inch mortar units were advanced on Bren carriers along with 4 infantry units emerging from the woods. One additional British infantry unit was situated on the rocky ground west of the 20-meter hill. The Axis forces were comprised of a combination of former Vichy French, now referred to as “Phalange Afrique” platoons, and elements of the 334th German Infantry Division. The Phalange Afrique infantry were dug in both on the southwest 20-meter hill and east of the road 800 meters south of town. All remaining Axis units were in Grich el Oued under the direction of Lt. Gruyere. British units moved slowly north at 0300 hours, and the Axis infantry near the road retreated toward town. By 0400 hours, all of the Axis units had were located in town except for the infantry on the west central 20-meter hill. By 0415, the British had the town surrounded on three sides, and were assaulting the 60mm and NW41 units in the northeast sector of the town. The German captain and Lt. Gruyere were both KIA by 0445 hours, and the entire town was under British assault. The British had control of the northeast sector of town by 0530, but could not dislodge Axis units from the south and northwest sectors until 0700 hours resulting in the Axis claiming a minor victory. This is a short scenario with a lot of tactics in it due to the limited sight range for much of the scenario. The basic objective for the British is control of the town, and the sooner the better. In this case, the Axis troops showed remarkable resistance in avoiding elimination in the town hexes despite some serious assault odds to the contrary. It took five turns to dislodge a single NW41 unit, and nine to clear the HMG from the northwest part of town. One British unit had moved to the north of town to tie up a returning Axis infantry unit so that the HMG could not be reinforced. The British finally cleared the town on Turn 17 when a DM HMG unit finally had to flee, holding the Axis to a minor victory. The key for the Axis is to slow the British advance with spotting for the NW41 and 60mm units, while regrouping to put the greatest strength in the town itself. Then it’s a question of endurance. In this scenario play, the British only lost two steps to the Axis loss of eight, and they had multiple action segments to open 11 of the 17 turns played. |
||||||||||||
| 0 Comments |
| La Campagne De Tunisie: scenario #12: Point 134 | ||||||||||||
|---|---|---|---|---|---|---|---|---|---|---|---|---|
La Campagne De Tunisie: scenario #12: Point 134 Pretty straight forward, control the town hexes as fast as you can. The British is short one CAPT counter for this scenario, so instead of getting one from another game, I just used the SGT counter as a CAPT counter. Also I believe the British setup on map 89, or why use it. The British use their strong Churchill tanks to led the assault and the Infantry follow closely behind. The German/French units put up a fight but the British wear them down and assault with strong Infantry and Armor combinations to clear out the town hexes of Grich el Oued by turn 12 in fact, winning a Major Victory as the Axis forces didn’t have enough strength left for a counter-attack. |
||||||||||||
| 0 Comments |