
|
Phoenix: Just Like Training La Campagne de Tunisie #10 |
||
|---|---|---|
| (Attacker) Germany | vs |
Britain
(Defender)
France (Defender) Morocco (Defender) United States (Defender) |
| Formations Involved | ||
|---|---|---|
| France |  |
9e Regiment de Tirailleurs Algeriens |
| France |  |
Groupement Lagarde |

| Total | |
|---|---|
| Side 1 | 1 |
| Draw | 1 |
| Side 2 | 2 |


| Overall Rating, 4 votes |
|---|
|
4.25
|
| Scenario Rank: --- of 913 |
| Parent Game | La Campagne de Tunisie |
|---|---|
| Historicity | Historical |
| Date | 1943-01-20 |
| Start Time | 16:00 |
| Turn Count | 16 |
| Visibility | Day & Night |
| Counters | 50 |
| Net Morale | 0 |
| Net Initiative | 2 |
| Maps | 2: 89, 91 |
| Layout Dimensions | 56 x 43 cm 22 x 17 in |
| Play Bounty | 156 |
| AAR Bounty | 165 |
| Total Plays | 4 |
| Total AARs | 2 |
| Battle Types |
|---|
| Inflict Enemy Casualties |
| Road Control |
| Conditions |
|---|
| Off-board Artillery |
| Smoke |
| Terrain Mods |
| Illumination |
| Scenario Requirements & Playability | |
|---|---|
| An Army at Dawn | Counters |
| Conquest of Ethiopia | Maps |
| La Campagne de Tunisie | Base Game |
| Introduction |
|---|
|
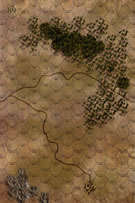
The situation on 20 January caused General Dwight Eisenhower's advance command post to arrange for coordinated resistance by French, American and British ground units and Allied air forces. British First Army elements would move toward the Rebaa Oulad Yahia valley to cut off and block the enemy's advance there, while Combat Command B, U.S. 1st Armored Division, was assigned to XIX Corps for commitment in the Ousseltia valley. By the next morning, the force was assembled about five miles southwest of Ousseltia and engaged in active reconnaissance. |
| Conclusion |
|---|
|
The US tankers had been attached to the French at the beginning of the campaign. They got neither mail nor orders; they drew neither pay nor supplies and ate French food. They had seen lots of action and every fourth man in the little company had been decorated by the French government. On the Ousseltia valley, the Americans had a little Arab village to hide in, but the German tanks were all around them and could sit out of range and blow up the village, house by house. By midnight, 20-21 January, Lüder overran the three lightly-held Allied roadblocks on the roads leading into Ousseltia village, and reached the Ousseltia-Kairouan road about four miles northwest of the Kairouan pass. During the night only one battalion of the 756th Mountain Regiment, using trucks borrowed from other units, was able to to reinforce Lüder. He proceeded to destroy the French units, cut off on the ridge to the north of Djebel Bou Cabouss, assisted by Italian elements attacking from east of the pass. |
| Additional Notes |
|---|
|
Maps from Africa Orientale Italiana are the same as those from Conquest of Ethiopia, and thus may be used in there place. |

|
|
|---|
| AFV Rules Pertaining to this Scenario's Order of Battle |
|---|
|
| Army |
|---|
|


| Armée de Terre |
|---|
|


| Moroccan Ground Forces |
|---|
|

| Heer |
|---|
|


| Army |
|---|
|


| 4 Errata Items | |
|---|---|

|
In 1940: Fall of France, the units show Direct Fire. All units are Indirect Fire. (rerathbun
on 2015 Jun 06)
|

|
The reduced direct fire value of the Heer HMG became 5-5 starting with Fall of France. (plloyd1010
on 2015 Jul 31)
|

|
All SPW 251s have an armor value of 0. (Shad
on 2010 Dec 15)
|

|
Liberation 1944's Tiger movement and armor ratings are backwards. They should be Armor 7 and Movement 5. (petermc
on 2014 Feb 14)
|
| Brawl at the Crossroads |
|---|
|
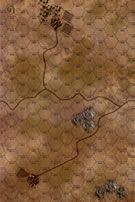
Scenario 10, Le Campaigne Tunisie: The background : This is a neat situation, with an odd assortment of Allies on the defense against Germans that bring halftracks, Panzers and Tigers (!!) to the party. The key is the three road junctions on the map, which are the primary objective for the Germans. The Allies saving grace is that is almost dusk, so if they can hold out they might be able to wear down the bad guys with some late assaults. Setup: All three crossroads are in the open, so I placed most of the Allies in nearby cover. The main defense line I placed in the woods just south of the crossroads in the middle of the map, with the Moroccans in the town to the northeast, the Brits in the woods northwest of the middle crossroads, and the 75s in the town to the southeast. The American task force—Stuarts and M3/75s—start behind the woods to the west, out of sight. Summary: The Germans come in from the north, with the main attack moving down the east side of the map, while the mountain troops take the village in the northwest. Right away the Allies score a coup, as the Morrocans rush forward and get the jump on a SPW251, destroying it along with the INF and Major on board. The Major was the ranking officer, so all other German officers take a morale check, which they all pass, but the German advance gets thrown out of whack. For a bit. The Germans reorganize, take out half the Moroccans and shove the others out of the way. The tanks zoom south, with the Tiger covering the advance on the middle crossroads and the Panzers hooking around to take the crossroads to the south. With night falling, the Americans move forward and take on the Panzers. They take out a step, but the Germans are too much and eventually only a step of M3/75s remain. Meanwhile the drive on the middle crossroads grinds on. The French in the woods rush forward and plant themselves on the crossroads, but they are assaulted by a force consisting of the Tiger, the SK 10/4 and infantry. The French keep feeding in reinforcements but the Germans steadily knock them down. Finally, on turn 13, with the Germans holding all three crossroads and losses getting out of control, the Allies pack it in and withdraw west. Comments: This was a surprisingly intense battle, with a lot of close fighting and high losses. While Tigers vs Stuarts makes this one look like a mismatch, I can see a path for the Allies to pull it out. The Morrocans bashing the Germans as soon as they got on the board worked well, and the US group maneuvered well but got mauled anyway due to poor rolls. Play this one 10 times and the Nazis probably win 8 or 9, the Allies have a puncher’s chance. Fun game. |
| 0 Comments |
| Night Moves | ||||||||||||
|---|---|---|---|---|---|---|---|---|---|---|---|---|
After holding the crossroads on the previous day, elements of Groupement Lagarde were reinforced and grouped with a multinational force consisting of US armor, British artillery and troops from the 9e Régiment de Tirailleurs Algériens. Late on the day of January 20, 1943, they were counterattacked by German forces from Battle Group Lüder northwest of Ousseltia. The units of Groupement Lagarde were positioned as follows: mortar in the west central woods, Staurt and M3/75 in the northwest town and north central woods with a 6-pdr. and HMG for support, and a 47mm and Morrocan Goumiers in the northeast town. Units from the 9e Régiment de Tirailleurs Algériens were situated either dug-in or in woods along the south central road. The Germans moved south at 1600 hours with their forces advancing east of the central road, with a Tiger platoon taking control of the northern intersection. By nightfall, the battle along the north central road and woods had resulted in the loss of two M3/75 platoons from the Allie,s and a Pz.IIIn and Gebirgsjäger platoons from the Axis forces. The German forces attacking north central woods had caused the desertion of a Lt., but the HMG and Moroccan units held on. A fierce battle also was ongoing with the Moroccan forces in the northeast village. While the northern crossroads was reoccupied by the Allies, a Gebirgsjäger unit captured the center crossroads at 1800 hours; however, a French 25mm unit hiding in the woods eliminated their Hanomag. By, 1900, the Germans had control of the north central woods, eliminating all the Allied units there, but the northeast village remained in turmoil. Having secured two crossroads, the German forces moved south, but were ambushed by French infantry. The only unit that continued to move south was an Sk.10/4 platoon that miraculously survived fire from two French 75mm units and occupied the south crossroads. The battle ended with the Germans in control of two crossroads (south and center), with the northern one only in partial control. The French were able to claim a minor victory through the last-ditch efforts of Stuart and M/75 platoons assaulting the north crossing. At first, the objectives for this scenario seemed pretty easy for a French major victory, as they only had to control a single crossroad to attain one. However, the strength of the German forces coupled with their mobility make this a somewhat difficult task. Similarly, it is difficult for the Germans to control all three crossroads, as the French can slip an Allied unit into one of the three under cover of darkness on the last turn as long as it can survive the close range fire of the turn before. This makes the scenario a bit of a dance of units jockeying to be the last unit standing alone in each crossroad. If there is no crossroad control, the scenario boils down to a step loss battle for victory. The French have a number of fairly good AT units to take on the Panzer III’s, but very little to confront the Tiger with its armor efficiency. There are multiple strategies that may be employed here by both sides, and a French delaying tactic was used primarily in this play. However, it almost didn’t work, as the German Sk.10/4 had an amazing survival capacity. If a Pz.III in the north crossroads had better accuracy, this could have been a German win, but it didn’t share the good fortune of the Sk unit in the south. The end result was German control of two of the three crossroads, but a French minor victory as they only lost 12 steps compared to the German loss of 15; this latter difference would have been closer if French tank losses had counted double like those of the Germans. |
||||||||||||
| 0 Comments |