Panzer Grenadier Battles on April 27th:
Arctic Front Deluxe #40 - Children's Crusade Broken Axis #14 - Târgu Frumos: The Second Battle Scenario 3: Sledge Hammer of the Proletariat
Army Group South Ukraine #6 - Consternation Road to Berlin #73 - She-Wolves of the SS
Errors? Omissions? Report them!
Phoenix: Pour la Légion!
La Campagne de Tunisie #9
(Defender) Germany vs Britain (Attacker)
France (Attacker)
Morocco (Attacker)
Formations Involved
Britain 6th Armoured Division
France 7e Régiment de Tirailleurs Marocains
France Groupement Lagarde
Display
Balance:


Overall balance chart for LCDT009
Total
Side 1 0
Draw 0
Side 2 4
Overall Rating, 4 votes
5
4
3
2
1
4.25
Scenario Rank: --- of 913
Parent Game La Campagne de Tunisie
Historicity Historical
Date 1943-01-19
Start Time 08:00
Turn Count 24
Visibility Day
Counters 66
Net Morale 0
Net Initiative 1
Maps 4: 85, 87, 88, 91
Layout Dimensions 112 x 43 cm
44 x 17 in
Play Bounty 173
AAR Bounty 171
Total Plays 4
Total AARs 1
Battle Types
Bridge Control
Inflict Enemy Casualties
Urban Assault
Conditions
Hidden Units
Minefields
Off-board Artillery
Smoke
Terrain Mods
Scenario Requirements & Playability
An Army at Dawn Counters
Conquest of Ethiopia Maps
La Campagne de Tunisie Base Game
Introduction

The Axis had reached and conquered the Oum-el-Abouab village on the previous evening. On the morning of 19th December, French Colonel Carpentier ordered two Moroccan companies supported by British tanks to counterattack the Germans along the mountain road to retake the village. After hard fighting, the counterstroke fell short of the village still strongly held by the Tigers. Panzer grenadiers then advanced farther to the south, following the winding road that led through the narrow valley.

Conclusion

At 1000, twenty panzers were in contact with the French along the mountain track leading to Henchir Moussa. French WWI vintage armoured cars exchanged shots with the Tigers in a kind of David vs Goliath fight but with a more predictable result. Luckily enough for the Légionnaires, they were separated by a minefield laid by the Italians during the previous night. The French eventually mounted a well-executed fighting withdrawal along the mountain road and delayed the German drive for more than five hours. It wasn't until evening the Battle Group Lüder reached the day's objective, the crossroads of Henchir Moussa.

Additional Notes

Maps from Africa Orientale Italiana are the same as those from Conquest of Ethiopia, and thus may be used in there place.


Display Relevant AFV Rules

AFV Rules Pertaining to this Scenario's Order of Battle
  • Vulnerable to results on the Assault Combat Chart (7.25, 7.63, ACC), and may be attacked by Anti-Tank fire (11.2, DFT). Anti-Tank fire only affects the individual unit fired upon (7.62, 11.0).
  • AFV's are activated by tank leaders (3.2, 3.3, 5.42, 6.8). They may also be activated as part of an initial activating stack, but if activated in this way would need a tank leader in order to carry out combat movement.
  • AFV's do not block Direct Fire (10.1).
  • Full-strength AFV's with "armor efficiency" may make two anti-tank (AT) fire attacks per turn (either in their action segment or during opportunity fire) if they have AT fire values of 0 or more (11.2).
  • Each unit with an AT fire value of 2 or more may fire at targets at a distance of between 100% and 150% of its printed AT range. It does so at half its AT fire value. (11.3)
  • Efficient and non-efficient AFV's may conduct two opportunity fires per turn if using direct fire (7.44, 7.64). Units with both Direct and AT Fire values may use either type of fire in the same turn as their opportunity fire, but not both (7.22, 13.0). Units which can take opportunity fire twice per turn do not have to target the same unit both times (13.0).
  • Demoralized AFV's are not required to flee from units that do not have AT fire values (14.3).
  • Place a Wreck marker when an AFV is eliminated in a bridge or town hex (16.3).
  • AFV's do not benefit from Entrenchments (16.42).
  • AFV's may Dig In (16.2).
  • Open-top AFV's: Immune to M, M1 and M2 results on Direct and Bombardment Fire Tables, but DO take step losses from X and #X results (7.25, 7.41, 7.61, BT, DFT). If a "2X" or "3X" result is rolled, at least one of the step losses must be taken by an open-top AFV if present.
  • Closed-top AFV's: Immune to M, M1 and M2 results on Direct and Bombardment Fire Tables. Do not take step losses from Direct or Bombardment Fire. If X or #X result on Fire Table, make M morale check instead (7.25, 7.41, 7.61, BT, DFT).
  • Closed-top AFV's: Provide the +1 modifier on the Assault Table when combined with infantry. (Modifier only applies to Germans in all scenarios; Soviet Guards in scenarios taking place after 1942; Polish, US and Commonwealth in scenarios taking place after 1943.) (ACC)
  • Tank: all are closed-top and provide the +1 Assault bonus, when applicable
  • Anti-Aircraft Weapon Carrier: apply a -1 modifier to an air attack if within three hexes of the targeted hex (15.14).
  • APC – Armored Personnel Carrier: These are Combat Units, but stack like Transports. They can transport personnel units or towed units. They are not counted as combat units for the +1 stacking modifier on the Direct Fire and Bombardment Tables (4.4). They may be activated by regular leaders and tank leaders (1.2, 3.34, 4.3, 5.43). They do not provide the +1 Assault bonus (ACC).
  • Armored Cars: These are Combat Units. They are motorized instead of mechanized. All have their own armored car leaders, who can only activate armored cars (6.85). Do not provide the +1 Assault bonus (ACC).
  • Reconnaissance Vehicle: 8.23 Special Spotting Powers Both foot and vehicle mounted recce units (1.2) possess two special spotting abilities. The first ability is that they can spot enemy in limiting terrain at one hex further than the TEC specifies for other units and leaders. For example, an enemy unit in town can normally be spotted at three hexes or less, but a recce unit can spot them at four hexes.Their second ability is that they can place a Spotted marker on any one enemy unit they can spot per turn, just as if the enemy unit had "blown its cover" by firing. Such Spotted markers are removed as described earlier.

Display Order of Battle

Britain Order of Battle
Army
  • Mechanized
France Order of Battle
Armée de Terre
  • Motorized
Légion Étrangère
  • Foot
  • Motorized
Moroccan Ground Forces
  • Foot
Vichy l’ Armee de l’ Armistice
  • Foot
Germany Order of Battle
Heer
  • Motorized

Display Errata (3)

3 Errata Items
Overall balance chart for 20

The reduced direct fire value of the Heer HMG became 5-5 starting with Fall of France.

(plloyd1010 on 2015 Jul 31)
Overall balance chart for 47

All SPW 251s have an armor value of 0.

(Shad on 2010 Dec 15)
Overall balance chart for 484

Liberation 1944's Tiger movement and armor ratings are backwards. They should be Armor 7 and Movement 5.

(petermc on 2014 Feb 14)

Display AARs (1)

Une Victoire à Savourer !
Author Schoenwulf
Method Solo
Victor Britain, France, Morocco
Play Date 2016-09-16
Language English
Scenario LCDT009

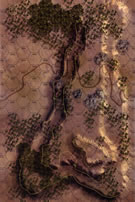
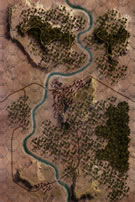
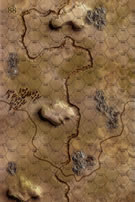
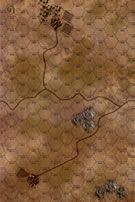
After the Germans had taken the town of Oum-el-Abouab on the night of January 18, 1943, they were counterattacked early the next morning by French troops of the 7e Régiment de Tirailleurs Marocains and Groupement Lagarde assisted by British tanks of the 6th Armoured Division. These forces aligned on both sides of an east-west ridge south of the town. German forces from Battle Group Lüder moved south to engage them, while a second Axis contingent moved east along a trail that ran north of the stream. Shortly after crossing the bridge south of town, a Pz.IIIn platoon received significant damage from a hidden minefield. The Germans continued to advance on both the east and central roads. As they approached the central ridge, Moroccan troops attacked them, but the German infantry prevailed. Over the course of the next hour, three Tirailleur platoons were eliminated, and the battle on the ridge escalated into a series of skirmishes. A German armored group destroyed a Valentine tank platoon with brewed-up units blocking the trail, while a Crusader group retreated with casualties. French AT fire destroyed a Greman Sk.10/4 group, and the French retreated to the south edge of the ridge with a group of Legionnaire units blocking the trail. A combined German force with both Tiger & Pz.IIIn tank and foot units eliminated remaining resistance from the ridge; French casualties were heavy, including two White scouting platoons and the aforementioned Crusader group. About 1030 hours, this combined force broke through the French roadblock at the base of the ridge, eliminating both Legionnaire foot and motorcycle units. As the armored group moved south, the French retreated; however, the power and range of the Tiger 88mm guns caught a number of French trucks carrying HMG, mortar and artillery groups that had been engaged in the prior fighting. While the armor moved forward steadily, many German foot units were still held up on the ridge making slow progress. At noon, French infantry still controlled the wye in the central trail, but Tiger and Pz.IIIn platoons had moved around them and were headed for the south bridge. They arrived at the bridge at 1215 and began an assault on the Legionnaire MTC platoons occupying the bridge. The French stalwarts managed to hold the bridge against the armor assault until the tanks were finally supported by an HMG unit at 1315, and the bridge fell to the Germans fifteen minutes later. In the meantime, the Pz.IIIn platoon had broken off and headed to the outskirts of the town awaiting infantry support that never arrived. A brave young Capitane and one infantry platoon, perched in the rocky area just north of the bridge, had disrupted a Mountain platoon led by a Lt., and they did not recover sufficiently to advance to aid the Panzer group. Commandant L'heureux held the town against the final Panzer assault with his small band consisting of a 60-meter gun unit and a platoon of Service d'Ordre Legionnaires. This resulted in a French victory, albeit a pyrrhic one, considering the disparity in lost troops.

This “widescreen” scenario, made up of four linked maps, offers a number of strategic and tactical challenges to both sides. The Germans must capture the town and bridge hexes on Board 88 without losing more than 10 steps. The French are tasked with the decision on how and where to fight a delaying strategy to prevent the Germans from reaching the town on Board 88, or an aggressive one to eliminate 10 German units, or some measure of both. The Germans are in a race against time, since they must cover approx. 50 hexes over steep slopes with only trails to speed travel, in 24 turns, which includes ultimately controlling the town hexes at the extreme end of Board 88. The French, who will probably lose the two British tanks at some point, are wise to make sure that they are destroyed on the road, resulting in a wreck slowdown. Careful placement of the minefields and sacrificing troops as roadblocks to force the Germans off the road is also a useful tactic. In this scenario as played, the French were set up to provide significant resistance on the east-west 40-meter ridge, and then sagging back to the south to attempt to impede the German advance. They got an early break when a Pz.IIIn unit hit a minefield, which was only a “1”, and rolled a “6” causing the Germans to lose two steps early (tanks count double; it ended up DM and did not recover for 11 turns!)), but were unable to destroy the requisite number of steps the rest of the way. However, the Germans could not get enough firepower to clear the town completely, as the French still had partial control of a single hex at the end of Turn 24. The Germans ended up with seven steps lost to 35 for the French, but the French gained victory by maintaining their grasp on the town on Board 88. There were many ways that this scenario could have gone either way, and it has great variability to allow different replays.

0 Comments
You must be a registered member and logged-in to post a comment.
Errors? Omissions? Report them!
Page generated in 0.538 seconds.