
|
A Close Call South Flank #9 |
||
|---|---|---|
| (Defender) Germany | vs | Soviet Union (Attacker) |
| Formations Involved | ||
|---|---|---|
| Germany |  |
3rd SS "Death's Head" Division |
| Soviet Union |  |
96th Tank Brigade |

| Total | |
|---|---|
| Side 1 | 1 |
| Draw | 5 |
| Side 2 | 3 |


| Overall Rating, 11 votes |
|---|
|
3.27
|
| Scenario Rank: 569 of 913 |
| Parent Game | South Flank |
|---|---|
| Historicity | Historical |
| Date | 1943-07-06 |
| Start Time | 16:00 |
| Turn Count | 12 |
| Visibility | Day |
| Counters | 58 |
| Net Morale | 1 |
| Net Initiative | 2 |
| Maps | 2: 36, 37 |
| Layout Dimensions | 56 x 43 cm 22 x 17 in |
| Play Bounty | 130 |
| AAR Bounty | 141 |
| Total Plays | 9 |
| Total AARs | 6 |
| Battle Types |
|---|
| Delaying Action |
| Exit the Battle Area |
| Inflict Enemy Casualties |
| Urban Assault |
| Conditions |
|---|
| Off-board Artillery |
| Reinforcements |
| Scenario Requirements & Playability | |
|---|---|
| South Flank | Base Game |
| Introduction |
|---|
|
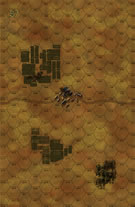
Second SS Panzer Corps’ failure to link up with Army Detachment Kempf meant that the former’s right flank was still hanging the air. So the Soviets began a series of coordinated attacks to exploit this advantage. Ninety-Sixth Tank Brigade struck the open Nazi flank to the south while farther to the north other Soviets were creating problems. Second SS Panzer Corps was forced to order Death’s Head Division to detach a reinforced battalion and send it northward, even though the situation to the south was touch-and-go. This sort of mission would become standard fare for Death’s Head in the days to come. |
| Conclusion |
|---|
|
The Luftwaffe’s 8th Staffel effectively blunted the attack of 2nd Guards Tank Corps, making Death’s Head’s job rather easy in the north. But in the south, 96th Tank Brigade managed to create enough havoc to disrupt the supplies reaching Death’s Head. Here the enemy had to be dealt with in the old-fashioned way, and ground forces eventually drove them off before any significant harm was done. It had been a close call nonetheless. The majority of Death’s Head Division would be tied down guarding the 2nd SS Panzer Corps’ right flank for three more days. |

|

|
|---|
| AFV Rules Pertaining to this Scenario's Order of Battle |
|---|
|
| Schutzstaffel |
|---|
|


")
")
")


| Army (RKKA) |
|---|
|


| 2 Errata Items | |
|---|---|

|
All SS 75mm IG guns are direct fire weapons (black), not indirect (white). (Shad
on 2010 Dec 15)
|

|
The reduced direct fire value of the SS HMG is 5-5 in Beyond Normandy and Road to Berlin. (plloyd1010
on 2015 Jul 31)
|
| Bad Day for Ivan | ||||||||||||
|---|---|---|---|---|---|---|---|---|---|---|---|---|
Germans start holding the 4-hex town on board 37, and while they have a fair array of AT guns and a Marder, it really looked like a fairly easy Russian win. Soviets have 10 platoons of T-34s, 9 tank riding SMG platoons, and 3 units of towed 76.2 guns. In order to win, the Soviets need to take at least part of the town, eliminate German units, and exit a number of steps off the west side of the board. From the start things didnt go as planned for the Soviets as they came under accurate anti-tank fire from the Marders in town, killing a step of tanks and a step of the riders with them. The next turn the Soviets decided to dismount and avance with the tanks rather than on them, but the OBA rolled esceptionally well and the dismounted SMGs took more damage, while the ace Marder crew took another T-34 step. The Soviets had started in 2 columns entering to the north and south of the large group of fields on the east half of board 37, figuring to flank the town, but the Germans had placed an outpost in the southern hexes of the fields with the 50mm AT and 2 infantry platoons dug in, and these started inflicting casualties on the southern Soviet pincer while the northern pincer was being bloodied. The Soviet 76.2s moved into the fields in the northwest sector of board 36 and deployed, and this drew the wrath of the German OBA, which eliminated two of the three guns in just a few turns. German reinforcements of 2 infantry with a LT and 2 StuG-IIIGs entered at the earliest possible moment and while the infantry moved east toward the town, the StuGs fired at long range, joining with the fire of the 50mm and 75mm AT guns on the hapless T-34s of the south pincer. In a matter of turns, the southern pincer was destroyed, all tanks dead on the fiel and the SMG troops reduced to a single platoon, an LT and the force commander, and the northern force, with the T-34s taking the initiative and assaulting into the town, lost heavily, with a single step of T-34s escaping towards the woods in the northeast, where surviving infantry from the northern pincer was trying to recover. Turn 9 ending with 33 steps lost (including the double value for the armor) and not a single German casualty, Ivan decided to leave the field to the Germans with hope that the Kommissars would allow them to live to fight another day. Great game. |
||||||||||||
| 0 Comments |
| Elbow room | ||||||||||||
|---|---|---|---|---|---|---|---|---|---|---|---|---|
This scenario is a fast one with relatively few forces involved. The Germans have a few companies of infantry and an assortment of ATGs and assault guns to prevent the Soviets from getting a foothold in a small town and exiting forces. The Soviets had a tank brigade consisting of a battalion of T34s, a battalion of SMGs, and a battalion of 76.2mm. The Germans spread their forces north-south across the board, guarding the town and a few points along the north-south road, with ATG support covering likely approaches. The Soviets concentrated everything in the south, hoping to blast a hole in the weak German line and pour through. They were basically playing for a minor victory by ignoring the town in the north. The Germans responded by shifting most of their forces south, hoping to bottle up the Soviets away from the town and as far from the west edge as possible. Unfortunately, their modest reinforcements took time to show up, and the Soviet SMGs hunkered down in some fields where they were safe unless the Germans mounted a costly assault. Meanwhile the T34s, being the fastest things on the battlefield, blew past the German forces now in the south and threatened the northern town. Suddenly the Soviets were playing for a major victory. When German reinforcements did show up, they lost a few turns trying to chase after some T34s that were heading west. They ultimately took out a platoon of tanks, but had suffered a steady attrition of infantry and ATGs while being unable to keep the town free of Soviet tanks. At the games conclusion the Soviets earned their major victory by relying on the speed of the T34s to keep the Germans reacting instead of acting. |
||||||||||||
| 0 Comments |
| Playing It Safe |
|---|
|
The Soviets enter with ample armor (all T-34s of various models) and a battalion of SMGs riding the tanks. The Germans have a badly weathered battalion with some gun support. The victory conditions call for the Soviets to exit units and either cause losses or take a town hex. The Germans conversely have to keep the Soviets from leaving, cause losses and hold the town. The difficulty is that the Germans do not have sufficient force on board to stop the Soviets from exiting but will rely on some reinforcements (STuGs and SCH) to add some strength to their outlying position. The Soviets enter well away from the town with the intent of smashing the outlying defenses (2 SCH and 2 weapon units, dug in in fields to the south of town) and, if fortunate, then turning back to the town to try to take some control. The Germans, however have a morale differential and with the Soviets carrying only a 7/6 morale the SMGs are subject to becoming disrupted in their advance. Hammered by artillery and long range opportunity fire (20mm and 75IGs) the SMGs fall off the tanks and try to recover. Ultimately through direct losses, etc. 11 steps of SMGs are eliminated. The T-34s, however, are very effective in moving forward and easily get three full platoons (which count for 12 steps of exiting troops) off the board. Without effective infantry support, however, the Soviets do not approach the town and settle for a minor victory which the Germans also reach through step reductions and control of the town. A draw is reached. The situation in this one depends on the aggression of the Soviets and the reinforcement rolls. As I was not able to get the STuGs on the board until the 4th possible turn I was not able to contest the Soviet exit. This could make the scenario more interesting. I give it a "3". |
| 0 Comments |
| Not even Close | ||||||||||||||
|---|---|---|---|---|---|---|---|---|---|---|---|---|---|---|
The Soviets entered in mass in the southwest corner of the battlefield driving north to capture entrance to the northern fields and control of both sides of the road. The 3 German infantry units and the 50mm AT gun were quickly displaced and destroyed by the Soviet tanks as the Soviet infantry raced forward in order to dislodge any remaining German units on the Western side of the battlefield. 2 Soviet tanks drove east along the southern edge into the eastern section rapidly approaching the town which was left with only 75mm/IQ and 2 mortar units to defend it. German reinforcements were late in arriving since the Soviets were already to pounce on the town. The easy Soviet victory was due to poor placement of the defending German units in the setup. Since 7 German steps and 1 officer were captured or destroyed in the first 5 turns. The remaining turns was just a mopping up exercise for the Soviets. |
||||||||||||||
| 0 Comments |
| Set-up Blues: Part II | ||||||||||||||
|---|---|---|---|---|---|---|---|---|---|---|---|---|---|---|
Game was called in turn 4 on account of German commander being a complete Scheisskopf! I don't know: I set up poorly. The Russians were in one spot, and the Germans were set up in several spots. I guess I could have started even farther back. I didn't know what to do; the Russian player did. |
||||||||||||||
| 0 Comments |
| Nothing Wrong with Death's Head's Gunnery | ||||||||||||
|---|---|---|---|---|---|---|---|---|---|---|---|---|
German set-up was predicated on the idea that there was little point in trying to prevent Soviet steps exiting. Rather, the goal was to attempt to play for a Minor Victory and, hopefully, prevent a corresponding Soviet Minor Victory. The Germans place: 1xSCH + 1x50mm + LT dug-in on the road north of the town. 3xSCH + 1xHMG + 2x81mm in the town. 75mmIG + 20mmAA in the north and south hexes of the town. Marder + 1xSCH + 1x75/41 in the SE corner of the fields SW of the town. Soviets: Goal was a pincer attack on the town; using the woods to hold the artillery to allow self-sighting of the town and northern SS holding units; smaller tank force to the N; larger to the South, using the fields as partial cover. Attack Group North: 1xT-34a + 3xT-34b + 3xSMG + the 3x76.2mm/KMS. Attack Group South: 6xT-34c + 6xSMG Turns 1 - 3: Disaster for Soviets. German OBA factor and on-board 81mm roll (not in order) 3, 4, 10, 11 inflicting DIS/DEM on the company of tank-riding or unloaded company of SMGs. Further, the first two AT rolls by the 50mm were both 10's, reducing and DEM two platoons. First volley of 76.2 mm counter-battery fire by Soviets was ineffective. Southern force unloads the SMGs at a range of 6 taunting the SS AT units. The rapidly grave situation in the North, has Soviet commander dispatch 2xT-34c's off to the SW to gain the eight countable steps exited required by VCs. SS roll a '5' on Turn III bringing on the StuGs + 2xSCH. These enter on the SW board edge to "cut-off" the T-34c's. In response to this, the Stalinites likewise rush the surviving two T-34 platoons from the Northern group past the 50mm. Remainder: The T-34b's make it past the 50mm (it finally missed) and exit the board for 8 countable steps. Soviet 76.2's attack the SCH+50mm whilst they are the targets of counter-battery fire by the SS OBA. After 5 turns, the Soviet 3xSMGs recover (hiding in the woods), and mount a foot attack supported by the two remained reduced T-34 platoons. One of the latter is killed before the Soviets can assault the hex. The SCH platoon, though alone, is dug-in and has better morale. It and the 50mm eventually are lost, but at the cost of 2xSMG + the other T-34. The two "exiting" T-34c's in the south are cut-off and destroyed by the StuGs, though a StuG platoon step is lost and the reduced step DEM. The 6xSMGs go after the SCH + 75/41 in the fields whilst the 4xT-34cs try to avoid the SS AT force, and move to attack the town via the fields to the East. The SS move the Marder though its fields into the town. The dug-in SCH and 75/41 are eventually destroyed, but so savage the Soviet SMGs that the Stalinites have nothing in good-order to make any assault on the town. Further, the 2xSCH reinforcing elements are moving north along with the surviving StuG. So the Soviets eek out a Minor Victory of their own (4 steps of SCH; 2 steps of AT guns; and 2 countable steps of StuG). They never seriously threatened the town. The SS have a Minor Victory by controlling the town and killing 12 countable steps of T-34's (3 platoons net); and 7 steps of SMGs. RKKA leadership was a factor as only one of the five had a morale bonus and one other a combat bonus. The Northern attack was seriously disrupted in the first two turns as the supporting SMGs were heavily morale damaged leaving the tanks without support. This allowed the German OBA and mortars to assist vs. the SMG attack in the south whilst the northern group recovered (with no leader with a morale bonus). Given the fragility of the Stalinite leadership/morale situation in this scenario, perhaps keeping the entire Soviet force in contact might prove more effective. The SS did take some casualties and damage here - and presumably this result would match well with the historical result of "A Close Call" that would alert the SS Panzer Korps to the tenuous nature of its Eastern flank. |
||||||||||||
| 0 Comments |