
|
Milne Bay — The Breakout Kokoda Trail #7 |
||
|---|---|---|
| (Defender) Australia | vs | Japan (Attacker) |
| Formations Involved | ||
|---|---|---|
| Australia |  |
2/10th "The Adelaide Rifles" Infantry Battalion |
| Japan |  |
16th Naval Pioneer Unit |
| Japan |  |
5th Kure Special Naval Landing Force |

| Total | |
|---|---|
| Side 1 | 1 |
| Draw | 0 |
| Side 2 | 4 |


| Overall Rating, 5 votes |
|---|
|
3.2
|
| Scenario Rank: 615 of 913 |
| Parent Game | Kokoda Trail |
|---|---|
| Historicity | Historical |
| Date | 1942-08-28 |
| Start Time | 02:00 |
| Turn Count | 18 |
| Visibility | Night |
| Counters | 48 |
| Net Morale | 0 |
| Net Initiative | 0 |
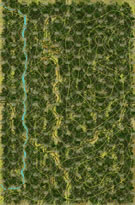
| Maps | 1: 35 |
| Layout Dimensions | 43 x 28 cm 17 x 11 in |
| Play Bounty | 134 |
| AAR Bounty | 153 |
| Total Plays | 5 |
| Total AARs | 4 |
| Battle Types |
|---|
| Road Control |
| Urban Assault |
| Conditions |
|---|
| Terrain Mods |
| Scenario Requirements & Playability | |
|---|---|
| Afrika Korps | Counters |
| Guadalcanal | Counters |
| Kokoda Trail | Base Game |
| Introduction |
|---|
|
Still uncertain about the intentions or strength of the Japanese forces on the north shore, Maj. Gen. Clowes ordered the lightly-armed 2/10th Battalion of the 18th Brigade forward during the daylight hours of 27 Aug to determine the location of the Japanese. They arrived at K. B. Mission late in the afternoon and prepared a position in case the Japanese attacked once again during the night. |
| Conclusion |
|---|
|
The Japanese finally chose to attack in strength and the Australians, who still had no effective weapons against the light tanks, were quickly split in two. One portion of the 2/10th was pushed up into the hills while the rest were pushed back to the Gama River. By dawn the Japanese were approaching No. 3 Airstrip. |

|
|
|---|
| AFV Rules Pertaining to this Scenario's Order of Battle |
|---|
|
| Army |
|---|
|


| Imperial Japanese Army |
|---|
|


| Imperial Japanese Navy |
|---|
|


| 1 Errata Item | |
|---|---|
| Scen 7 |
Scenario 7 calls for 10 SER platoons. There are only 9 in the Guadalcanal mix. As many platoons and leaders as are present in this scenario, I didn't see it as a problem and recommend just using the 9 platoons. (thomaso827
on 2014 Aug 31)
|
| Ever So Much More So |
|---|
|
Robert McCloskey did NOT write the Milne Bay scenarios for Kokoda Trail, it just seems that way. The book Homer Price by McCloskey (a children's book, my wife is a teacher and one can never get too far from elementary and young adult fiction in our house) includes a vignette about a salesman who sells a product called "Ever So Much More So" which makes everything just so much more of exactly what it is. This scenario is just ever so much more so in comparison to the preceding two. There are more Austrailians, more Japanese (the entire countermix of SER and SNLF troops) and there is simply no real way for the Austrailians to hold out. In the end result, the entire battalion of Austrailians was crushed under a wave of Japanese. A coastal drive and a force sent over the mountain both met at the village and the Austrailians despite a heroic stand along the trail were overwhelmed and at scenario's end had only one demoralized platoon trapped along the coast and a lone leader looking desperately for someone to lead. Again the tension was much higher mid-scenario as it seemed as though the flankers would never get into position but ultimately they did and the result was the complete destruction of the Austrailian defenders. The history of these three scenarios includes a constant escalation of the committed forces but the Japanese had the ability to ramp up much quickly and the Austrailians simply didn't have the forces or heavy weaponry to make a difference. I give it a "4" for the scope of it. |
| 0 Comments |
| Australians Win the Day! | ||||||||||||
|---|---|---|---|---|---|---|---|---|---|---|---|---|
This scenario is similar to the other 2 Milne Bay scenarios, with the exception that the Japanese have a battalion of Service troops along with the SNLF force, and victory conditions is that they must clear the trail and village of anything but demoralized Australian troops. Australians and Japanese set up similarly to the last 2 scenarios, with the Service troops following behind the SNLF. In hind sight, I might have put them up front as cannon fodder. As it was, the Australians won initiative for the first 4 turns and were able to stay just outside of Japanese assault range until turn 4. From that point on, initiative was pretty well maintained by the Japanese for the rest of the game. Stacks of Australian troops held off multiple stacks and succumbed slowly to assaults. One Service company actually found a hole and assaulted a disrupted Australian platoon with an LT, but the defense disrupted 1, demoralized a second platoon, leaving half of the assault that started out. The Japanese pinned one full company stack with the Australian CPT in one hex of the village, and slowly the Japanese took a toll, but the 10-1-1 Cpt consistently rallied survivors turn after turn to the bitter end. On turn 17, the SNLF Cdr was killed, but the decapitation had no effect when the rest of the SNLF leadership shrug it off and the LT Cdr picked up and carried on for the final turn. In the end, one step of Australian infantry was still at bay near the beach while the Australian and a single step held the single village hex as the sun came up. Australian win. Great game. |
||||||||||||
| 0 Comments |
| Kokoda Trail, scenario #7: Milne Bay – The Breakout | ||||||||||||
|---|---|---|---|---|---|---|---|---|---|---|---|---|
Scenarios: 5, 6, 7 & 10 are all somewhat a related, continued battle from the four scenarios, so now I have played them all and actually really enjoyed them all. Scenario numbers 5 & 10 were very close where scenarios 6 & 7 favored the Japanese more than the other two. Back to scenario #7, the Japanese won this, losing only three steps where the Australians lost 13 steps and 2 leaders but all they had to do was hold on to a village or trail hex but they fell short of this. The Japanese higher morale was difficult to over come and the fact that they had more then twice the combat units. Still a fun one to try! |
||||||||||||
| 0 Comments |
| When trading space for time, it's bad to run out of space... |
|---|
|
I didn't expect much from this scenario given the overwhelming Japanese advantage in numbers, leadership, and morale. The Japanese set up with a wide sweep through the jungle, preparing to walk across the board. The Aussies could either take an aggressive stand on the trail, or try running around the jungle. Given the lack of leaders and the wide Japanese sweep, the Aussies opted for the aggressive trail stand. The initial clash (first six turns) were close to equal, with the Aussies losing five steps to two Japanese. But losing one leader was critical, and the Japanese could afford the steps much more so than the Japanese. The Japanese were pushing the flanks against a weakening force. The mid game (middle six turns) saw Aussies losses continuing at about a step a turn average, but the loss of two more leaders made any hope of the remaining units running around the jungle pretty much impossible. The Japanese only suffered one additional step loss, but all losses so far were SNLF. The Aussies were backed up to the village, and the Japanese were knocking at the doors. During this time Fog of War became Japan's biggest enemy, and the north flank was not keeping up. Still, the Aussies were in trouble, and those northern units were becoming superfluous. The last third saw the Aussies run out of space. The casualties continued to climb at about a step per turn, while the Service troops finally lost one step (and the last step loss for the Japanese). Finally pinning one step in the village and one step on the last trail hex, turn 17 saw both those steps wiped out. The final Aussie Lt was the only survivor. Japanese victory in 17 out of 18 turns. For what appeared to be an overwhelming force, the Fog of War and jungle really slowed the Japanese down. More tension than I expected. While I still think it favors the Japanese slightly, I was pleasantly surprised with how close the Aussies came to a win. Better than I expected! |
| 0 Comments |