Panzer Grenadier Battles on April 27th:
Arctic Front Deluxe #40 - Children's Crusade Broken Axis #14 - Târgu Frumos: The Second Battle Scenario 3: Sledge Hammer of the Proletariat
Army Group South Ukraine #6 - Consternation Road to Berlin #73 - She-Wolves of the SS
Errors? Omissions? Report them!
The Andong Battles
Pusan Perimeter #43
(Attacker) North Korea vs South Korea (Defender)
Formations Involved
Display
Balance:


Overall balance chart for KWPP043
Total
Side 1 0
Draw 0
Side 2 3
Overall Rating, 3 votes
5
4
3
2
1
4
Scenario Rank: --- of 913
Parent Game Pusan Perimeter
Historicity Historical
Date 1950-08-01
Start Time 12:00
Turn Count 12
Visibility Day
Counters 60
Net Morale 0
Net Initiative 0
Maps 1: 93
Layout Dimensions 43 x 28 cm
17 x 11 in
Play Bounty 152
AAR Bounty 165
Total Plays 3
Total AARs 2
Battle Types
Urban Assault
Conditions
Off-board Artillery
Smoke
Scenario Requirements & Playability
Pusan Perimeter Base Game
Introduction

Gen. Walton Walker had selected the Naktong River as the basis for the Pusan Perimeter line. As the last, best defensible position before the Eighth Army was pushed into the Sea of Japan, it had to be held. Along the upper Naktong, inland from Yongdok, the North Korean 12th Division made repeated attempts to secure crossings. The ROK 8th and Capital Divisions had so far denied them, but with few reinforcements and scanty supplies, their ability to resist had worn thin.

Conclusion

North Korean troops finally fought their way over the river and captured Andong, at a terrible cost in casualties. The ROK had also suffered badly, losing 1,500 killed in action and another 1,200 prisoners plus a large array of weapons and equipment. With Andong in their hands, the North Koreans were on their way to rolling up the Naktong line and with it, the Pusan Perimeter.


Display Relevant AFV Rules

AFV Rules Pertaining to this Scenario's Order of Battle
  • Vulnerable to results on the Assault Combat Chart (7.25, 7.63, ACC), and may be attacked by Anti-Tank fire (11.2, DFT). Anti-Tank fire only affects the individual unit fired upon (7.62, 11.0).
  • AFV's are activated by tank leaders (3.2, 3.3, 5.42, 6.8). They may also be activated as part of an initial activating stack, but if activated in this way would need a tank leader in order to carry out combat movement.
  • AFV's do not block Direct Fire (10.1).
  • Full-strength AFV's with "armor efficiency" may make two anti-tank (AT) fire attacks per turn (either in their action segment or during opportunity fire) if they have AT fire values of 0 or more (11.2).
  • Each unit with an AT fire value of 2 or more may fire at targets at a distance of between 100% and 150% of its printed AT range. It does so at half its AT fire value. (11.3)
  • Efficient and non-efficient AFV's may conduct two opportunity fires per turn if using direct fire (7.44, 7.64). Units with both Direct and AT Fire values may use either type of fire in the same turn as their opportunity fire, but not both (7.22, 13.0). Units which can take opportunity fire twice per turn do not have to target the same unit both times (13.0).
  • Demoralized AFV's are not required to flee from units that do not have AT fire values (14.3).
  • Place a Wreck marker when an AFV is eliminated in a bridge or town hex (16.3).
  • AFV's do not benefit from Entrenchments (16.42).
  • AFV's may Dig In (16.2).
  • Open-top AFV's: Immune to M, M1 and M2 results on Direct and Bombardment Fire Tables, but DO take step losses from X and #X results (7.25, 7.41, 7.61, BT, DFT). If a "2X" or "3X" result is rolled, at least one of the step losses must be taken by an open-top AFV if present.
  • Closed-top AFV's: Immune to M, M1 and M2 results on Direct and Bombardment Fire Tables. Do not take step losses from Direct or Bombardment Fire. If X or #X result on Fire Table, make M morale check instead (7.25, 7.41, 7.61, BT, DFT).
  • Closed-top AFV's: Provide the +1 modifier on the Assault Table when combined with infantry. (Modifier only applies to Germans in all scenarios; Soviet Guards in scenarios taking place after 1942; Polish, US and Commonwealth in scenarios taking place after 1943.) (ACC)
  • Tank: all are closed-top and provide the +1 Assault bonus, when applicable
  • APC – Armored Personnel Carrier: These are Combat Units, but stack like Transports. They can transport personnel units or towed units. They are not counted as combat units for the +1 stacking modifier on the Direct Fire and Bombardment Tables (4.4). They may be activated by regular leaders and tank leaders (1.2, 3.34, 4.3, 5.43). They do not provide the +1 Assault bonus (ACC).

Display Order of Battle

North Korea Order of Battle
Chosŏn inmin'gun
  • Mechanized
South Korea Order of Battle
Daehanminguk Yukgun
  • Mechanized
  • Misc

Display AARs (2)

Good Kommissar
Author thomaso827
Method Solo
Victor South Korea
Play Date 2015-01-25
Language English
Scenario KWPP043

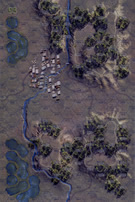
This scenario has a mixed ROK force, half reduced and half full strength infantry with a couple of HMGs, a 57mm AT, a 105 short and a bazooka holding a large town, part of which is protected by a major river, against several companies of NKPA troops, mostly infantry but including 6 platoons of SMGs, and bring along a Kommissar. The random draw for leaders was very much in favor of the North with no leaders having any morale influence and only 1 having a direct fire influence of 1, while the NKPA came in with a very good Major and a 10-1-2 Captain and lots of 8s and 9s. The South drew 4 leaders with only 7s, a good bunch that sort of reinforced some thoughts of families buying their sons good places in the military when they had no military leadership ability. The ROKs set up in a strong line along the north edge of the town with casemates at either extreme, the 105 set up on the hill west of town with it's M3 tow vehicle and a 7-0-0 LT, the 57mm AT set up with the ROK Captain covering the bridges towards the center of town and the bazooka team in the next row of hexes back with the ROK Colonel and reserves where he could be moved into the line where most needed. It took 1 turn for the T-34s to find a spot 3 hexes away from town where they could pound town hexes while the NKPA infantry worked their way across the hills in the northwest corner of the map. I split the forces up with a force centered on the engineer to cross the river to the west while the other force came towards the bridges and the town hexes east of the bend in the river. It took quite some time before NKPA troops were in position to do any damage but the ROK troops decided to take advantage of the time to sally forth with a unit and the bazooka team trying to flank the T-34s and engage in a turn or two of assaults in hopes of taking out as many steps of tanks as possible. With the NKPA getting the initiative next turn, the tanks got a point blank shot on the adjacent ROK troops, demoralizing them and then watching them flee when they failed their next turn's morale checks, with brought them back into the ROK line pretty much where they started. Then the NKPA struck. Bridge crossing and swinging around to the hexes to the east of the river bend, the NKPA were able to initiate 4 hexes of assaults while their river crossing to the west didn't fare so well and took longer to make. First ROK casualties were the two guns, both demoralized and then required to flee. ROK luck turned out to be slightly better in the assaults than the NKPA's as both sides exchanged demoralizations and disruptions, with the NKPA getting a bit worse of the trade, and even that 10-1-2 Captain and his troops became demoralized and found themselves having to flee along with nearly the whole NKPA assault force. With the NKPA losing contact and falling back for the Kommissar to work his magic, the ROK troops had the breathing space they needed to regroup. With so many losses and NKPA just getting their own troops regrouped on the 11th turn, there was nothing they could do under any circumstances to move forward to contact and initiate enough assaults to take 6 town hexes. With losses of 11 steps (including 1 tank step for 2 points) to only 4 ROK steps lost, the ROK line was just too much for them. ROK victory. In hindsight, I'd like to try the NKPA with a tank rider force moving with the armor for an early attempt at an assault instead of waiting more than half the game for assaults that can go either way. The short scenario keeps the NKPA hopping with little time to spare. Great game.

Forgot to mention after the title of my AAR, the Kommissar ran around and successfully rallied nearly a dozen units, including the tanks, without shooting anyone. The game I played the day before went just the opposite, with nearly every unit he touched dying.

0 Comments
You must be a registered member and logged-in to post a comment.
Pusan Perimeter, scenario #43: The Andong Battles
Author JayTownsend
Method Solo
Victor South Korea
Play Date 2015-12-27
Language English
Scenario KWPP043

Pusan Perimeter, scenario #43: The Andong Battles

On paper this looks to be a great small Stalingrad type battle with NKPA T34/85s even but my dice rolls destroyed this battle. Out of all the scenarios I have ever played, I never rolled this lopsided dice rolls. Just about every dice roll the ROK side made was a 2, 3, 11 or 12 on the first 6 turns while every combat roll the NKPA rolled were 6, 7 or 8 on the same first six turns. I tried rolling all kinds of different way and should have stopped and restarted the game but I continued and went for one large all out desperate assault of the mini Stalingrad only to be blunted again as the North Korean side. The South Korean side controlled 8 town hexes to 3 town hexes for the North Koreans for a ROK victory on the game board but I am sure fighting would continue for many hours after the 12 turn limit.

0 Comments
You must be a registered member and logged-in to post a comment.
Errors? Omissions? Report them!
Page generated in 0.211 seconds.