
|
Task Force Smith Pusan Perimeter #16 |
||
|---|---|---|
| (Attacker) North Korea | vs | United States (Defender) |
| Formations Involved |
|---|

| Total | |
|---|---|
| Side 1 | 1 |
| Draw | 2 |
| Side 2 | 4 |


| Overall Rating, 8 votes |
|---|
|
4.38
|
| Scenario Rank: 26 of 913 |
| Parent Game | Pusan Perimeter |
|---|---|
| Historicity | Historical |
| Date | 1950-07-05 |
| Start Time | 08:00 |
| Turn Count | 18 |
| Visibility | Day |
| Counters | 78 |
| Net Morale | 1 |
| Net Initiative | 1 |
| Maps | 1: 92 |
| Layout Dimensions | 43 x 28 cm 17 x 11 in |
| Play Bounty | 154 |
| AAR Bounty | 153 |
| Total Plays | 7 |
| Total AARs | 4 |
| Battle Types |
|---|
| Delaying Action |
| Exit the Battle Area |
| Inflict Enemy Casualties |
| Conditions |
|---|
| Off-board Artillery |
| Reinforcements |
| Severe Weather |
| Smoke |
| Scenario Requirements & Playability | |
|---|---|
| Pusan Perimeter | Base Game |
| Introduction |
|---|
|
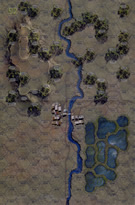
On the evening of June 30th, Lt. Col. Charles B. Smith received orders to take two companies of his battalion of the 21st Infantry Regiment, plus some support weapons, and fly to Pusan to “block the main road as far north as possible.” They made their way north by truck and train, watching Australian planes shoot up ROK ammunition trains and American jets devastate ROK truck convoys. Finding a suitable position near Osan, Smith told his men to dig in. The North Koreans arrived soon afterwards. |
| Conclusion |
|---|
|
The T34’s drove directly at the American positions, and the mostly-inexperienced Americans opened up with a barrage of fire from their bazookas and recoilless rifles – all of which seemed to bounce off the tanks’ thick hides. Three or four of the tanks were knocked out by 105mm artillery pieces firing high-explosive anti-tank (HEAT) rounds at them over open sights, and the rest trundled through the American lines and continued southward. When a second force of mostly infantry appeared, Smith ordered his troops to pull back but the inexperienced soldiers panicked, leaving behind weapons, helmets and even some of their wounded. |

|
|
|---|
| AFV Rules Pertaining to this Scenario's Order of Battle |
|---|
|
| Chosŏn inmin'gun |
|---|
|


| Army |
|---|
|


| 2 Errata Items | |
|---|---|
| Scen 16 |
If AP ever does a reprint of the Pusan Perimeter, I would like to change scenario Sixteen. Task Force Smith, I would like to make two changes, first the North Korean reinforcements should enter on turn 8 not turn 12 and for the North Koreans initial force, there should be 6 x T34/85s not 5. (JayTownsend
on 2021 Feb 15)
|
| Scen 16 |
Not errata, just restudying the subject again. (JayTownsend
on 2021 Feb 16)
|
| Korean War: Pusan Perimeter, scenario #16: Task Force Smith | ||||||||||||
|---|---|---|---|---|---|---|---|---|---|---|---|---|
Korean War: Pusan Perimeter, scenario #16: Task Force Smith I decided this would be my second scenario, one because it is probably the better known engagement, it gets American units involved for their first action and it’s just a cool scenario. On paper you think the Americans won’t standup very well but when you look at the interesting victory conditions you see there are a lot of choices to be made: points for eliminated steps, points for undemoralized American steps still on the map, points for NKPA tanks steps that exit the south edge of the map. I setup the Americans dug-in in a blocking formation but mostly around or in the town hexes and the hill terrain covering the enemy’s approaches. The NKPA player has two groups of units that enter the map; the first group consists of all T34/85 tanks on turn one and the second mostly infantry both on foot and trucks or GAZ67 mounted and another half step of T34/85s but do not enter until turn 12. The Americans defend with a mixed bunch of Infantry and support weapons including a 105mm artillery unit, 75mm RR, 4.2-inch, and 2.36-inch Bazookas. All this in 18 turns! I moved the 10 steps of NKPA steps on to the map but decided they would be better to just get exit points but did engage some forward element American Infantry disrupting one unit before find a gap in the American lines and heading south, losing one step to the American 75mm RR gun which rolled high on the dice. This took about eight turns, now I still had 4 turns to kill before the next group of NKPA entered the map, as I chose to exit my NKPA tanks early. This gave me the chance to reorganize my American lines and recover my disrupted Infantry unit which took all four turns by the way, as the American morale is only 7/5. The next much larger group of NKPA Infantry entered the map on turn 12 and has only 7 turns left to do as much damage a possible the American lines. They moved in as close as they could but took heavy casualties before they got close enough to use their direct fire or assault. The NPKA also has off-board artillery support but they rolled terrible with their dice except one or two times. The Half step of T34/85 tanks from the second group also managed to exit south taking the same path as the tank before it, even with a Bazooka team chasing it. In the end, much to my surprise, as I wasn’t keeping track of the points, I added them up: The Americans lost 6 steps, the NKPA lost 9 steps, the NKPA exited 10 steps and the Americans had 16 undemoralized steps still on the map. The totals were 16 points for the NKPA and 25 points for the Americans, a Major American Victory! This scenario rocks, as there are many different strategies and setups to make it interesting, which in turn mean many different outcomes. In hindsight I should not have exited all my T34/85s from the map so early, yes they are easy points you don’t want to lose in combat but they should have stuck around and softened up the American positions a bit, so when their Infantry arrived they would not have been met with a hail of bullets. Maybe I freaked out when a 2.36 Bazooka Team assaulted a passing T34/85 but I shouldn’t have as the bazooka team was destroyed. But this goes to show you, these scenarios can have a different outcome then historically and a player can do worst or better than the Generals of the past. This scenario I feel will have a lot of replay value and may even become a PG classic but only time will tell. Disclaimer: I know I said I wouldn't rank any of my own design material a 4 for fairness from now on but this one I felt was way too good and I made an exception and gave this classic a 5. |
||||||||||||
| 0 Comments |
| Tough Task Force Smith | ||||||||||||
|---|---|---|---|---|---|---|---|---|---|---|---|---|
This was my first Pusan Perimeter scenario and my first with the 4th Edition rules. TF Smith set up in a curved line from the woods in 0208 to the town to woods on the opposite side of the river with a platoon forward blacking the west gap in the rice paddies. I also set up in depth with the 105mm Howitzers on the west side of the river and the mortars on the SE end of the hill. The North Koreans (NK) sent the tanks on the east side of the river, skirted the town and just bulled thought the TF positions. the 75mm RR platoon took shots but was ineffective. the tanks rolled on south for an easy 10 points. The NK infantry attacked with the main effort on the east bank and supporting attack on the west. Their initial collision with the TF Smith front went well and the TF had to withdraw knowing it could not stay in contact long. The 75mm RR platoon and its supporting infantry were overrun. TF Smith set up a subsequent line along the XX07 hex line and held the rest of the game there. They did not waiver and only a few units got demoralized. the West attack was halted completely. The NKs did break into the TF's line in the center but the west held, and the east fell back in good order. The breakdown of points: NK eliminated 6 US steps and exited 10 steps of tanks off the board for 16 total. The US eliminated 1 step of NK units and had 18 un-demoralized steps on the board at game end for 19 total. A side needed a 4-point lead for at least a marginal victory. It is a draw; this one was close. I played with Fog of War and I got about four or five turns ending too early for the NKs. I think this hurt them badly as they needed everything up front to really pressure the US. I like the rule as it adds an unknown but I'm finding it really hurts the attacker in short scenarios. i think I am going to not use use for the next few games I played. I do think that it caused the NK to not be able to hammer TF Smith like it should have been able to. |
||||||||||||
| 0 Comments |
| Two scenarios in one, how and when to abandon the town (US) or envelop it (NK) is the key. |
|---|
|
This is a unique scenario, with 11 full turns of NK tanks roaming around, with very limited US weaponry that can usually only hit on an 11 or 12. But they can't earn many points doing so and they need to exit the board, so the real scenario begins on turn 12 and lasts for a mere 7 turns when a large NK infantry force, also very light on weapons but with some OBA, enters the board. This is a pull the rug out moment...the NKs will take 2-3 turns to march to the American lines, if the Americans haven't already pulled out. Either way they'll start to fall back; the alternative is to hold out in the town, that might be better but it depends upon circumstances. As the US falls back they try to avoid losses and avoid DEM results. In my game the NK tanks rolled terrible dice in the early turns, took some hits and were generally unimpressive against dug-in or woods or town based US infantry. When the final assault came it was staggering, but I wasn't able to envelop the town quickly and enough US units escaped. Finaly tally was 10 US steps lost and 7 NK tanks steps exited, for 17 NK victory pionts. The US had 12 non-DEM steps on the board at game's end, and hit 7 NK steps lost, for a total of 19 US points, resulting in a +2 Draw (you need 4 for the minor win). The NKs did just barely demoralize a 2 step US unit on the very last activation of the game, saving a minor loss for them. On the US side, 6 of their 7 points from NK casualties were from tanks hit with early 11+ shots. The luck balanced out to a draw. |
| 0 Comments |
| Dig the US out of the Town | ||||||||||||||
|---|---|---|---|---|---|---|---|---|---|---|---|---|---|---|
The NKPA have to either eliminate US Army steps or have te units demoralized at the end of the scenario. The five full strength t-34/85s can either go off the south end for VP or bunch or gang up on separate USA units that are reasonably isolated. I choose to go off the map for VP's. The scenario has 18 turns. That left my turn 12 reinforcements enter against most of Task Force Smith. I killed on unit out of the US Army. Do not forget the OBA. The first 2 turns the NKPA is approaching the US positions. Use the OBA. My opponent put a large portion of his troops in the town. There were scattered locations to me honest with my tanks. The dice gods did not favor me. He made some opportunity fire shots that I failed demoed 3 out of 4 units. The best he got was aM! and I had a 1 leader to help. 11's and the odd 12 will do wreck the best plans. My units for the most part have 1 & 2 DF hex range. Stayed 3 hexes away for the -1 DF shift at the end of my movement. Sent a sacrifcial unit to draw fire. Ran everyone up to be adjacent to the town hexes. The next 3 turns (14 - 16) I lost initative by one. He had a Major that activated his hex and the adjacent ones. No fire teams, not that theyt were needed. The Captain was a 10 morale w/a 2 morale modifier. -2 DF shift fot the town on some of my return fire. I should have gone in for assault asap. My morale was 8/7 and his 7/5. So I would stay on what ever columsn I started. Whe nhe countered he would lose 2. I would get 2: better moral and non Demoralized leader w/inf. Maybe I should have kept the tanks till later. Turn 15 tanks exit the assault hex to leave the map for VPs. Jay T is correct that this scenario is balanced. Would like a leader earlier to spot for the OBA. |
||||||||||||||
| 0 Comments |