
|
Isolation Pusan Perimeter #11 |
||
|---|---|---|
| (Attacker) North Korea | vs | South Korea (Defender) |
| Formations Involved |
|---|

| Total | |
|---|---|
| Side 1 | 3 |
| Draw | 0 |
| Side 2 | 1 |


| Overall Rating, 4 votes |
|---|
|
4.25
|
| Scenario Rank: --- of 913 |
| Parent Game | Pusan Perimeter |
|---|---|
| Historicity | Historical |
| Date | 1950-06-28 |
| Start Time | 11:00 |
| Turn Count | 20 |
| Visibility | Day |
| Counters | 59 |
| Net Morale | 1 |
| Net Initiative | 0 |
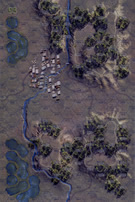
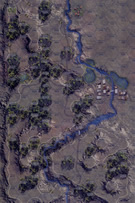
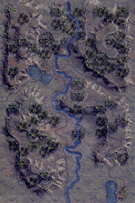
| Maps | 3: 93, 94, 95 |
| Layout Dimensions | 84 x 43 cm 33 x 17 in |
| Play Bounty | 163 |
| AAR Bounty | 165 |
| Total Plays | 4 |
| Total AARs | 2 |
| Battle Types |
|---|
| Delaying Action |
| Exit the Battle Area |
| Rear Guard |
| River Crossing |
| Conditions |
|---|
| Off-board Artillery |
| Randomly-drawn Aircraft |
| Smoke |
| Scenario Requirements & Playability | |
|---|---|
| Pusan Perimeter | Base Game |
| Introduction |
|---|
|
For three days and nights the ROK 1st Division fought hard, though its command staff had little idea of the bigger picture. When they tried to send trucks south for more ammunition they returned with news that the sole vehicular bridge leading south to Seoul over the Han River had been blown up by friendly forces and capital was occupied by enemy forces. Cut off and short of artillery ammunition, the division commander, Col. Paik Sun-yup, decided to withdraw across the Han River. Right about that time the headquarters staff spotted an enemy cavalry unit, indicating that the 1st Division’s eastern flank had been turned. |
| Conclusion |
|---|
|
The South Koreans held off the flanking cavalry while pushing south to get out of the trap. They could not find any bridge over the river, but they did discover a few small ferries. First Division ended up abandoning 150 vehicles and all their artillery; Army headquarters staff estimated that only 30 percent of the troops retreating southward still had their personal weapons. Meanwhile, the first American airstrike of the war hit the South Korean 1st Division with a devastating rocket barrage. “You did not think the Americans would help us,” Paik told his staff. “Now you know better." |

|
|
|---|
| AFV Rules Pertaining to this Scenario's Order of Battle |
|---|
|
| Chosŏn inmin'gun |
|---|
|


| Daehanminguk Yukgun |
|---|
|


| Deep Kimchee | ||||||||||||
|---|---|---|---|---|---|---|---|---|---|---|---|---|
This scenario pits elements of NKPA troops against a smaller ROK force. The ROK troops have to exit 14 steps off of the south edge of the board. They get air support that may just shoot at them instead of the North Koreans. The scenario looks like the ROK should pull off a win in a foot race, except for a pesky NKPA cavalry force that had already infiltrated their right flank. On turn 1 the ROK get their first step off as the jeep tows the 37mm AT gun down the road. The cavalry stop deceptively far from retreating ROK troops but as North Korean artillery finds it's mark, the ROK force breaks up into every stake for itself, and on turn 2 the cavalry lines itself up well for a charge the next turn. The firstallied air support of B26 bombers make an innefective appearance, then the Mustangs come in and take out two steps, but of the wrong side. The NK cab attack the reduced and demoralized ROK troops and finish them off before charging another stray stack. This time the retreating infantry sting back, but not without loss. The North Koreans envelope and destroy two stacks on turn 10 after the ROK get 11 steps off, and that makes it a North Korean win. Total losses were 22 steps and 3 ROK leaders to 2 steps of North Koreans. Very good scenario, great game. |
||||||||||||
| 0 Comments |
| Korean War: Pusan Perimeter, scenario #11: Isolation | ||||||||||||
|---|---|---|---|---|---|---|---|---|---|---|---|---|
Korean War: Pusan Perimeter, scenario #11: Isolation This is a pretty fun scenario to play and you would think the South Korean could just out run the North Koreans off the southern edge of the map but the key to the whole scenario is the blocking NKPA Cavalry that enter on the eastern edge and I had mine enter on the eastern edge of map 94 on the east-west road where they could block and attack any advancing/retreating ROK units. The ROKs did put a blocking unit of their own, of a jeep unit and 37mm AT-gun unit and one leader to slow down the northern NKPA forces, especially the SU-76 & GAZ, SMG and one leader that had raced ahead. This did buy me some time and eliminate a step of SU-76s and was better than racing this unit off the map for only one point. But there are too many bridges, four to block the major river on map 93, unless I put a larger blocking force emplace there. The American Airforce attack both sides once and the North Korean Cavalry had a field day and also called in off-board artillery strikes on the South Koreans. Only four steps of ROK Infantry and two leaders managed to escape off the southern edge of the map, so a North Korean Victory, as the ROKs needed 14 steps to exit. The North Koreans only lost two steps, the step of SU-76s and one step of Cavalry, while the ROKs lost a lot of steps, at least seven in their desperate attempt to escape. Next time I’ll block all four bridges with my HMG, 37mm and ENG units and try to exit with just my INF units, which should give me a better chance if that enemy cavalry doesn’t cause as much chaos next time around. A good time playing this one! |
||||||||||||
| 0 Comments |