
|
The Fall of P'yongyang Counter Attack #63 |
||
|---|---|---|
| (Defender) North Korea | vs |
South Korea
(Attacker)
United States (Attacker) |
| Formations Involved |
|---|

| Total | |
|---|---|
| Side 1 | 0 |
| Draw | 1 |
| Side 2 | 1 |


| Overall Rating, 2 votes |
|---|
|
4
|
| Scenario Rank: --- of 913 |
| Parent Game | Counter Attack |
|---|---|
| Historicity | Historical |
| Date | 1950-10-19 |
| Start Time | 13:30 |
| Turn Count | 18 |
| Visibility | Day |
| Counters | 58 |
| Net Morale | 1 |
| Net Initiative | 3 |
| Maps | 1: 111 |
| Layout Dimensions | 43 x 28 cm 17 x 11 in |
| Play Bounty | 159 |
| AAR Bounty | 171 |
| Total Plays | 2 |
| Total AARs | 1 |
| Battle Types |
|---|
| Road Control |
| Urban Assault |
| Conditions |
|---|
| Off-board Artillery |
| Smoke |
| Terrain Mods |
| Scenario Requirements & Playability | |
|---|---|
| Counter Attack | Base Game |
| Introduction |
|---|
|
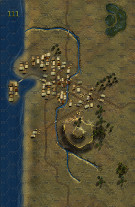
Douglas MacArthur planned for American troops to enter P'yongyang first, but Paik Sun-yup had other ideas. While the 1st Cavalry Division struggled up the main highway toward the capital, the ROK division fought its way through rough terrain and cleared numerous minefields to enter the city first. The North Koreans still had a say in whether the city would be captured at all. |
| Conclusion |
|---|
|
While the U.S. Army's Official History is very grudging about acknowledging the ROK capture of P'yongyag - the phrase "almost at the same time" appears more than once - other sources are clear that the Forward Division took the enemy capital. American tank support played a crucial role in getting the ROKs past the final North Korean defenders of the approaches to the city. |

|
|
|---|
| AFV Rules Pertaining to this Scenario's Order of Battle |
|---|
|
| Chosŏn inmin'gun |
|---|
|


| Daehanminguk Yukgun |
|---|
|


| Army |
|---|
|

| Korean War: Counter-Attack, scenario #63: The Fall of P'yongyang | ||||||||||||
|---|---|---|---|---|---|---|---|---|---|---|---|---|
Korean War: Counter-Attack, scenario #63: The Fall of P’yongyang After all the rhetoric from North Korean Leader Kim Jong Un, I decided to invade his Grandpa’s (Kim II Sung) P’Yongyang with the tough South Korean 1st Division, led by General Paik Sun Yup and supported by American Patton Tanks. The ROKs have setup and underwater bridge on the section of the map where most of the units will cross the river but just to be safe, I also attempt to cross with a South Korean engineer unit on the west side of the map, as well as a smaller third group doing and end around on the far western side of the map. The eastern crossing went well, as did the end around but the engineer crossing got hammered and had to abandon the attempt in that area. I realized I could not just rush the Patton tanks adjacent to the P’yongyang city hexes without support, as the NKPA have a healthy dose of Anti-Tank fire, with ATRs, 45mm ATs, 40mm AAs, captured American Bazookas and a couple of Su-76 units. The overall assault went well and the ROKs slowly contracted the NKPA defenses. Both sides were able to attack with their bazooka units but the ROKs were able to eliminate two steps of Su-76s before death while the NKPA bazooka team die without any results attacking American M46 tanks and ROK Infantry, I guess they didn’t have good of enough training with this type of weapon but both sides lost their bazooka team eventually, proving it to be a dangerous occupation. The South Koreans were able to achieve all their victory conditions and the lower North Korean 7/5 morale help a lot in assaulting city hexes, as did the powerful tank support. Not that step loses mattered in this scenario but the NKPA lost 17 steps and few leaders and their KOM leader to boot, for a total ROK victory and gratifying at that. The ROKs lost 5 steps. True, this is probably a better solitary scenario but fun to play. |
||||||||||||
| 0 Comments |