
|
Battle of the Barricades Counter Attack #51 |
||
|---|---|---|
| (Attacker) North Korea | vs | United States (Attacker) |
| Formations Involved |
|---|

| Total | |
|---|---|
| Side 1 | 0 |
| Draw | 1 |
| Side 2 | 0 |


| Overall Rating, 0 votes |
|---|
|
0
|
| Scenario Rank: of |
| Parent Game | Counter Attack |
|---|---|
| Historicity | Historical |
| Date | 1950-09-26 |
| Start Time | 02:00 |
| Turn Count | 16 |
| Visibility | Night |
| Counters | 46 |
| Net Morale | 1 |
| Net Initiative | 0 |
| Maps | 1: 111 |
| Layout Dimensions | 43 x 28 cm 17 x 11 in |
| Play Bounty | 156 |
| AAR Bounty | 171 |
| Total Plays | 1 |
| Total AARs | 1 |
| Battle Types |
|---|
| Bridge Control |
| Inflict Enemy Casualties |
| Conditions |
|---|
| Off-board Artillery |
| Smoke |
| Scenario Requirements & Playability | |
|---|---|
| Counter Attack | Base Game |
| Introduction |
|---|
|
During the late evening of 25 September, Almond’s headquarters sent a teletype message to Gen. Oliver P. Smith of 1st Marine Division declaring that the North Koreans were on the run and ordering the Marines to enter Seoul immediately to pursue them. Smith demurred, instead ordering his regiments to probe ahead carefully according to the division’s attack plan. That caution proved wise when a small Marine patrol found a large force of tanks and infantry preparing to fall on the 1st Marine Regiment as it entered the city. |
| Conclusion |
|---|
|
Forewarned, Chesty Puller responded by calling down an intensive artillery barrage on the advancing North Koreans, and following it with a counter-attack. Marine bazooka teams hunted down five of the enemy tanks, and the Marines counted 375 North Korean dead left in the otherwise empty streets of Seoul. The regiment began its own attack immediately afterwards, but made little progress during the night. |

|
|
|---|
| AFV Rules Pertaining to this Scenario's Order of Battle |
|---|
|
| Chosŏn inmin'gun |
|---|
|


| Marine Corps |
|---|
|


| 1 Errata Item | |
|---|---|

|
The 8-3 Marine Infantry counter appears in most of the Saipan 1944 and Marianas 1944 scenarios, replacing the 10-3 DF valued Marine counters for those scenarios and is currently published in the most recent Saipan printing. (JayTownsend
on 2015 Dec 26)
|
| Korean War: Counter-Attack, scenario #51: Battle of the Barricades | ||||||||||||
|---|---|---|---|---|---|---|---|---|---|---|---|---|
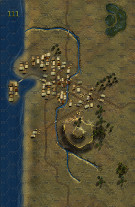
Korean War: Counter-Attack, scenario #51: Battle of the Barricades When I originally created this scenario I called it: When two Forces Meet! Scenario #52 was called Battle of the Barricades but AP changed it and call this one Battle of the Barricades and the next one Street Fight. I am slowly working my way through all the Counter-Attack scenarios and this one in at night but with three hexes visibility due to all the fires from burning buildings, illuminating the sky. Both sides have an interesting mix of units including armor and both come on the map from opposite sides. Each side gets two points for each bridge hex controlled at the end of the scenario, which there are a total of five and one point for every eliminated enemy step with tank steps counting double. The North Koreans have an advantage in that most of the bridges are closer to their entry point but the Marines have stronger Infantry valves but the armor and odd units on both sides offsets all of this. The North Koreans happened to win the Initiative the first three turns in a row which help them get to the bridges first but they should never have bothered taking the far western one, as it they only held it a couple of turns and lost some T34/85 steps but in turn they eliminated some M26 steps. Both sides put a lot of resources and energy into those bridges and lost unnecessary steps instead of just eliminating enemy steps. When it was all said and done, the NKPA had three bridges and the Marines had two bridges but eliminated a few more North Korean Steps but not enough to break a tie. The score was almost dead even for a Draw. There was a lot of factors in this scenario that really could have changed the results in either direction, so this scenario will be fun to try again. I have added my extra Soviet Laser counters from the Kursk games into the Korean War: Counter-Attack box as I replaced them with die-cut counters and decided to use these to represent Chinese counters for my Intervention game scenarios and not wait for AP to publish it and I also added my Canadian counters into the box from Maple Leaf Bridge to play my Additional Canadian scenarios I created for the Korean War getting the Canadians into the Korean War as well, for real historical scenarios. The East German counters were add also for one hypothetical as well. So now my Counter-Attack box is really full. |
||||||||||||
| 3 Comments |
Great AAR. Korea sounds like a lot of fun. I’m still beginning playing through what I have. Your AARs are good reading and really give a clear picture of the battle. Thanks!
Great AAR. Korea sounds like a lot of fun. I’m still beginning playing through what I have. Your AARs are good reading and really give a clear picture of the battle. Thanks!
Thanks for reading and Merry Christmas!